Warbird Information Exchange

DISCLAIMER: The views expressed on this site are the responsibility of the poster and do not reflect the views of the management.
It is currently Wed Apr 30, 2025 4:45 am

All times are UTC - 5 hours


Classic Wings Magazine WWII Naval Aviation Research Pacific Luftwaffe Resource Center
When Hollywood Ruled The Skies - Volumes 1 through 4 by Bruce Oriss


Post new topic Reply to topic  [ 60 posts ]  Go to page Previous  1, 2, 3, 4
Author Message
 Post subject:
PostPosted: Wed Feb 11, 2009 11:19 pm 
Offline
3000+ Post Club
3000+ Post Club

Joined: Thu Dec 21, 2006 8:32 am
Posts: 4324
Location: Battle Creek, MI
It also has the longer nose. Would that make it a Liberator II equivalent?

SN


Top
 Profile  
 
 Post subject:
PostPosted: Thu Feb 12, 2009 9:27 am 
Offline
3000+ Post Club
3000+ Post Club
User avatar

Joined: Thu Sep 28, 2006 12:56 pm
Posts: 3442
Location: North of Texas, South of Kansas
You're right, Steve, the model depicts a Liberator II/LB-30. About the only thing missing would be Curtiss propellers, and they may have been swapped out with Hydromatics when the U.S. took the airplane over from the RAF order. General Tinker went missing in an airplane a lot like this one. They were used early in the Pacific and Aleutian campaigns, and a few patrolled in the Canal Zone for a long time. The turret is correct for this plane, a Martin being installed instead of a Boulton-Paul on the RAF machines.

Scott


Top
 Profile  
 
 Post subject:
PostPosted: Thu Feb 26, 2009 3:14 pm 
Offline
Long Time Member
Long Time Member
User avatar

Joined: Wed Jan 24, 2007 1:54 am
Posts: 5197
Location: Stratford, CT.
Somebody beat me too it! :shock: But not exactly how mine is going to be. :wink: Though granted, that one looks to be a very clean and well fitted example! :D Cant say if ill have all the windows cut out, but it will have the appropriate top hatch and it definitely will have Kilroy! :lol: 8) It will look at little faster too!

Christopher

_________________
Keep Em' Flying,
Christopher Soltis

Dedicated to the preservation and education of The Sikorsky Memorial Airport

CASC Blog Page: http://ctair-space.blogspot.com/
Warbird Wear: https://www.redbubble.com/people/warbirdwear/shop

Chicks Dig Warbirds.......right?


Top
 Profile  
 
 Post subject: Re:
PostPosted: Mon Feb 01, 2010 4:52 pm 
Offline
3000+ Post Club
3000+ Post Club
User avatar

Joined: Fri Apr 30, 2004 2:29 pm
Posts: 4525
Location: Dallas, TX
Warbird Kid wrote:
Thanks Scott! -Chances are Swamp Ghost will be flying by the time I'm done! :lol:

Looks like you better get to work quick!

Ryan

_________________
Aerial Photographer with Red Wing Aerial Photography currently based at KRBD and tailwheel CFI.
Websites: Texas Tailwheel Flight Training, DoolittleRaid.com and Lbirds.com.

The horse is prepared against the day of battle: but safety is of the LORD. - Prov. 21:31 - Train, Practice, Trust.


Top
 Profile  
 
 Post subject: Re: Re:
PostPosted: Mon Feb 01, 2010 5:18 pm 
Offline
Long Time Member
Long Time Member
User avatar

Joined: Wed Jan 24, 2007 1:54 am
Posts: 5197
Location: Stratford, CT.
RyanShort1 wrote:
Warbird Kid wrote:
Thanks Scott! -Chances are Swamp Ghost will be flying by the time I'm done! :lol:

Looks like you better get to work quick!

Ryan


ROFL :lol: Oh crap!

_________________
Keep Em' Flying,
Christopher Soltis

Dedicated to the preservation and education of The Sikorsky Memorial Airport

CASC Blog Page: http://ctair-space.blogspot.com/
Warbird Wear: https://www.redbubble.com/people/warbirdwear/shop

Chicks Dig Warbirds.......right?


Top
 Profile  
 
PostPosted: Fri Feb 26, 2010 8:23 am 
Offline
User avatar

Joined: Wed Nov 18, 2009 6:21 pm
Posts: 14
I have just completed My 1/32 scale B-24 D. and have the Ol' 927 Theme, Like on on the Real one i have the cargo entery on the left side and the gun on the right. I have the lower gun where the entery would go. Sealed the top turret and used a B-25 Cockpit canopy on it as well.
I had the Nose art custom made from Plane Crazy Interprises. and yes i even included a mock up of Gary Austin.
It was a hard seven months but it was worth it.

Good luck on yours and BE PATIENT.

TEXASRAIDERS :D

_________________
Chris Williams
B-17 Texas Raiders Supporter.
GCW Member
Keep 'em Flying!


Top
 Profile  
 
PostPosted: Fri Feb 26, 2010 12:40 pm 
Offline
User avatar

Joined: Sun Jun 07, 2009 1:13 pm
Posts: 671
Location: Indiana
We need some pictures! That sounds awesome.

What's the wingspan on a 1/32 scale B-24?

_________________
Image


Top
 Profile  
 
PostPosted: Fri Feb 26, 2010 2:34 pm 
Offline
3000+ Post Club
3000+ Post Club
User avatar

Joined: Thu May 18, 2006 3:08 pm
Posts: 4542
Location: chicago
No kidding... where are the pics?! :shock: 8)

_________________
.
.
Sure, Charles Lindbergh flew the plane... but Tom Rutledge built the engine!

Visit Django Studios online or Facebook!


Top
 Profile  
 
PostPosted: Wed Mar 03, 2010 10:49 am 
Offline
User avatar

Joined: Wed Nov 18, 2009 6:21 pm
Posts: 14
The wing span of my 1/48 scale b-17 is about 2.5ft so the 1/32 scale is about 3.5-4ft.

I will try and add pix to this forum but has not worked yet.

_________________
Chris Williams
B-17 Texas Raiders Supporter.
GCW Member
Keep 'em Flying!


Top
 Profile  
 
PostPosted: Mon Mar 10, 2025 2:25 pm 
Offline
Long Time Member
Long Time Member
User avatar

Joined: Wed Jan 24, 2007 1:54 am
Posts: 5197
Location: Stratford, CT.
Hello friends...

It's been awhile... over 15 years!?!?!? since the last post on this thread... and my Ole 927 is STILL not done! But I hope that will change soon. Starting with redoing a model of this bird when see was in her desert pink...

"Diamond Lil"
Back in the 90s my father made for me a collection of 1/144th scale models that were custom painted in the markings of various flying warbirds at the time, including the CAF's LB-30/B-24. This model started off as a standard Crown/Minicraft B-24J. He cut the nose off, shaped a piece of balsa wood into a greenhouse nose, heat and smashed a vacuformed nose, and added it on, along with some hand painted nose art.
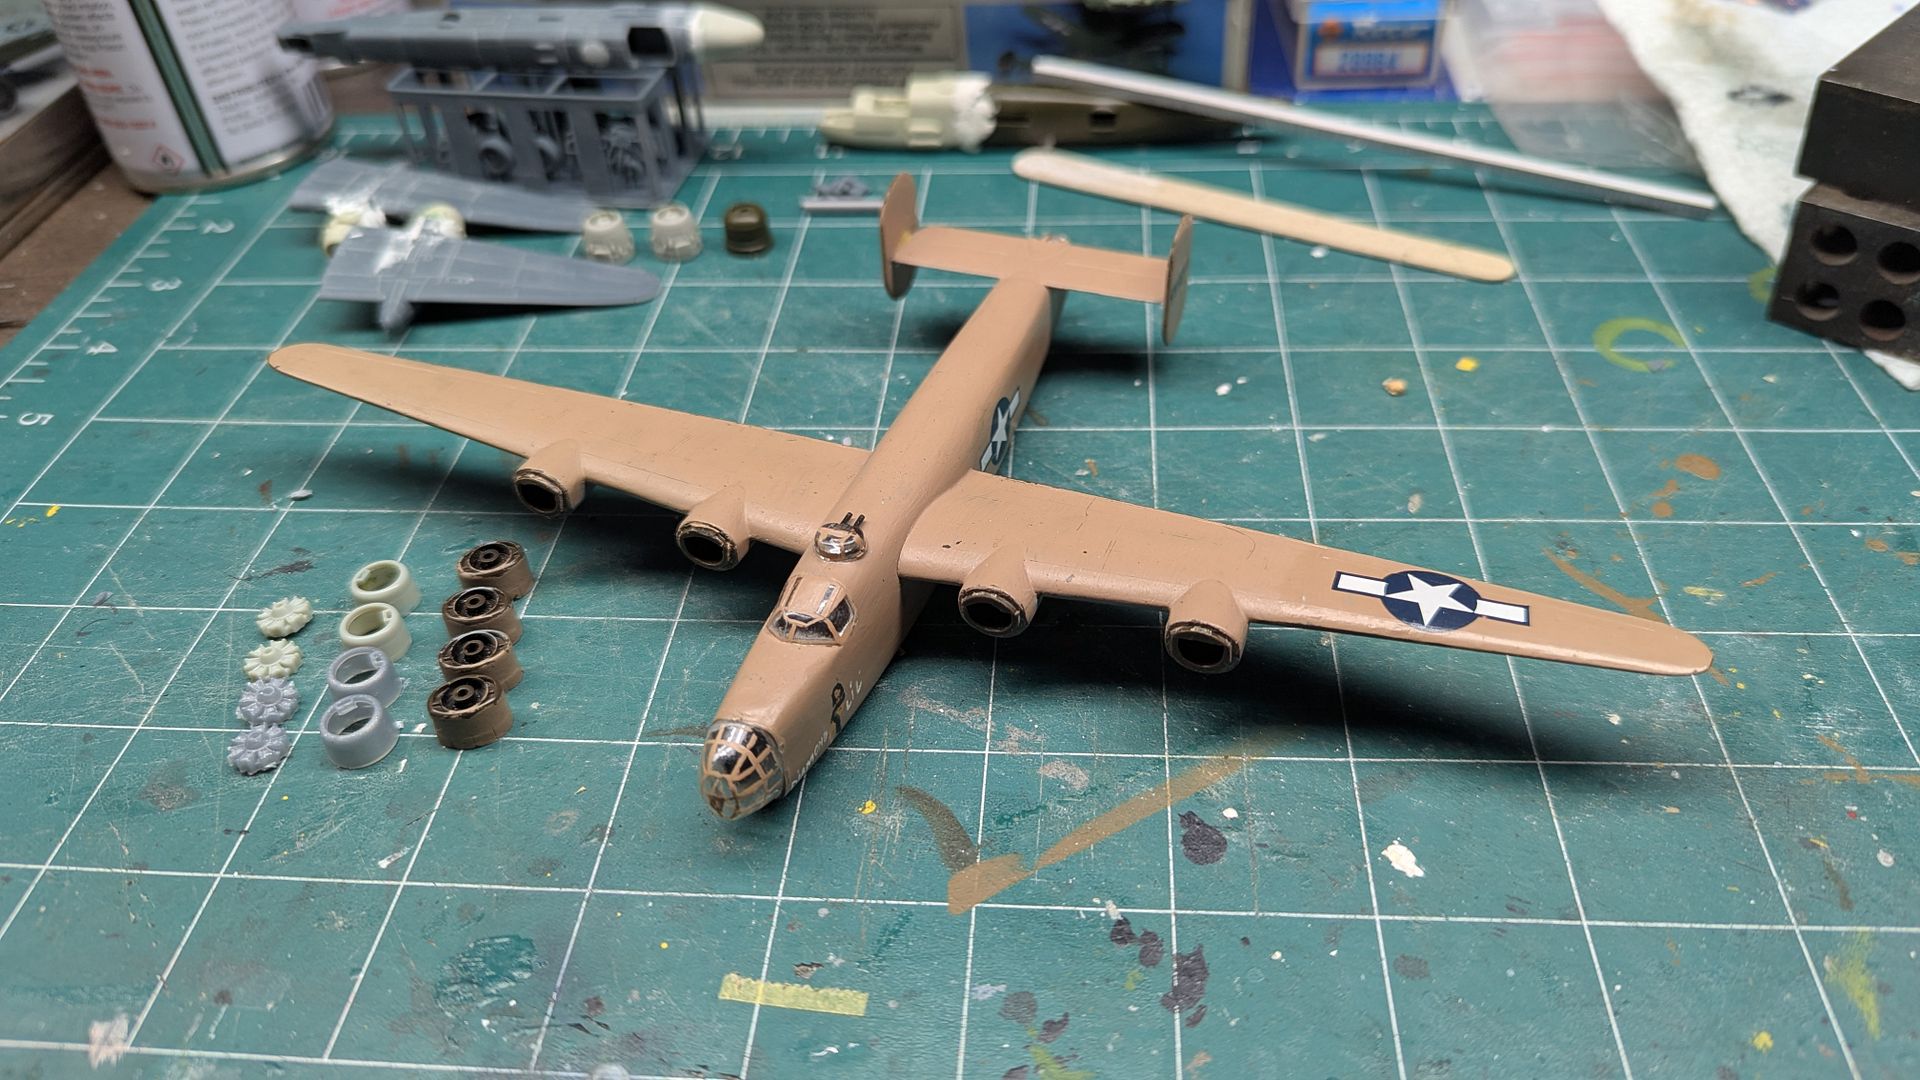
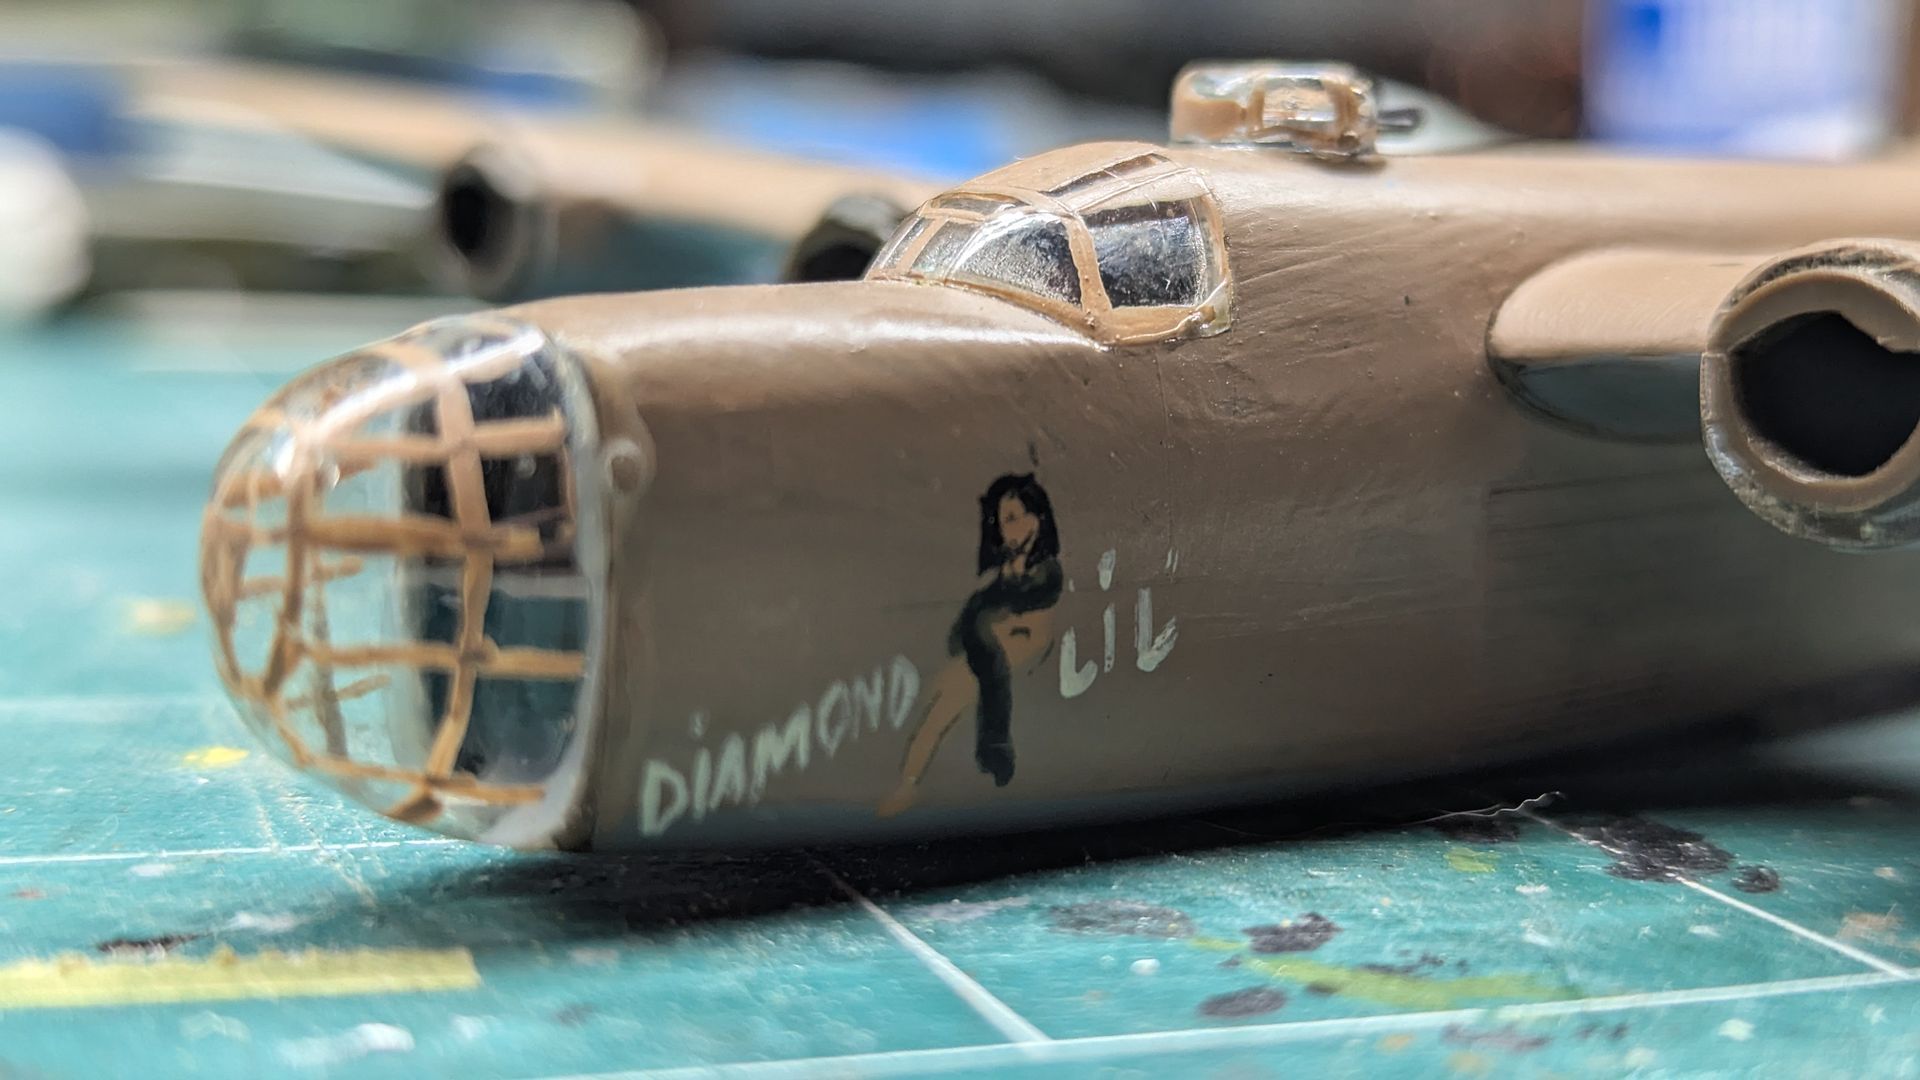
Image

Image

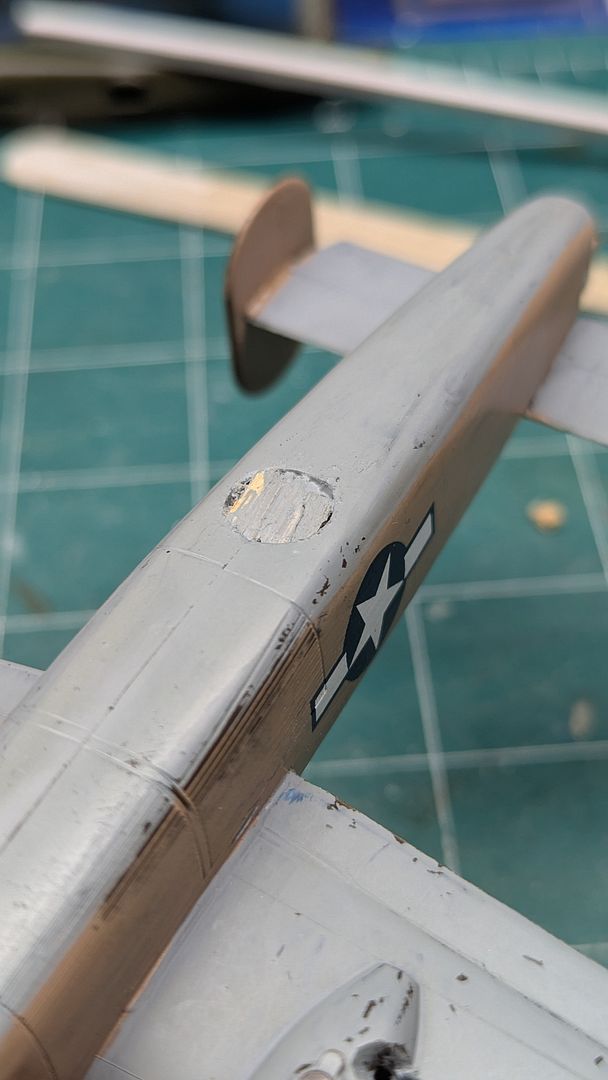
I ended up trying to cover up the hole for the non-existent ball turret with some balsa wood back when I was 12-13.
Image

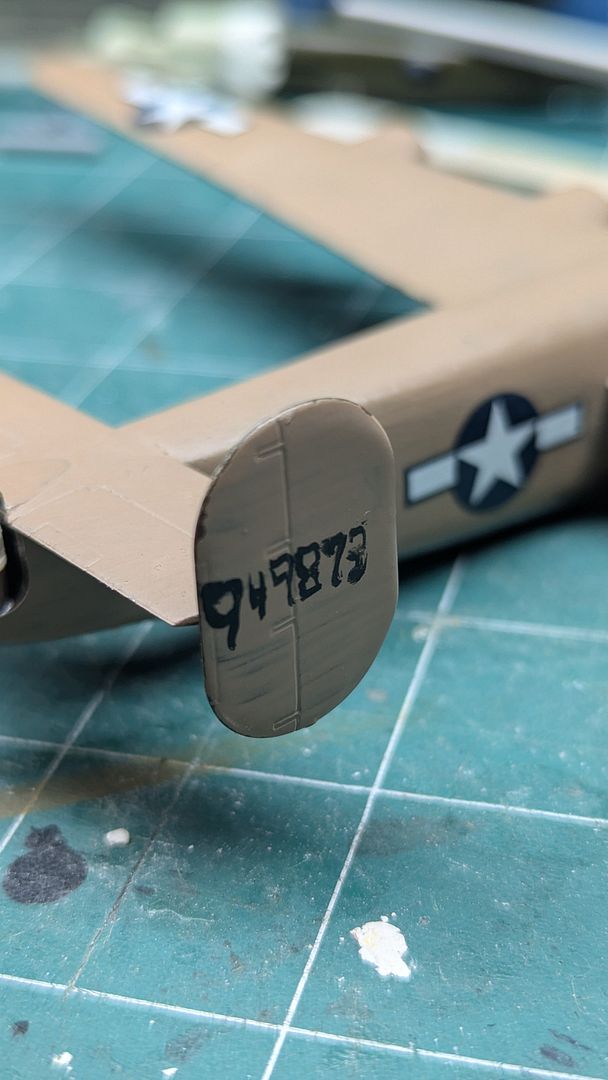
And apparently i tried to hand paint the N number onto the tails at some point. :oops:

Image

And that's how she stayed for years, sitting in a drawer. More of a straight B-24D then anything, but not an LB-30/B-24A like the original plane. Fast forward to last week I was looking at the old bird, and felt the spark of motivation and drive to get her into a more accurate configuration to resemble the plane I grew up with. This started with removing the tail turret, top turret, wood cover for the ball turret and four engines.

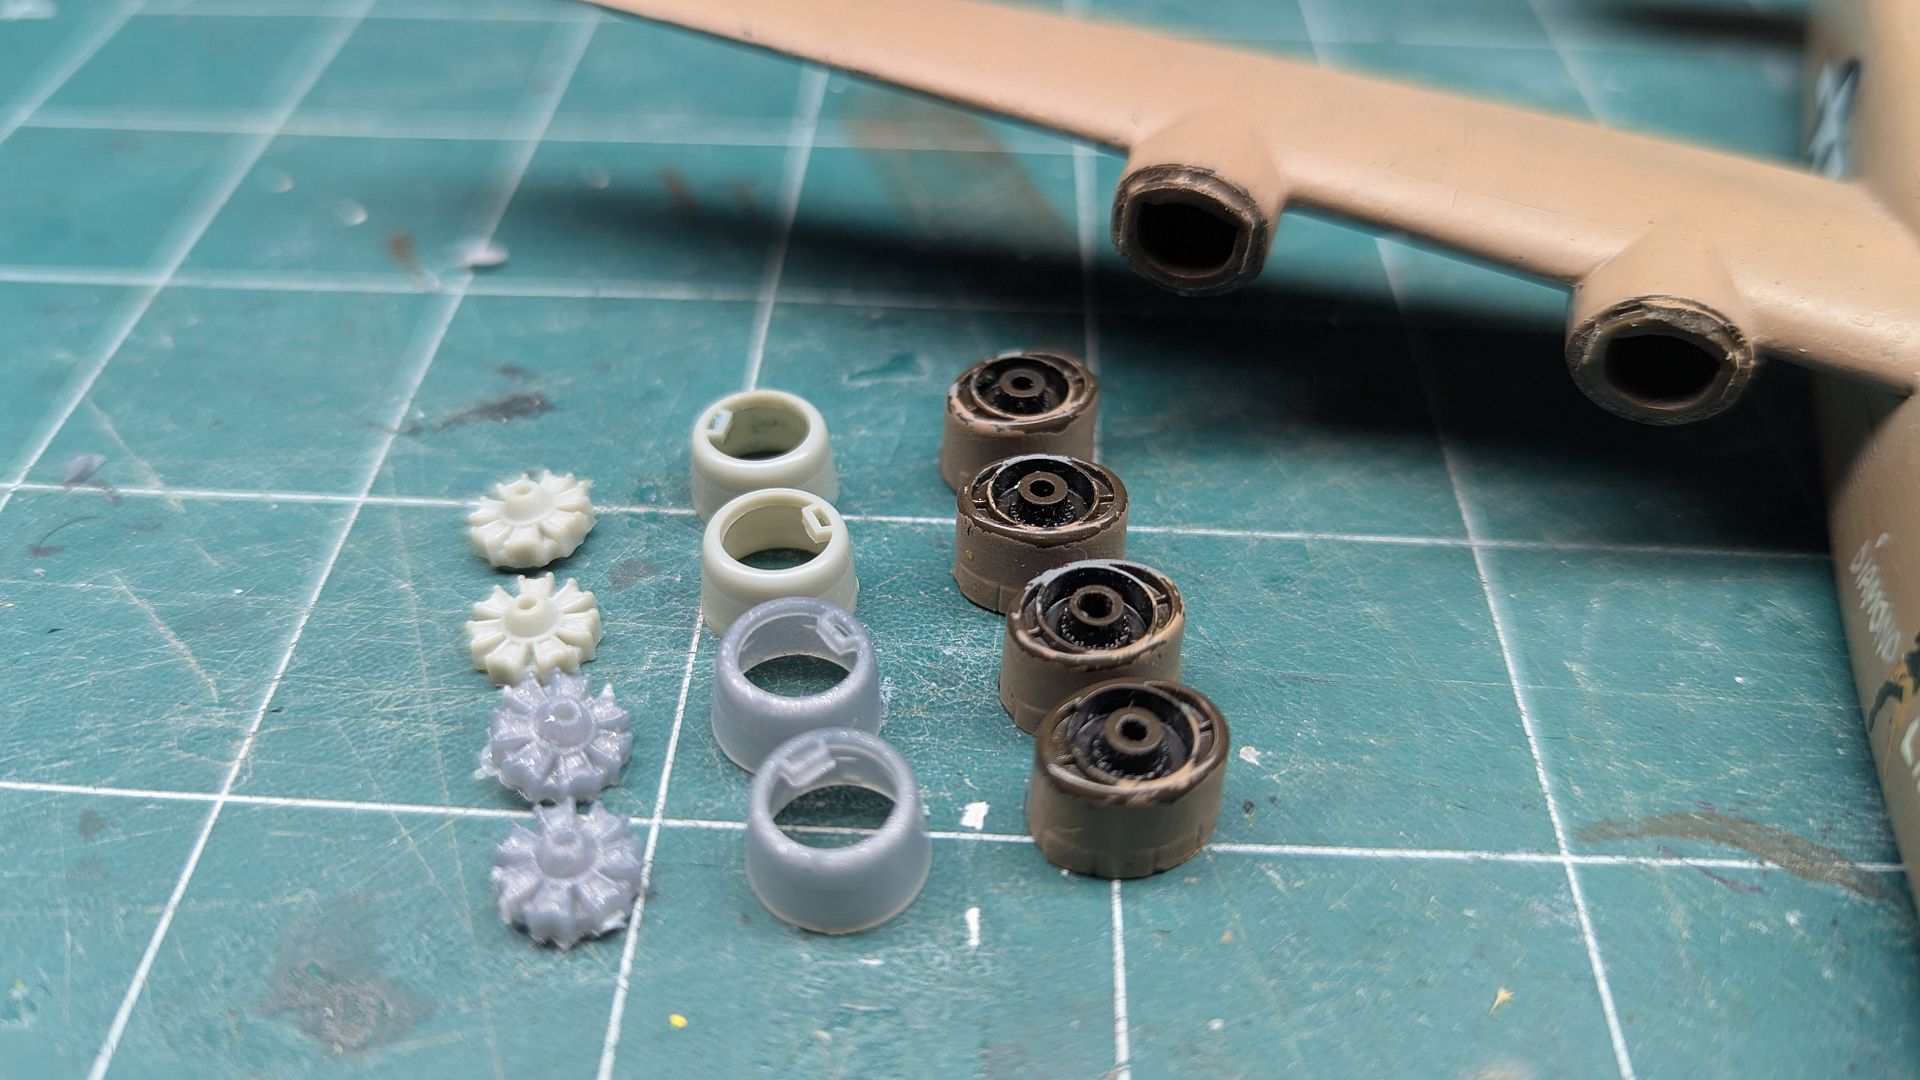
Here are the original engines along with the donor PBY engines and cowlings from two Minicraft PBY kits. Don't worry, both models will have different engines attached to replace these.
Image

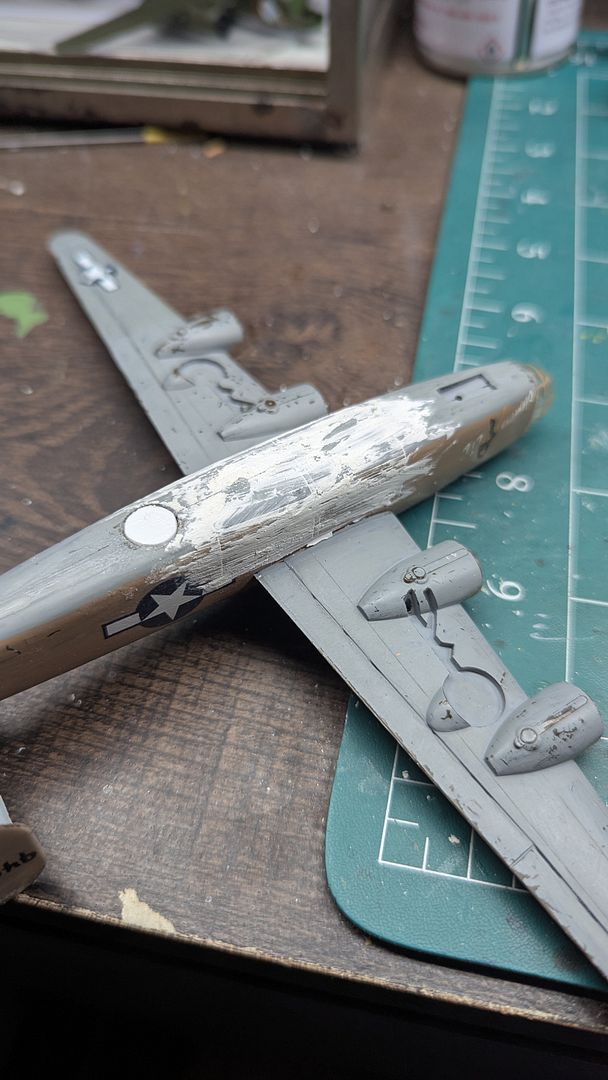
Alot of putty and sanding was required. I sanded off the turbo-super chargers, and continued on the nacelle to a tapered point like the original. I also had to fill in the bomb bay and sanded it smooth.
Image

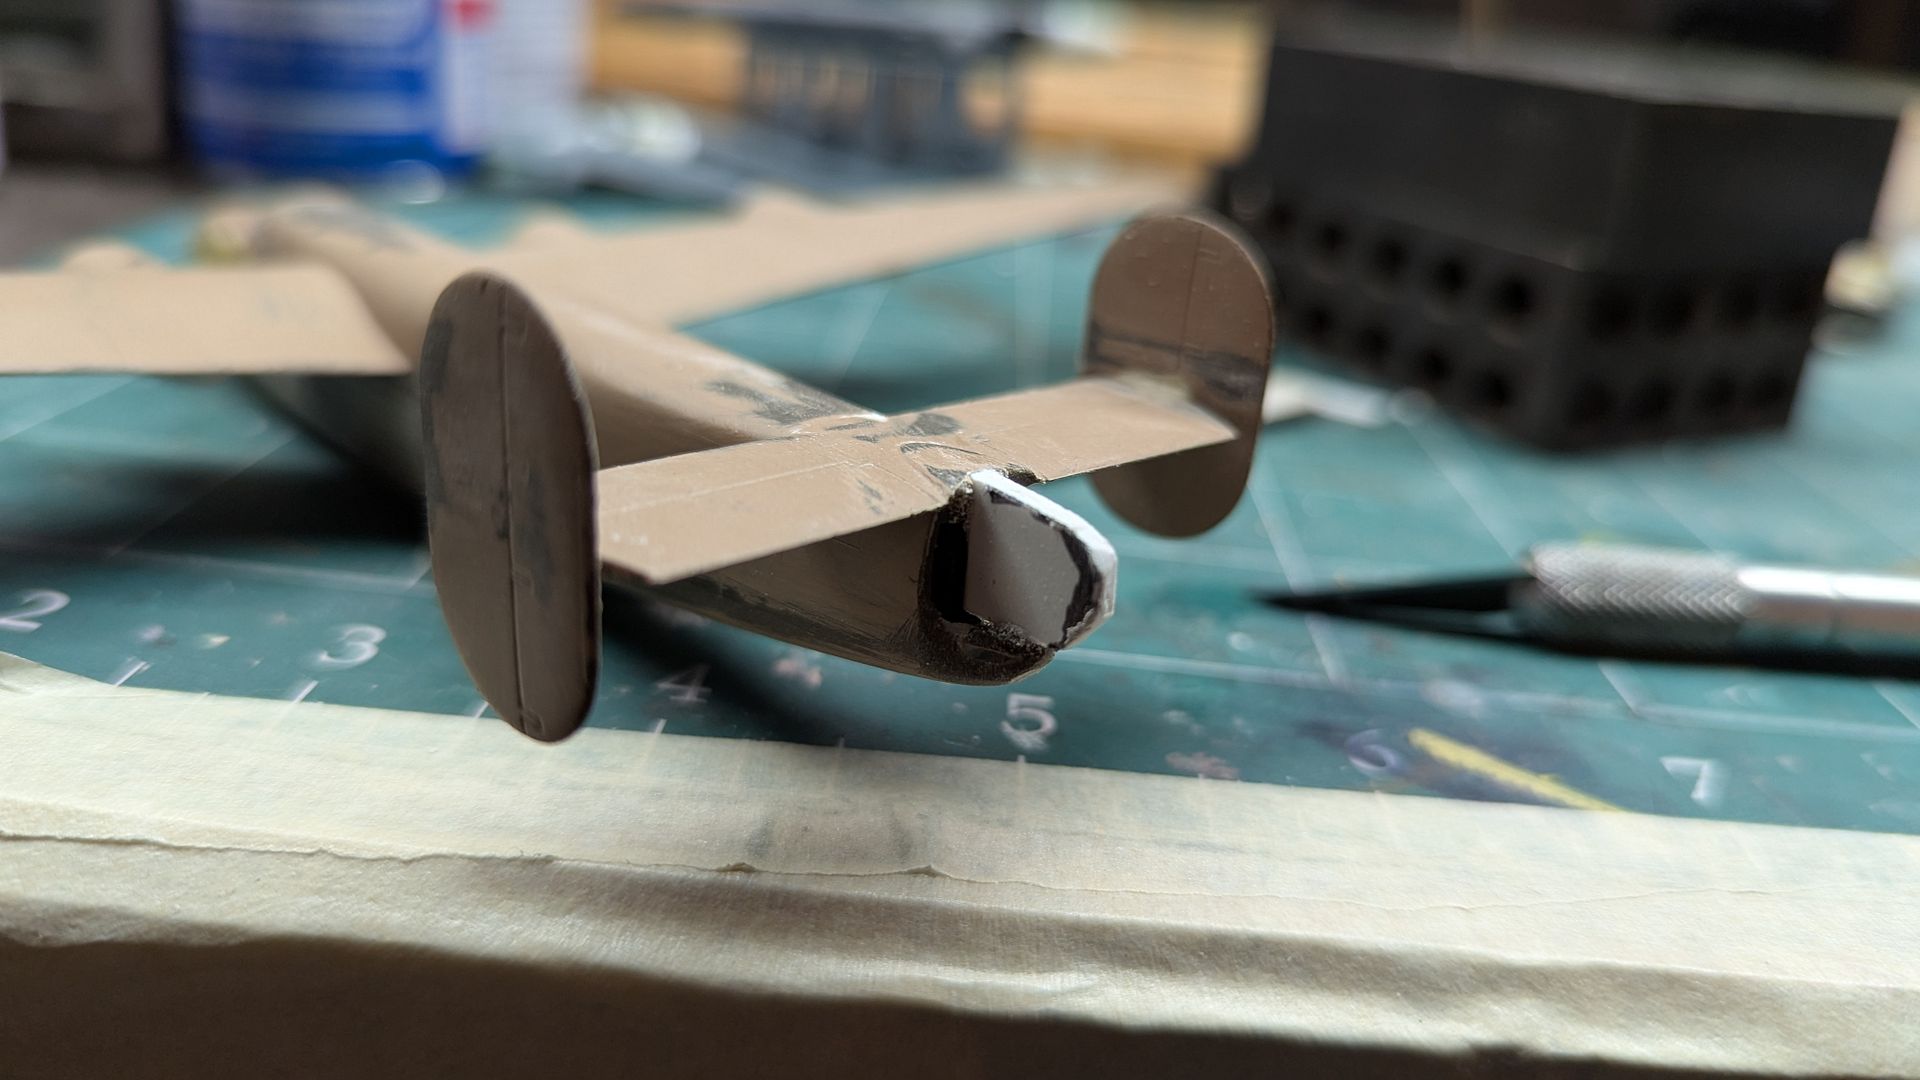
I also cut out a plastic shape that was similar to the "plug" that was made for the original plane and bolted onto the back where the tail gunner position was originally. I then added putty and sanded. I'm still sanding and shaping this tail piece down as it still seems too big for my liking.
Image

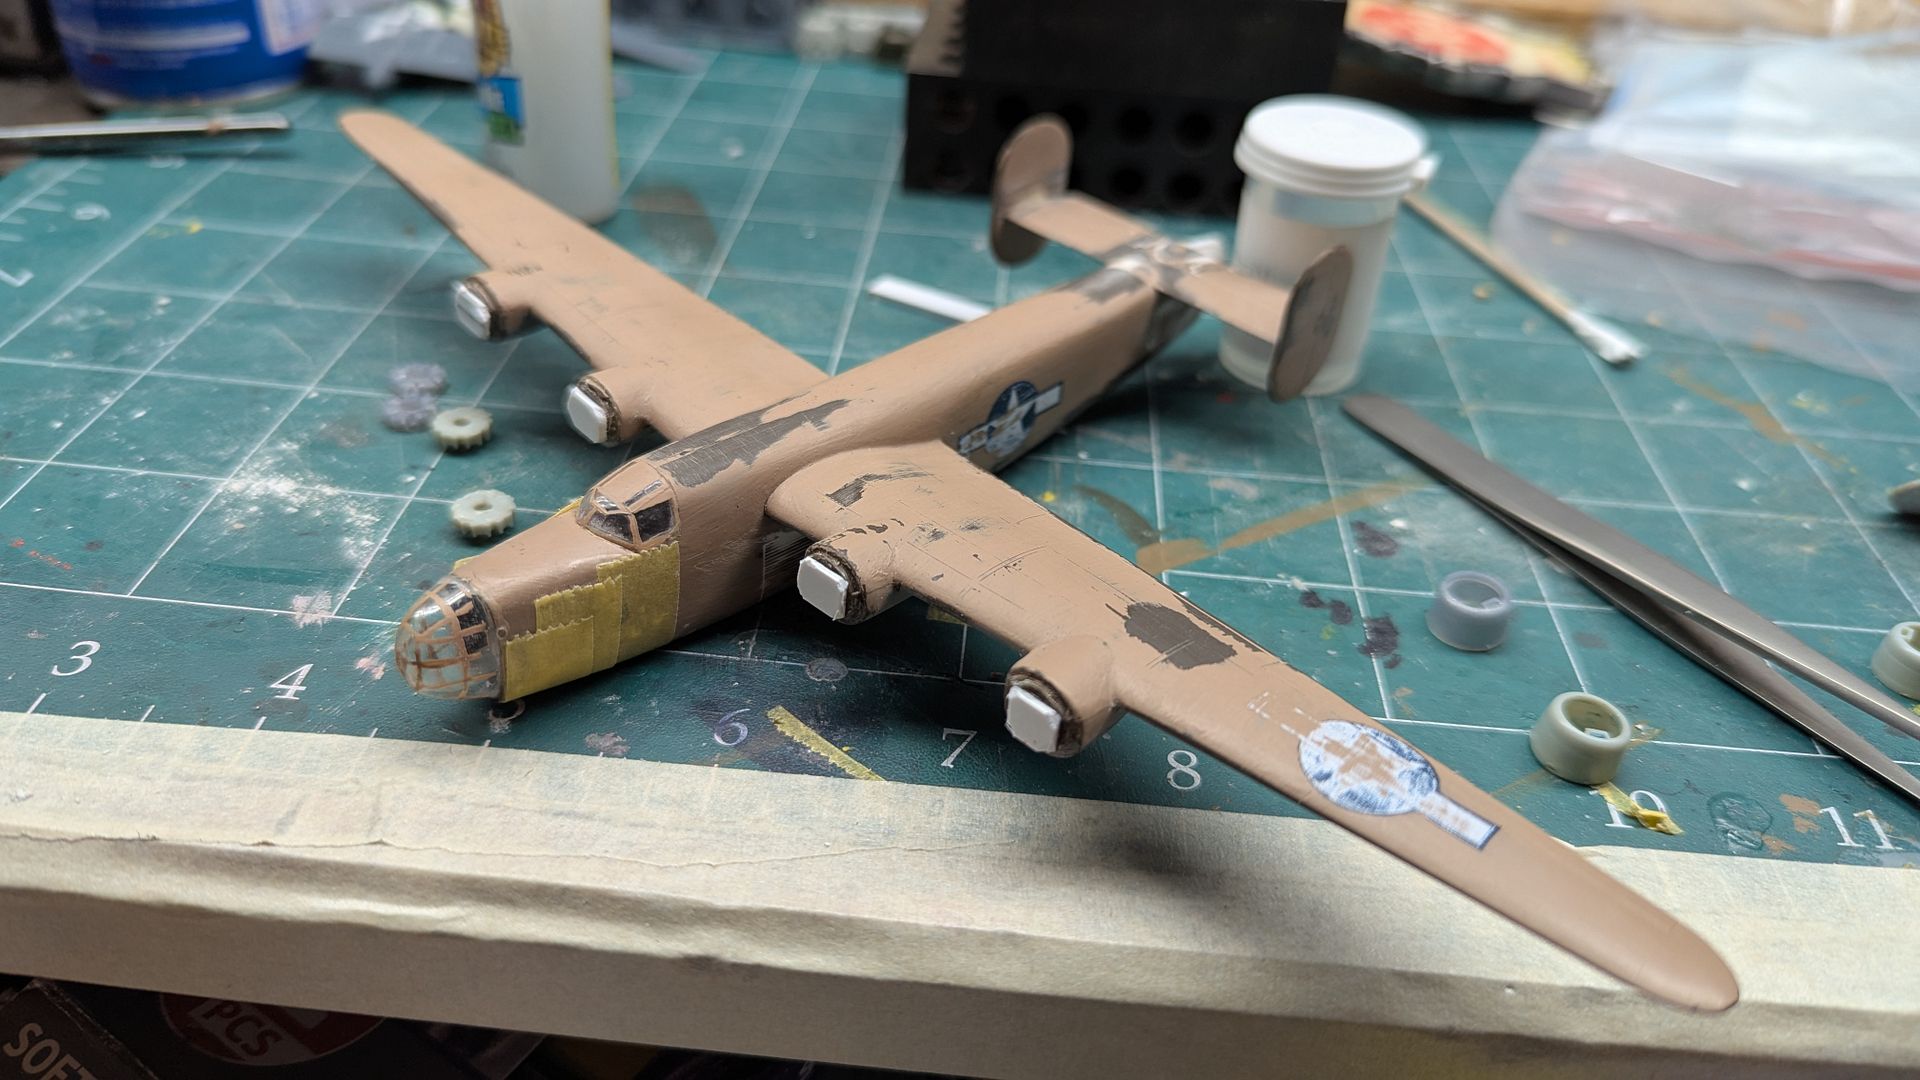
What's great is that the PBY cowlings fit nicely over the original inner lip for the original 24 engines. The one problem is that the PBY engines are recessed too much and need a spacer. So I added a little but of styrene.
Image

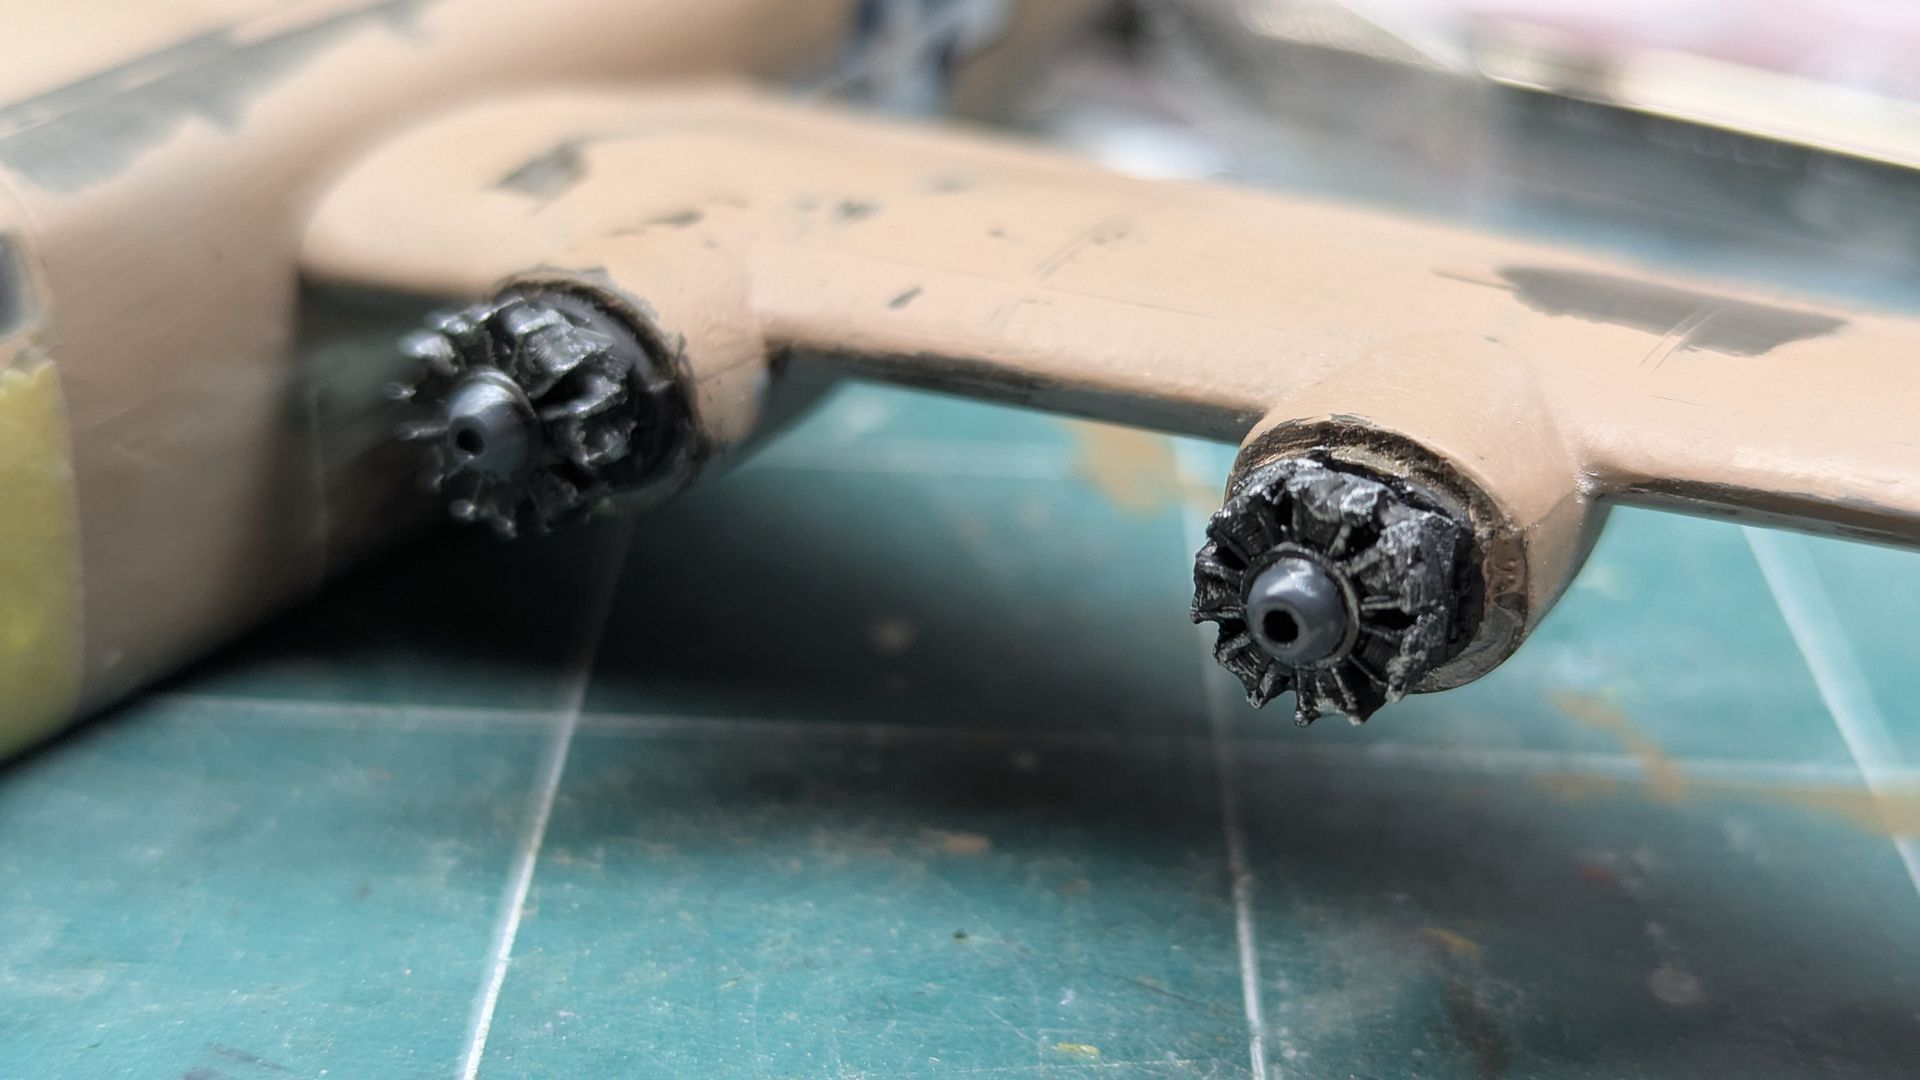
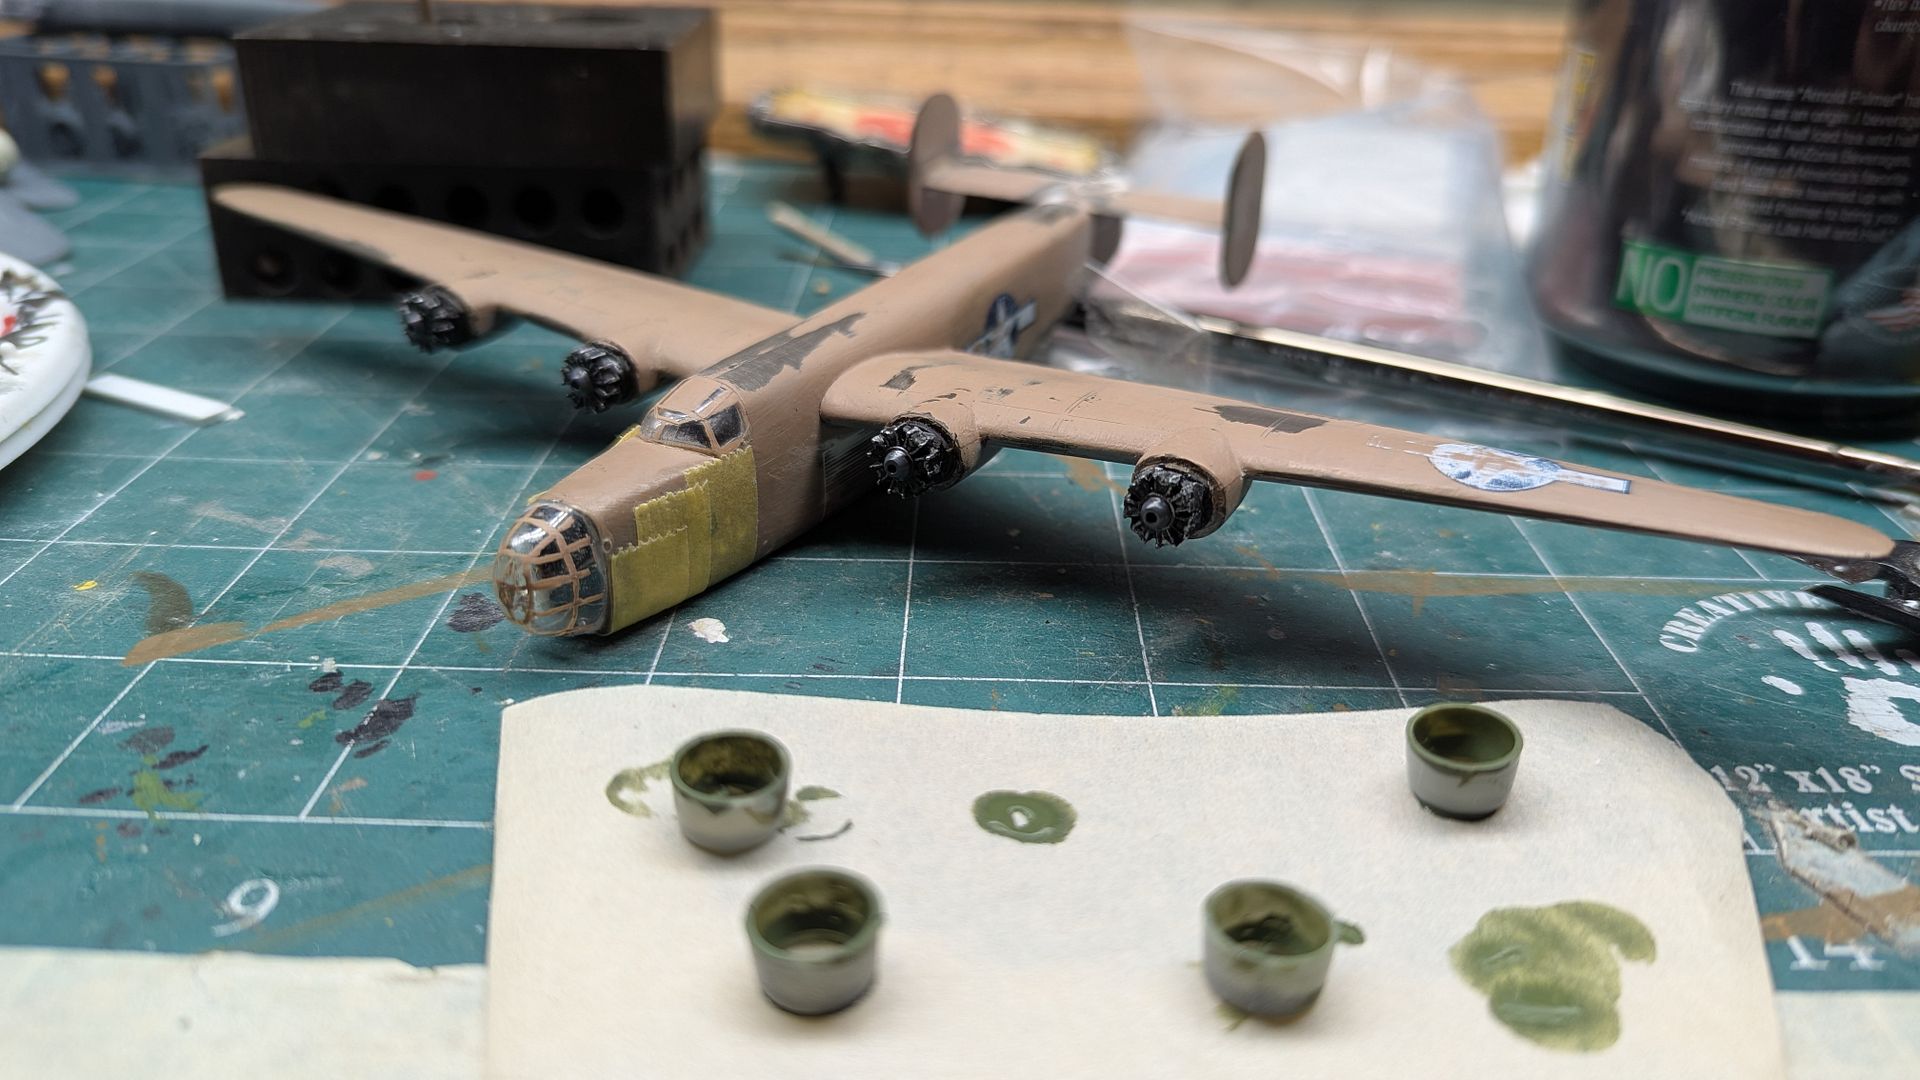
I continued to dry fit the PBY cowlings to ensure they would fit on without an issue. I then glued the engines on and then fitted the cowlings over them to ensure they were in the right location. I then removed the cowlings without budging the engines out of place. Once they were glued in place, I went over with black, grey for the nose case, dry brush silver, and black line filler to tone the whole thing down. Here were the reuslts.
Image

And a close up of the engines.

Image

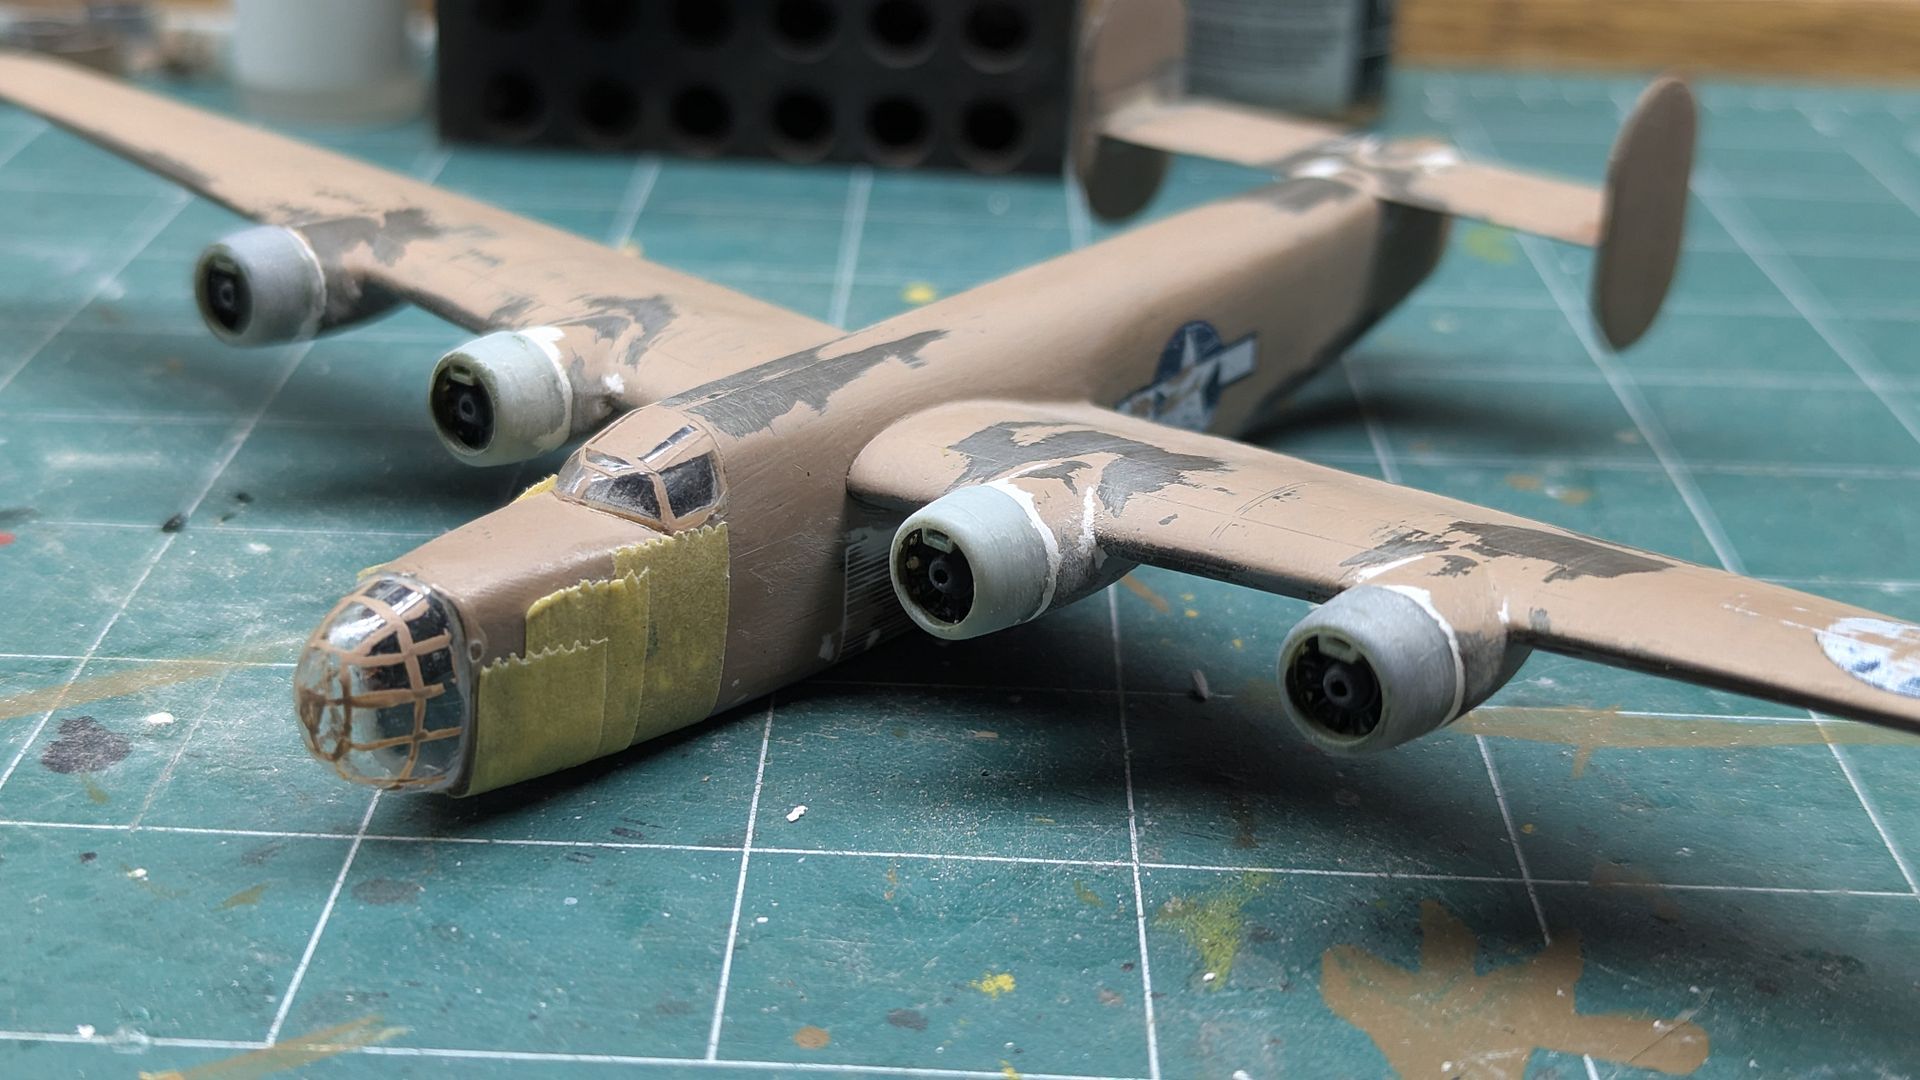
Once the interior green for the inside of the cowlings was dry, I glued them on, puttied, sanded, and was overall happy with the results.
Image

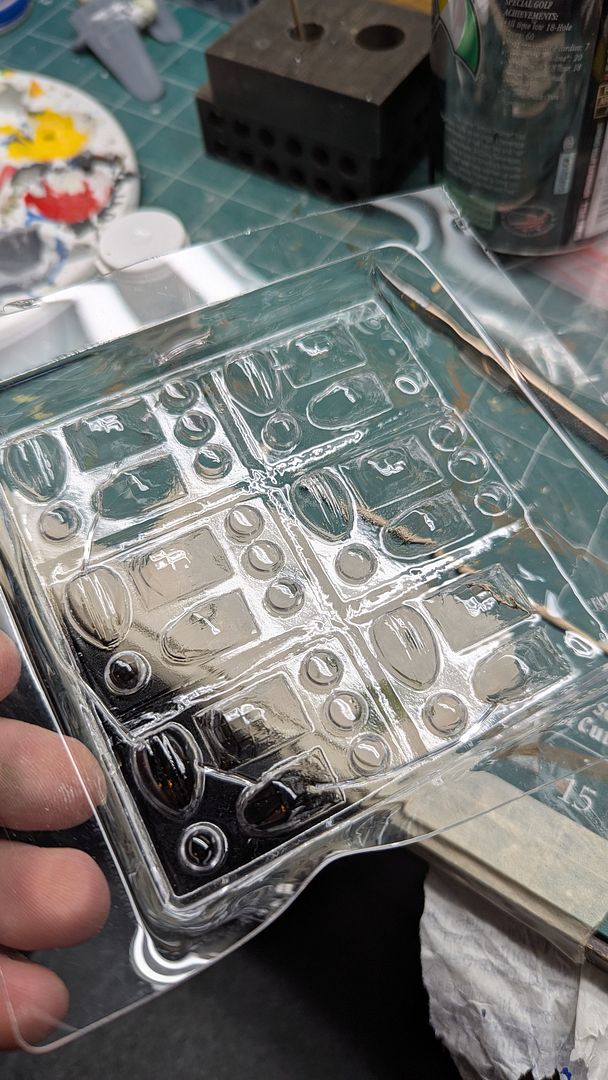
I'm not worried about the decals as the stars will come from an aftermarket sheet, and I now have the know-how how to design and make some decals for myself on the printable sheets on clear and white. This will include all the windows on the fuselage as well. Looking at more and more reference photos, you really start to get an idea of this ancient kit's shortcomings. Namely the glass. Initially my idea was to completely redo the plane and preserve the cockpit glass, greenhouse glass, and nose art to preserve the homemade "charm" of it like so many other example's my father painted for me back in the day (i.e. P-51B Shangri-La, FG-1D Skyboss, etc.) Right now I'm thinking of using a spare canopy from the Cobra PB4Y set and maybe a Minicraft D model greenhouse glass (in case anyone out there has one and is not using it). Otherwise maybe I'll try and make my own again.
Image

So far this whole experience has been a fairly pleasant and quick one. Not to mention familiar... I wonder why? Perhaps because (as you fine folks know) I had already done all this before...
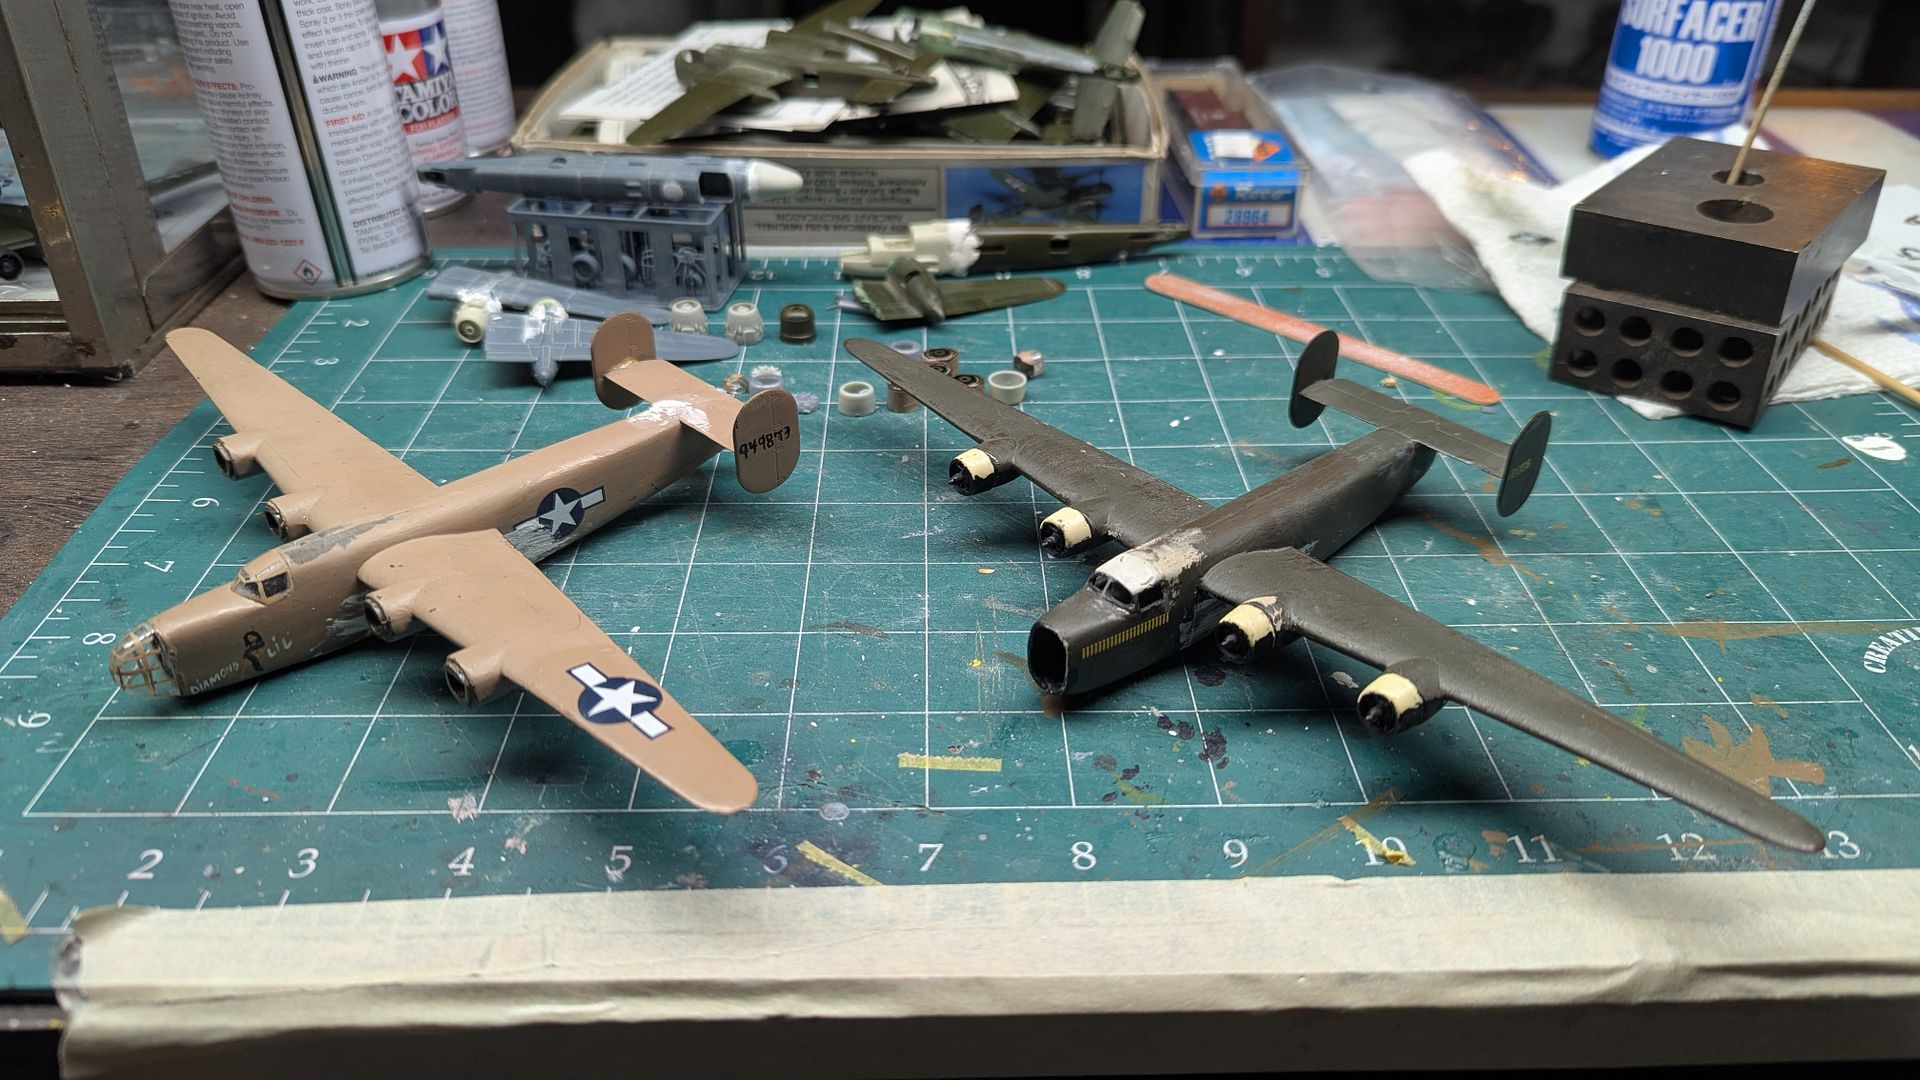
Image

"Ole 927"
Recap: I started with a standard Crown/Minicraft B-24J. I had a modeling associate cast four new PBY engines and cowlings for me, since these are the engines that can be found on the B-24A. I used the tail turret, turned it around and pushed it farther into the fuselage and glued it into position. I then puttied and sanded it smooth as the original tail gunner position does not extend out from under the tail really. I did the same process with the engines and nacelles as described above, along with making my own flight deck framework. As you can see, this model as well has been stagnant and half-finished for more than a few years now. And maybe (finally) now I will have the motivation to complete it alongside itself.

This is the only decent shot of this model I could find of "Ole-927" from back in the day. (don't know where that old account I had went with those pictures!)
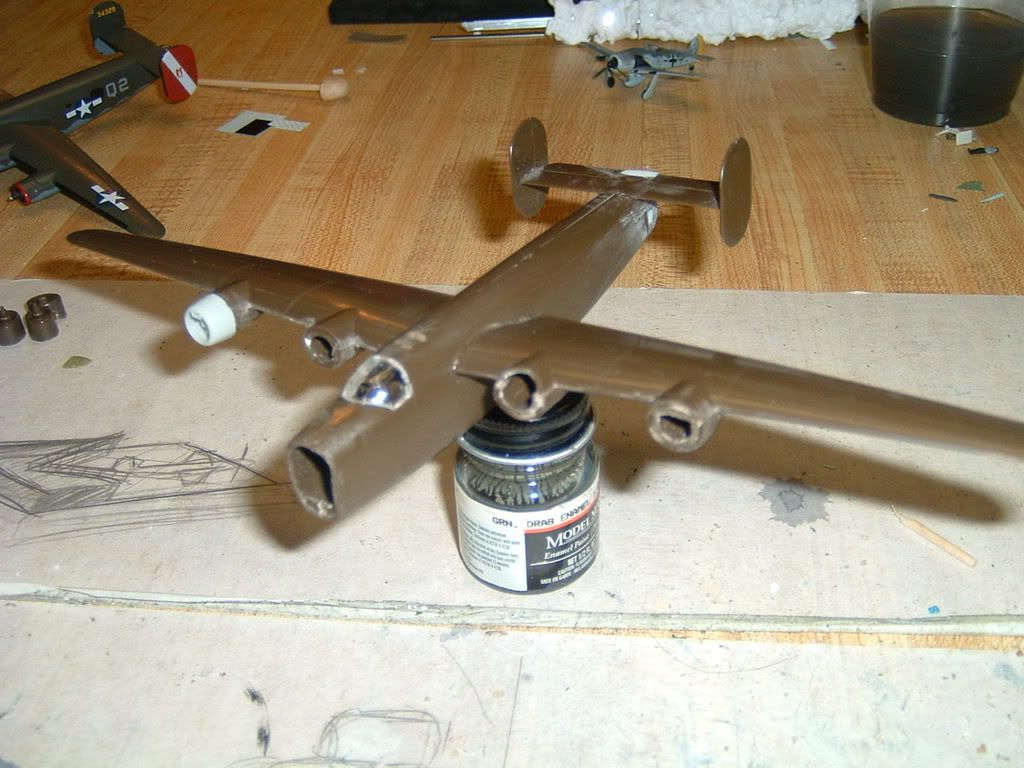
Image

So now you're caught up to where I am! Thanks for looking.

_________________
Keep Em' Flying,
Christopher Soltis

Dedicated to the preservation and education of The Sikorsky Memorial Airport

CASC Blog Page: http://ctair-space.blogspot.com/
Warbird Wear: https://www.redbubble.com/people/warbirdwear/shop

Chicks Dig Warbirds.......right?


Top
 Profile  
 
PostPosted: Mon Mar 10, 2025 4:44 pm 
Offline
2000+ Post Club
2000+ Post Club
User avatar

Joined: Sat Jan 14, 2006 7:18 pm
Posts: 2036
Location: Meriden,Ct.
Now, it's time for the B-25 I see in the background... pop2

Phil

_________________
A man's got to know his limitations.


Top
 Profile  
 
PostPosted: Wed Apr 02, 2025 10:09 am 
Offline
Long Time Member
Long Time Member
User avatar

Joined: Wed Jan 24, 2007 1:54 am
Posts: 5197
Location: Stratford, CT.
phil65 wrote:
Now, it's time for the B-25 I see in the background... pop2

Phil


Eagle eye! Truth be told, it will be another CAF bird... but which one?

Update with the two Liberators. I cut out of some half round stock styrene for new and slightly larger intakes for the engines.

Image

Image

I also added the exhausts on top of "Ole 927" as a sort of test. I'm not sold on them yet and think I may go another route. (I really don't want to have to drill 116 perfect holes!)

Image

"Diamond Lil" received a coat of blue on the underside and a custom mixed tan with model master sand, red, and and white to get a near close version of the original paint on the plane.
Image

She also received a set of styrene doors.
Image

I then started cutting out and applying all the decals.

Image

Image

Image

All decals are now in place. A few more touchups and then a flat clear coat to seal it in. Then its onto the landing gear, props, and small details. And then to do it all again with "Ole 927"! Stay tuned...

_________________
Keep Em' Flying,
Christopher Soltis

Dedicated to the preservation and education of The Sikorsky Memorial Airport

CASC Blog Page: http://ctair-space.blogspot.com/
Warbird Wear: https://www.redbubble.com/people/warbirdwear/shop

Chicks Dig Warbirds.......right?


Top
 Profile  
 
PostPosted: Tue Apr 08, 2025 4:49 am 
Offline
3000+ Post Club
3000+ Post Club

Joined: Thu Dec 21, 2006 8:32 am
Posts: 4324
Location: Battle Creek, MI
Quote:
It's been awhile... over 15 years!?!?!? since the last post on this thread... and my Ole 927 is STILL not done!


Don't feel bad. I've got a model that I still need to finish that was given to me by a friend...in 2002! He reminded me recently that the unfinished kit is now old enough to buy alcohol. :lol:

Steve N


Top
 Profile  
 
PostPosted: Fri Apr 11, 2025 9:16 am 
Offline
Long Time Member
Long Time Member
User avatar

Joined: Wed Jan 24, 2007 1:54 am
Posts: 5197
Location: Stratford, CT.
Steve Nelson wrote:
Quote:
It's been awhile... over 15 years!?!?!? since the last post on this thread... and my Ole 927 is STILL not done!


Don't feel bad. I've got a model that I still need to finish that was given to me by a friend...in 2002! He reminded me recently that the unfinished kit is now old enough to buy alcohol. :lol:

Steve N


That is a hot minute for sure! :lol:

I finally turned my attention towards the landing gear...

Image

I was able to salvage two original mains that needed to be glued together and sanded. I needed to make a new landing gear door out of styrene but after realizing the original door was in fact glued on the wrong side, I pulled it off and made a second door out of styrene so they'd match..
Image

The nose wheel is an upright wheel for a F-toys Grumman Goose with some styrene rod bent and shaped as the nose gear. Slightly undersized but I'm good with it.

Image

Gear now glued in place and I think she's looking pretty good! I added more styrene for the connecting rods to further detail out and stabilize these already pretty weak landing gear. I don't think the original landing gear for the 24 was ever finished and painted actually. So this is a first for this model.

Image

She is weighted in the nose, but just enough when the moon is in alignment just right. I'm hoping the props will add a bit more weight. (Boy do I wish I had cast metal props!)

Image

I used a black decal stripe for the wing walk area sand added the triangular section with paint. The entire plane received slight touchups of tan and blue before being shot with a flat coat. We are now ready to unmask and finish this one up!

Image

I was considering using original B-24 props from the kit but in the end decided that if I was using PBY engines and cowlings, I might as well use the props too. Problem was I only had two... I had already scavenged the other two props for my B-25D diorama (many years ago) and it appears my dad stole one for the P-36 Choco Egg overhaul. Thankfully our modelling buddy Bob is finishing up a diorama with a 1/144th PBY that will have prop blurs so I will be able to use his examples to complete the plane.

So what's left on this bird is to:
1. Weather (very slightly)
2. Final clear coat
3. Finish and install props
4. Add any postwar antennas / wires
5. Base

Thanks for looking! Next update she should be done! And then I'm going to try and finish Ole'927!

_________________
Keep Em' Flying,
Christopher Soltis

Dedicated to the preservation and education of The Sikorsky Memorial Airport

CASC Blog Page: http://ctair-space.blogspot.com/
Warbird Wear: https://www.redbubble.com/people/warbirdwear/shop

Chicks Dig Warbirds.......right?


Top
 Profile  
 
PostPosted: Mon Apr 28, 2025 11:34 am 
Offline
Long Time Member
Long Time Member
User avatar

Joined: Wed Jan 24, 2007 1:54 am
Posts: 5197
Location: Stratford, CT.
I finished the props and clear coated the plane. I added antennas on but they were all too big. So I replace them with smaller more accurate ones at a later date. i brought "Lil" over to the parent's for Easter to show it off and left it there. My father was kind enough to take a couple shots of her with some figures and a Jeep!

Image

Image

Image

Image

Now onto "Ol' 927"!

_________________
Keep Em' Flying,
Christopher Soltis

Dedicated to the preservation and education of The Sikorsky Memorial Airport

CASC Blog Page: http://ctair-space.blogspot.com/
Warbird Wear: https://www.redbubble.com/people/warbirdwear/shop

Chicks Dig Warbirds.......right?


Top
 Profile  
 
Display posts from previous:  Sort by  
Post new topic Reply to topic  [ 60 posts ]  Go to page Previous  1, 2, 3, 4

All times are UTC - 5 hours


Who is online

Users browsing this forum: No registered users and 4 guests


You cannot post new topics in this forum
You cannot reply to topics in this forum
You cannot edit your posts in this forum
You cannot delete your posts in this forum
You cannot post attachments in this forum

Search for:
Jump to:  
Powered by phpBB® Forum Software © phpBB Group