Warbird Information Exchange

DISCLAIMER: The views expressed on this site are the responsibility of the poster and do not reflect the views of the management.
It is currently Sun Jun 08, 2025 10:58 am

All times are UTC - 5 hours


Classic Wings Magazine WWII Naval Aviation Research Pacific Luftwaffe Resource Center
When Hollywood Ruled The Skies - Volumes 1 through 4 by Bruce Oriss


Post new topic Reply to topic  [ 1022 posts ]  Go to page Previous  1 ... 26, 27, 28, 29, 30, 31, 32 ... 69  Next
Author Message
 Post subject:
PostPosted: Sun Sep 13, 2009 10:09 am 
Offline
User avatar

Joined: Sun Sep 28, 2008 9:44 pm
Posts: 379
Michel Lemieux wrote:
This is soooooo slick.

Condradulations to all. :D

Just a quicky question.

Would you be able to post at one point pics of the engines without the cowlings on of both the new & old set-up side by side ? Will make for an interesting point of view.

I am mostly curious to see all the changes related to the custom exhaust and how much it also affected the nacelles.

Again, tks for sharing


I know this isn't what you are looking for but my wife took this shot and noticed that it represents all 4 engines in different stages of disassembly or reassembly, as is the case with #3.

Image

When I have the #4 cowling off, I'll get pictures of that and the new engine for you.
Dave


Top
 Profile  
 
 Post subject:
PostPosted: Tue Sep 15, 2009 5:37 am 
Offline
2000+ Post Club
2000+ Post Club
User avatar

Joined: Tue Nov 15, 2005 6:23 pm
Posts: 2950
Location: Somewhere South of New Jersey...
B29B24crewchief wrote:
Ken wrote:
Not a critique - a question: Is it okay to run a single engine to full power without its symmetrical partner run up as well? Maybe it's a C-130 thing.

Congrats on the success - the shiny prop hub is looking fine (particularly while turning)!


This has been brought up to me before. I checked with Boeing engineers and know from experience that Boeing aircraft, in particular are built 50 % stronger that actual loads on the airframe that could occur. You have to think about this for just a minute to realize the question. Did they ever run an engine after an engine change, to full power? Of course they did. Do we do that today? Of course we do. These airplanes are designed to withstand the loads of a single engine run at full power, no problem!! We did it with 707's, DC-9's, 727"s, 737's. I'm told they did it on the B-29's, DC-7's, Connies and the C-119's.
Good question.
Dave


This is just me but...C-130's are one of the strongest airframes around. They are designed to land on unimproved dirt strips (assault) and take all kinds of abuse. I'll tell you what they can't take: Single engine power runs. The truss mounts, wing structure, landing gear can't take it. The side loads alone on the nose gear would be cause for NDI inspections.
Now I realize that a B-29 is a different animal, but it's still a large aircraft with powerful engines. I'd do a sanity check on the books and make sure it says specifically you can do something like that. I wouldn't take somebody's word for it - lot's of people claim to be experts.
Just because a plane is "over-designed" doesn't mean it can stand up to certain stresses. Just my two cents (which isn't worth much).

_________________
"Everyone wants to live here (New Jersey), evidenced by the fact that it has the highest population per capita in the U.S..."


Top
 Profile  
 
 Post subject:
PostPosted: Tue Sep 15, 2009 8:20 am 
Offline
3000+ Post Club
3000+ Post Club
User avatar

Joined: Fri Mar 02, 2007 6:52 pm
Posts: 3413
Location: Wichita Falls, Texas, USA
The concern with the C-130 is probably less side load and more torque load and acoustics with those big paddle props. First, the T56 is a massive generator of torque. This torque, when applied singly would be the cause of the problem, not the power. The R3350, while a powerful engine, doesn't produce the same amount nor the same type of torque that the T56 does. This is something we had to be careful of with the CV-580s. We certainly did single engine full power runs with the 501D (T56), but we couldn't leave it there for too long because it'd start twisting things too long and you could get fatigue failures after a while. The other thing I was told was that both the Ham-Stan & Aeroproducts props create a lot of pressure waves into the fuselage when the plane is stationary and this creates problems as well when running an engine at high power either singly or in multiples.


Top
 Profile  
 
 Post subject:
PostPosted: Tue Sep 15, 2009 8:22 am 
Offline
1000+ Posts!
1000+ Posts!
User avatar

Joined: Sun Feb 18, 2007 12:39 pm
Posts: 1817
Location: Irving, Texas
When we fly the B-29, we do an engine run-up before flight to check the mags and props. We always run-up one engine at a time and have never had a problem and there isn't any caution in the flight manual about it either.


Top
 Profile  
 
 Post subject:
PostPosted: Wed Sep 16, 2009 3:18 am 
Offline

Joined: Wed Mar 29, 2006 10:45 am
Posts: 442
Just wondering what has happened with the engine or engines that Abbot was doing? Didn't they start before Anderson did? Just curious whats happening.


Top
 Profile  
 
 Post subject:
PostPosted: Wed Sep 16, 2009 3:59 am 
Offline
User avatar

Joined: Tue May 04, 2004 11:52 pm
Posts: 393
Location: North Georgia
APG85 wrote:
Now I realize that a B-29 is a different animal, but it's still a large aircraft with powerful engines. I'd do a sanity check on the books and make sure it says specifically you can do something like that. I wouldn't take somebody's word for it - lot's of people claim to be experts. Just because a plane is "over-designed" doesn't mean it can stand up to certain stresses. Just my two cents (which isn't worth much).


2800 @ 49", the B-29 Gods have spoken! :wink:

Image

_________________
~Trevor McIntyre
http://www.TrevorMcIntyre.com


Top
 Profile  
 
 Post subject:
PostPosted: Wed Sep 16, 2009 6:48 am 
Offline
2000+ Post Club
2000+ Post Club
User avatar

Joined: Tue Nov 15, 2005 6:23 pm
Posts: 2950
Location: Somewhere South of New Jersey...
Good info! You guys are the experts. Thanks for setting me straight... :wink:

_________________
"Everyone wants to live here (New Jersey), evidenced by the fact that it has the highest population per capita in the U.S..."


Top
 Profile  
 
 Post subject:
PostPosted: Wed Sep 16, 2009 7:25 pm 
Offline
User avatar

Joined: Sun Sep 28, 2008 9:44 pm
Posts: 379
Well I think we can finally put that to rest. Thanks for the support John! Thanks for the tech info Trevor!!
Its always been my policy to be careful and err on the side of safety. We have done that and have found this procedure is both.
As far as the Abbott engine goes, it was put on hold until we knew we had a proven powerplant with the numbers we were looking for and swinging that 16' 7" prop. We have that now so Jeff has been given the goahead to finish the engine he started. We are hopeful, he will finish it soon and it will be put on the aircraft as soon as it arrives here in Midland.
Dave


Top
 Profile  
 
PostPosted: Thu Sep 17, 2009 6:08 pm 
Offline

Joined: Sat Jul 11, 2009 9:25 pm
Posts: 22
Location: Odessa, TX
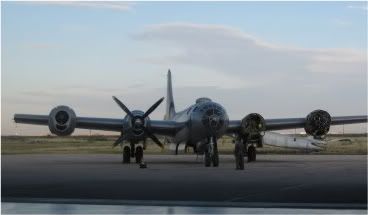
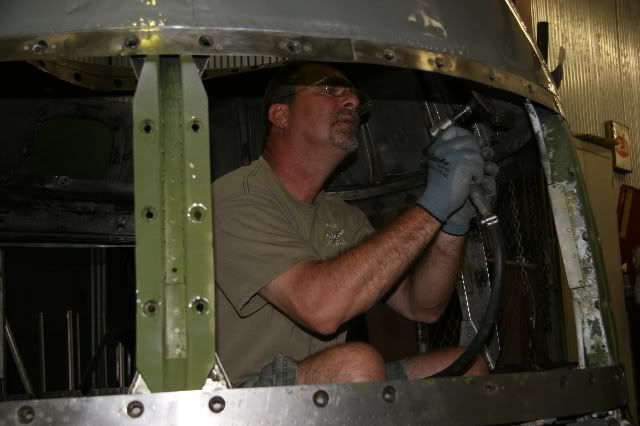
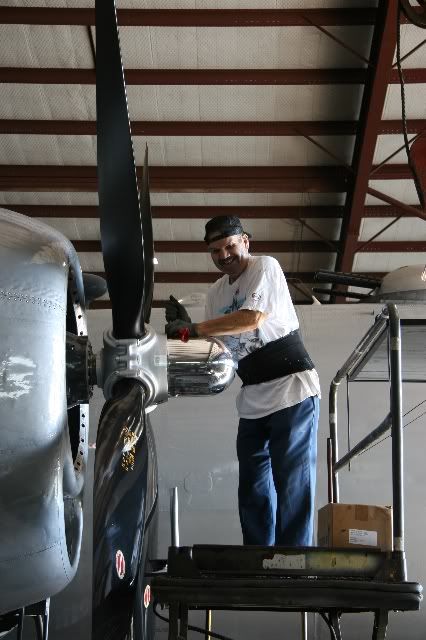
Well the test run is complete and now it is time to put the finishing touches on the number 3 engine. This is a typical day for us here in the ol' hangar. It was decided that all the holes in the cowlings (where the old front facing exhaust used to go into the cowling) needed to be covered. We want to do this so that we can have maximum cooling to the engine. In order to do this, we had to pull the prop and the cowling. After spending quite some time rounding up the proper tools and getting them in the proper locations we were ready to begin. Rudy disassembled the cowl flaps from the control rods, and removed the nuts from the main hangars. (Yesterday we removed sheetmetal from the cowl and removed control cables etc.) Today we had Rudy, Dave and Mark in the crew. Rudy is the most photogenic in the group, so he gets to star today.

Here is Rudy preparing to remove the prop.

Image


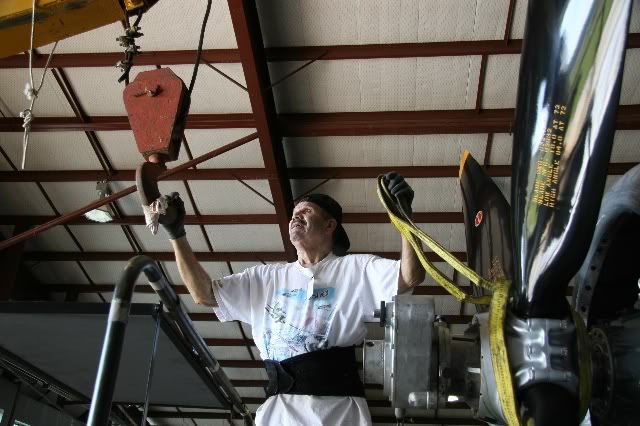
A little persuasion and the polished hub begins to move.

Image


Dave drives the lift while Rudy directs. "Just this much more Dave!"

Image


Here she is without the prop, again. Sigh. Seems some days that it is three steps forward and two steps back.

Image


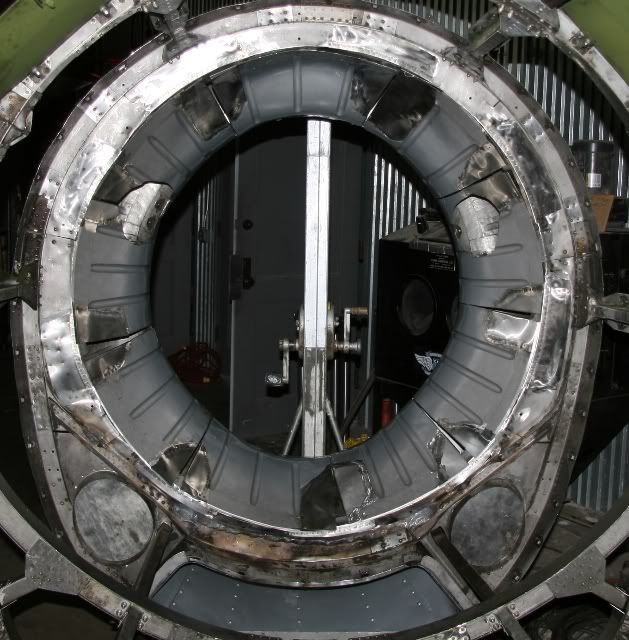
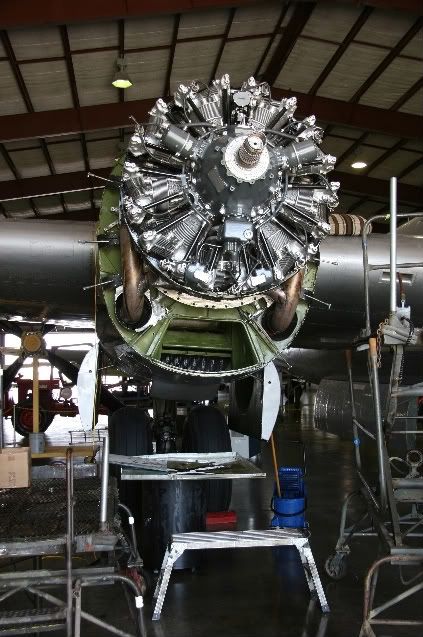
Wow, here the number three engine is again. Still looking good.

Image


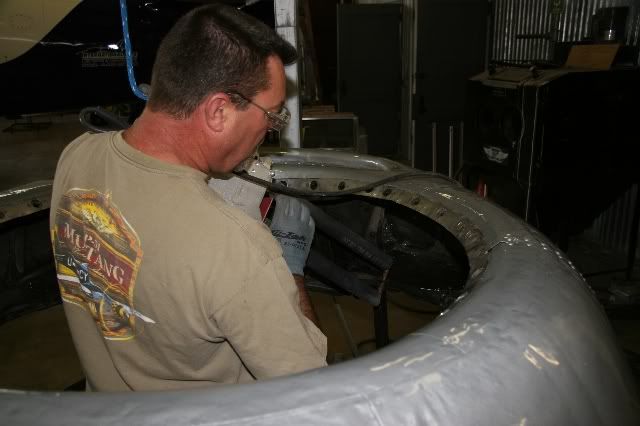
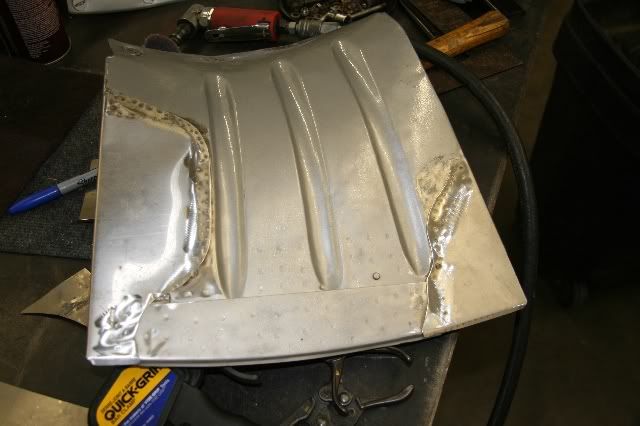
And here is the reason for the disassembly. Look at the cut out on the edge on the inside of the cowling. Air would go through this instead of through the engine. We want max air in the engine, so we need to cover up where the old front facing exhaust went.

Image


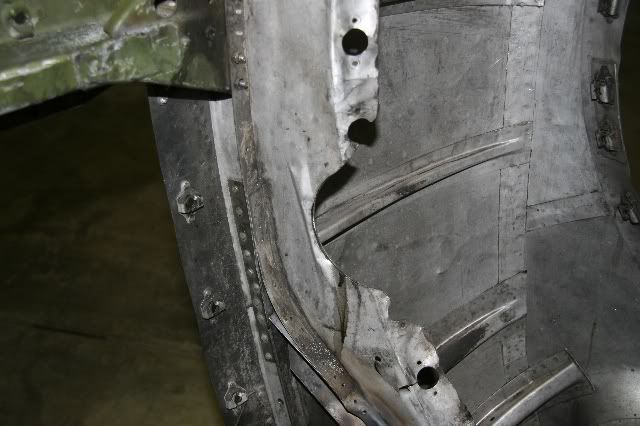
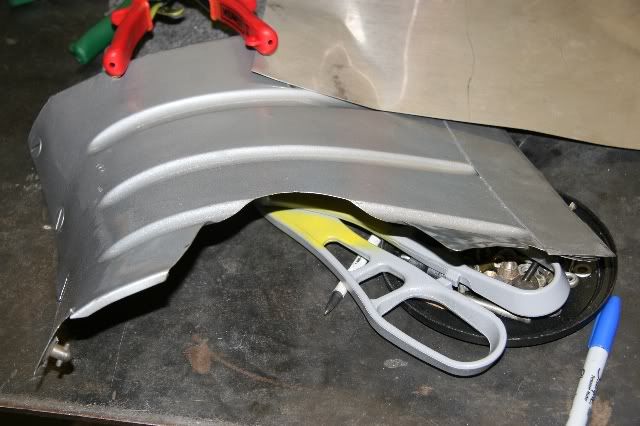
Here is where the repair will be. The metal has to be cleaned very well, so that we can spot weld new metal in place. It has been buffed and cleaned with solvent.

Image

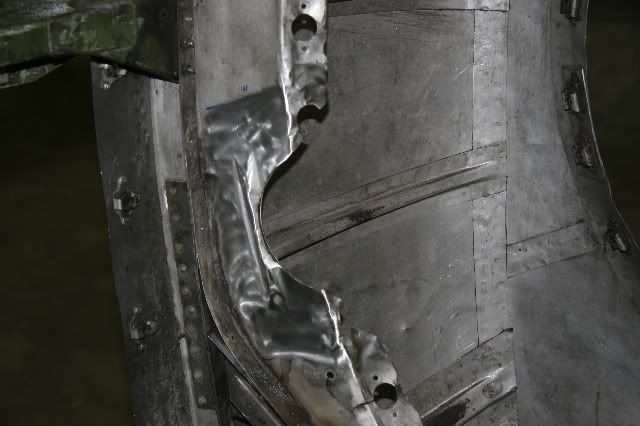
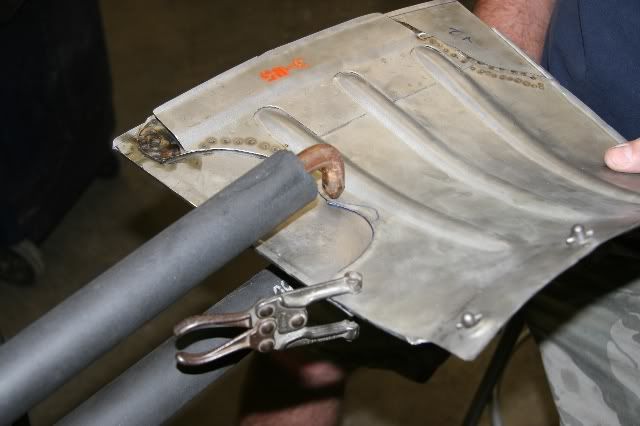
New sheetmetal parts had to be fabricated for each hole in the cowling. Here we show the new sheetmetal in place! One down and many more to go. Tomorrow we will start spot welding the new metal into place.

Image


Top
 Profile  
 
 Post subject:
PostPosted: Thu Sep 17, 2009 10:14 pm 
Offline
User avatar

Joined: Sun Sep 28, 2008 9:44 pm
Posts: 379
Mark, thanks for the update! As he said, many more things need to be done before we are done with #3. We are in the process of cleaning up the holes in the cowling and the forward inner cowl panels so we have smooth airflow to the cylinders. We should have this completed in the next few days and get the cowling and prop back on. The next big thing is the wing section which I'm told will be back to Midland by the end of this month. If all goes as planned, we will have #3 all done and have the wing section hung for AirSho!
Dave


Top
 Profile  
 
 Post subject:
PostPosted: Sat Sep 19, 2009 9:51 am 
Offline
User avatar

Joined: Fri Mar 16, 2007 7:58 am
Posts: 469
Location: Montreal
I am impressed by how much attention you guys put on what at first seems like small details.

When she is back in the air, the ol'girl will be magnificient, no doubt ! And will run much better it seems... awesome work guys !

Love the pictures and the progress reports.

_________________
Michel C
Thousands of a/c pics at Passion-Aviation


Last edited by Michel C-GNCJ on Sun Sep 20, 2009 7:35 am, edited 1 time in total.

Top
 Profile  
 
 Post subject:
PostPosted: Sat Sep 19, 2009 6:44 pm 
Offline
User avatar

Joined: Sun Sep 28, 2008 9:44 pm
Posts: 379
You know, it's all in the details! Everyone looks at what the big things are and they don't realize what amount of little things go into making the big things work. Did that make sense?? We have the engine now just get it hung and we're ready to go. Well as you have seen, it's much more than that. If it was that easy, anyone could do it! I just love the challenge and figuring out how to make it work. Mark and I did some work on the inner cowl panels to close up those holes so look for his pics of that.
Dave


Top
 Profile  
 
 Post subject:
PostPosted: Tue Sep 22, 2009 10:24 am 
Offline
3000+ Post Club
3000+ Post Club
User avatar

Joined: Thu May 18, 2006 3:08 pm
Posts: 4542
Location: chicago
Very cool to see her turn a prop!

_________________
.
.
Sure, Charles Lindbergh flew the plane... but Tom Rutledge built the engine!

Visit Django Studios online or Facebook!


Top
 Profile  
 
 Post subject:
PostPosted: Tue Sep 22, 2009 10:48 pm 
Offline

Joined: Sat Jul 11, 2009 9:25 pm
Posts: 22
Location: Odessa, TX
Well we have worked and worked, and worked. Doesn't look like it should take that much time, but the cowling is now just about finished with the air seal procedure. We used all stainless steel, and spot welded each new custom piece into place.

Each place the old exhaust went into the cowling had a new stainless steel plate installed. In order to spot weld the stainless, the cowling had to be clean on both sides of the weld. Here Dave is cleaning with a buffer pad.

Image


Each new piece is spot welded into place. Here Dave is using a portable spot welder.

Image


After the main cowling was done, the removable sheet metal parts had to be filled in. Here is one before the new metal was added.

Image


The new metal is spot welded into place.

Image


Wow, that was easy! Well maybe not so easy, but it sure sounded good.

Image


Here is the completed assembly. Note the multiple new pieces of stainless steel. We still have a few cracks to fill, but we will get those soon!

Image


Top
 Profile  
 
 Post subject:
PostPosted: Wed Sep 23, 2009 12:07 pm 
Offline
User avatar

Joined: Mon Jan 12, 2009 9:45 am
Posts: 12
Location: Dallas Tejas
Looking good David!!!

_________________
Doing it right the first time may take longer and be more expensive but I sure sleep better at night.... Hard learned lessons.


Top
 Profile  
 
Display posts from previous:  Sort by  
Post new topic Reply to topic  [ 1022 posts ]  Go to page Previous  1 ... 26, 27, 28, 29, 30, 31, 32 ... 69  Next

All times are UTC - 5 hours


Who is online

Users browsing this forum: No registered users and 3 guests


You cannot post new topics in this forum
You cannot reply to topics in this forum
You cannot edit your posts in this forum
You cannot delete your posts in this forum
You cannot post attachments in this forum

Search for:
Jump to:  
Powered by phpBB® Forum Software © phpBB Group