Warbird Information Exchange

DISCLAIMER: The views expressed on this site are the responsibility of the poster and do not reflect the views of the management.
It is currently Sun May 04, 2025 3:07 am

All times are UTC - 5 hours


Classic Wings Magazine WWII Naval Aviation Research Pacific Luftwaffe Resource Center
When Hollywood Ruled The Skies - Volumes 1 through 4 by Bruce Oriss


Post new topic Reply to topic  [ 1322 posts ]  Go to page Previous  1 ... 52, 53, 54, 55, 56, 57, 58 ... 89  Next
Author Message
PostPosted: Fri Nov 23, 2012 10:42 pm 
Offline
Long Time Member
Long Time Member
User avatar

Joined: Wed Jan 24, 2007 1:54 am
Posts: 5197
Location: Stratford, CT.
Fantastic job all around! Cant wait to see whats in store in the coming year!

_________________
Keep Em' Flying,
Christopher Soltis

Dedicated to the preservation and education of The Sikorsky Memorial Airport

CASC Blog Page: http://ctair-space.blogspot.com/
Warbird Wear: https://www.redbubble.com/people/warbirdwear/shop

Chicks Dig Warbirds.......right?


Top
 Profile  
 
PostPosted: Sun Nov 25, 2012 10:32 am 
Offline
User avatar

Joined: Fri Jun 24, 2005 7:59 am
Posts: 500
Location: Central Indiana
Taigh,
Yep, we're waiting on that plexi. Thanks for thinking of us. I have one of those Navy leather heated flying suits I will donate to you. Once those visitors don that and the other flying clothes they will gain an appreciation of how heavy and awkward that gear was. All of that heavy clothing for winter flying, plus being teathered to an electric outlet. I've also read that sometimes the clothing would short out and catch fire. Wishing you continues success....she's looking good!


PJ
PV-2 Harpoon "Hot Stuff"
www.amhf.org


Top
 Profile  
 
PostPosted: Wed Nov 28, 2012 1:27 pm 
Offline
User avatar

Joined: Thu Nov 11, 2010 9:45 pm
Posts: 147
Location: Stockton, CA
Thanks PJ! We could totally use that! Can't wait to make the glass and see Taigh's hair smoking like a cartoon character when he comes out of the oven!!!!!

_________________
Ken Terpstra

Vice-President
Stockton Field Aviation Museum
PV-2D Harpoon 84062


Top
 Profile  
 
PostPosted: Thu Nov 29, 2012 10:17 am 
Offline
User avatar

Joined: Fri Jun 24, 2005 7:59 am
Posts: 500
Location: Central Indiana
O.K. Ken...I'll get it in the mail. Keep the extinguisher next to Taigh!


PJ
PV-2 Harpoon "Hot Stuff"
www.amhf.org


Top
 Profile  
 
PostPosted: Thu Nov 29, 2012 9:03 pm 
Offline
Aerial Pirate
User avatar

Joined: Thu May 06, 2004 11:46 pm
Posts: 2002
Location: South San Francisco, CA (next to SFO Airport)
If you check out the January issue of Smithsonian's Air & Space magazine, you can find an article called "The Beech Boys" that is in part about Taigh and his Beechs. http://www.airspacemag.com/military-aviation/The-Beech-Boys-179523171.html

_________________
Roger Cain
www.sfahistory.org
http://groups.yahoo.com/group/Stearman/


We must limit politicians to two terms:
one in office and one in jail.


Top
 Profile  
 
PostPosted: Fri Nov 30, 2012 12:46 pm 
Offline
3000+ Post Club
3000+ Post Club
User avatar

Joined: Tue Jul 17, 2007 9:11 pm
Posts: 3160
Location: MQS- Coatesville, PA
Roger Cain wrote:
If you check out the January issue of Smithsonian's Air & Space magazine, you can find an article called "The Beech Boys" that is in part about Taigh and his Beechs. http://www.airspacemag.com/military-aviation/The-Beech-Boys-179523171.html

Neat to see Roscoe quoted. I spent many hours at his home as a teenager and he was quite supportive of my aviation vocation when others weren't. He also has a T-28A that is for sale.

_________________
Rich Palmer

Remember an Injured Youth
benstear.org
#64- Stay Strong and Keep the Faith

BOOM BOOM, ROUND ROUND, PROPELLER GO

Don't Be A Dilbert!


Top
 Profile  
 
PostPosted: Fri Nov 30, 2012 7:18 pm 
Offline
1000+ Posts!
1000+ Posts!

Joined: Sun Dec 31, 2006 5:11 pm
Posts: 1111
Location: Outer Space
Taigh, just wanted to show off the T-shirts I just got in the mail today. Jeana called me 2 days ago to let me know you guys had the T-shirts in. I was pleasantly surprised when they came today. Nice shirts. My girlfriend's two boys thought the shirts were kewl.

Image


Top
 Profile  
 
PostPosted: Sun Dec 09, 2012 3:38 pm 
Offline
1000+ Posts!
1000+ Posts!
User avatar

Joined: Wed Aug 17, 2005 9:29 pm
Posts: 1484
Location: Stockton, California
maxum96 wrote:
Taigh, just wanted to show off the T-shirts I just got in the mail today. Jeana called me 2 days ago to let me know you guys had the T-shirts in. I was pleasantly surprised when they came today. Nice shirts. My girlfriend's two boys thought the shirts were kewl.

Image


Great shot. Thanks for posting it. Sorry about the color differences. We have had trouble with our T shirt maker and Ken is in the trail of a new one.

Thanks for your donation! We sure need it.

_________________
To donate to the PV-2D project via PayPal click here http://www.twinbeech.com/84062restoration.htm

We brought her from: Image to this in 3 months: Image Help us get her all the way back Image

All donations are tax deductible as the Stockton Field Aviation Museum is a 501c3 nonprofit organization. Tell a friend as the Harpoon needs all the help she can get.

Thank you!

Taigh Ramey
Vintage Aircraft, Stockton, California
http://www.twinbeech.com
'KEEP ‘EM FLYING…FOR HISTORY!'


Top
 Profile  
 
PostPosted: Sun Dec 09, 2012 4:56 pm 
Offline
1000+ Posts!
1000+ Posts!
User avatar

Joined: Wed Aug 17, 2005 9:29 pm
Posts: 1484
Location: Stockton, California
Now for a long overdue update:

Mark is our radio volunteer. He is building his own collection of WWII radio gear at home so he like to come up and play with our gear since we have the same sets. He wants to recreate a late war Corsair ARC-5 radio set which is practically identical to the ARC-5 we have in the Harpoon meaning it also has the VHF transmitter and receiver. I think Mark likes to work on our radios so he can practice before he works on his own gear which is perfectly fine with us. He does nice work with good attention to detail.

There are several areas that old radios typically need attention and one is the bearings on the old dynamotors. For those that don't know the dynamotor is a motor/generator. One one end is a 28 volt DC motor on one end that drives a generator with a different set of wingdings on the other side. These are used to create different voltages needed for radios and other equipment in the aircraft. You will find many different dynamotors throughout old aircraft but mostly they have been replaced or removed today for a variety of reasons. The radio and electronics they powered are no longer installed or operated so they are not needed or desired. They are also removed because of weight as they typically are small to large bricks of copper and aluminum and are referred to as boat anchors. For me the phrase 'boat anchor' is a term of endearment and boat anchors belong in WWII aircraft especially Navy aircraft. Don't get me started on the weight saving argument...Arghh!

Dynamotors also use lots of power to run and normally sound like vacuum cleaners. If your dynamotor sounds like a grindy, grumbly and angry vacuum cleaner then it is probably time to service or replace the bearings. Once the bearings start to go then the armature can contact the wingdings and that is not a good thing. This can lead to letting the smoke out of your electronics which is also not a good thing.

I am sure many of you have heard the old axiom that all electronics have smoke built into them right at the factory and the trick is to not let the smoke out. This cracks me up but is too true as it is real hard to get the smoke back in once it has been let out. Not that it has ever happened to me :roll: but once that smoke is out it is even harder to get the smell out of the aircraft. Not a good thing indeed!

There are a lot of dynamotors in the Harpoon which is kind of surprising to me. Normally on late Army aircraft there is usually one big dynamotor and a back up and this powers an AC bus which provides 115 volts 400 cycle power to all equipment that needs it. The Harpoon, and I speculate other late Navy aircraft too, have many small independent dynamotors throughout the ship. They have a big one to power the radar and IFF and then there are smaller ones throughout the ship that provide the same 115v 400cy power. Interesting.

Off the top of my head I can count 12 dynamotors in the Harpoon for radios and instrumentation.That's a lot of vacuum cleaners for sure.

Here is Mark working on the dynamotor for one of the two ARB receivers. They came out great and sound like happy vacuum cleaners with no malice audible at all.

Image

One of the other things Mark is working on is wiring up the radios. The plan has been to build the racks, install the radios and radar and then wire them up and get them working. We have a majority of the radios installed on their proper racks now so it is time to wire them up and bring them back to life.

Mark was making some of the ARC-5 system harnesses for the Harpoon at home. The ARC-5 is also called the Command set which was used for short range communication like the plane to tower and plane to plane. It was also used for navigation to receive radio range signals. As I mentioned our system has a VHF component which was becoming the standard throughout the war and is still in use today.

The ARC-5 had several racks for transmitters and receivers. Each rack could hold one radio that could tune in one band. Multiple radios in the racks would give you a wider range of reception. The typical ARC-5 and its Army counterpart the SCR-274N would have two transmitters and three receivers. The Harpoon had spare radio racks in the aircraft that carried two extra receivers and four transmitters so you could swap them out to cover an even wider range of frequencies.

The ARC-5 is one of the most popular radio sets to come out of WWII because it was greatly used by many aspiring ham folks for portable use. These were installed in cars, boats and in ham shacks all over the place. The system was also in use in the Navy into the 1970's. I have a Beech SNB-5P/RC-45J sitting outside the shop here that was retired in 1972 and it still has a full compliment of ARC-5 gear installed.

Here is Mark wiring up the ARC-5 system in the Harpoon. This is the modulator that supplied the high voltage needed for the transmitters. If you look close you can see the dynamotor on the back of the modulator.

Image

In the shot above you can see the knife switch for the antenna. This was used to select between the fixed antenna on top of the aircraft and the trailing wire antenna on the bottom. Our switch has temporary wire from when we were quickly getting the ART-13 Liaison transmitter working for a special flight a while ago. We now have the proper insulated wire to hook up all of the antenna leads. Army aircraft used small ceramic beads for insulation but the late Navy aircraft had wire with special neoprene covering for insulation. If you touched one of these wires while the transmitter was broadcasting it would zap you hard and could knock you across the aircraft or worse.

Image

The tie wraps are temporarily installed to hold the wiring in place until the waxed cord and clamps hold the harnesses in place. When we are done the Harpoon is once again proud to be tie wrap free!

This is the dual receiver rack and you can see the wiring on the back of the rack. We are using cotton covered wire that we had made just for the radio gear. It looks great and is a perfect match to the original wiring in the Harpoon.

Image

The radios are coming along nicely. Thanks Mark!

_________________
To donate to the PV-2D project via PayPal click here http://www.twinbeech.com/84062restoration.htm

We brought her from: Image to this in 3 months: Image Help us get her all the way back Image

All donations are tax deductible as the Stockton Field Aviation Museum is a 501c3 nonprofit organization. Tell a friend as the Harpoon needs all the help she can get.

Thank you!

Taigh Ramey
Vintage Aircraft, Stockton, California
http://www.twinbeech.com
'KEEP ‘EM FLYING…FOR HISTORY!'


Last edited by Taigh Ramey on Sun Dec 09, 2012 11:29 pm, edited 2 times in total.

Top
 Profile  
 
PostPosted: Sun Dec 09, 2012 7:21 pm 
Offline
1000+ Posts!
1000+ Posts!
User avatar

Joined: Wed Aug 17, 2005 9:29 pm
Posts: 1484
Location: Stockton, California
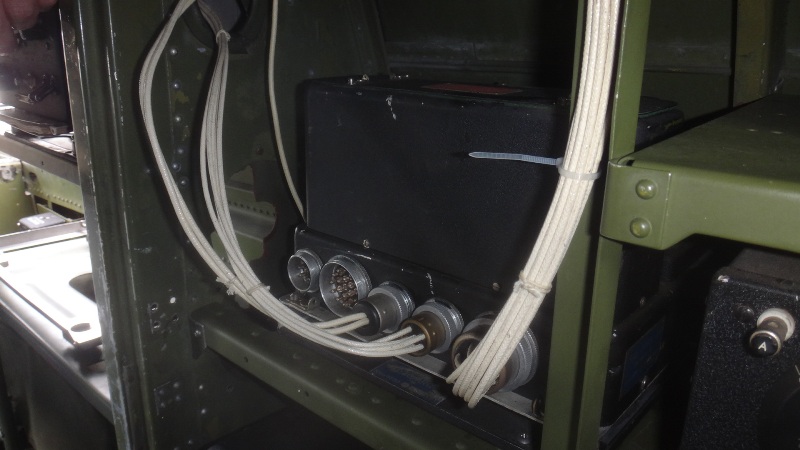
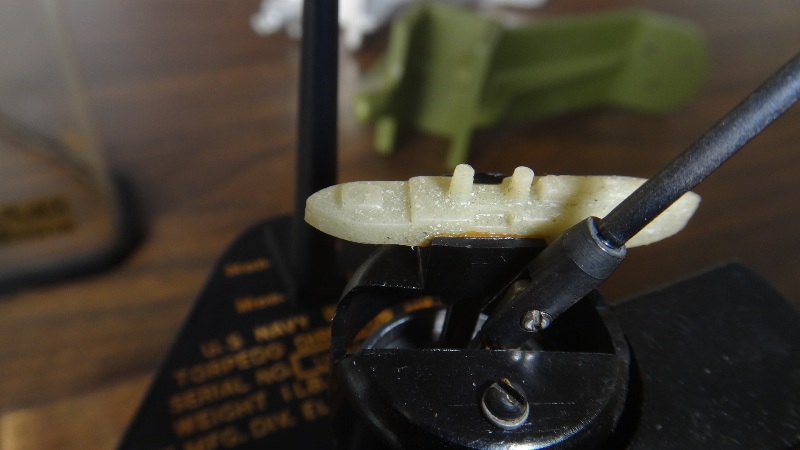
One of the recent acquisitions was the Mk 32 Torpedo director. It is a sight used by the pilot to drop torpedoes accurately.

Image

Image

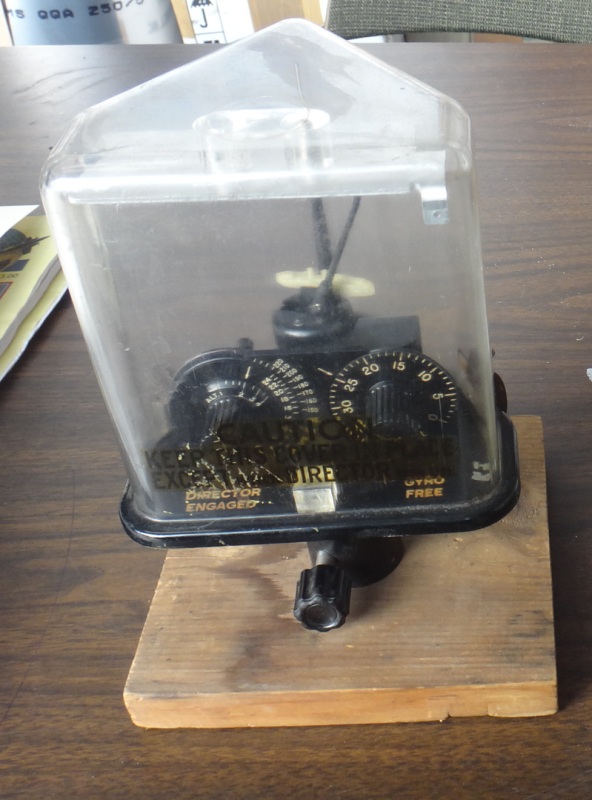
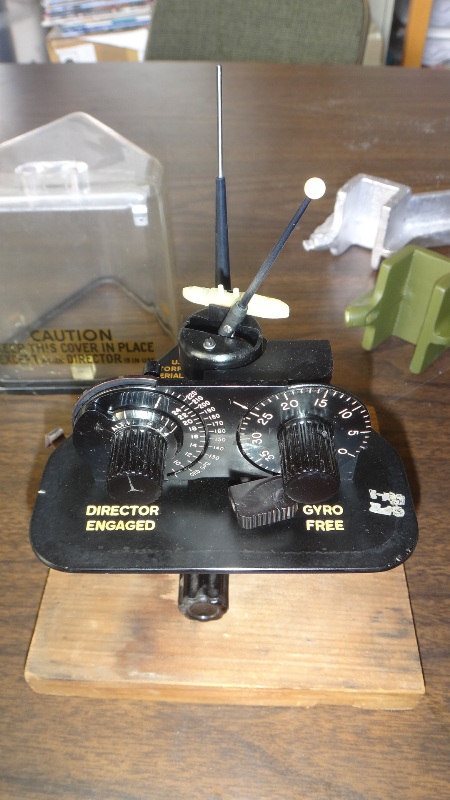
Check out the little ship model on the director. The pilot was to align this ship up in the same direction as the ship he was attacking

Image

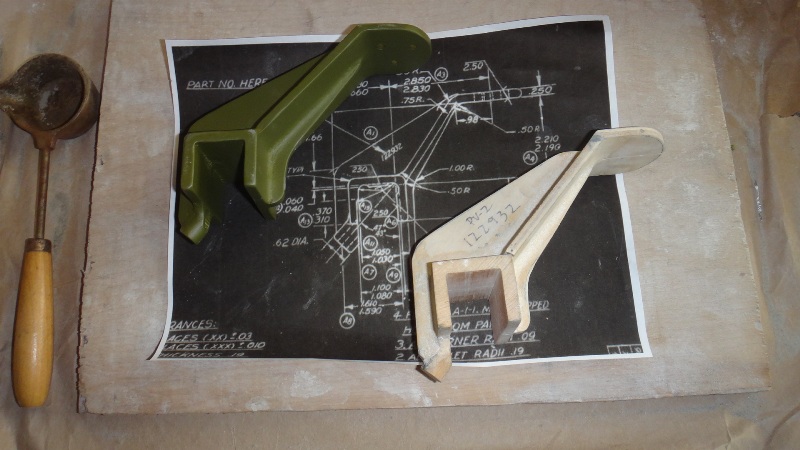
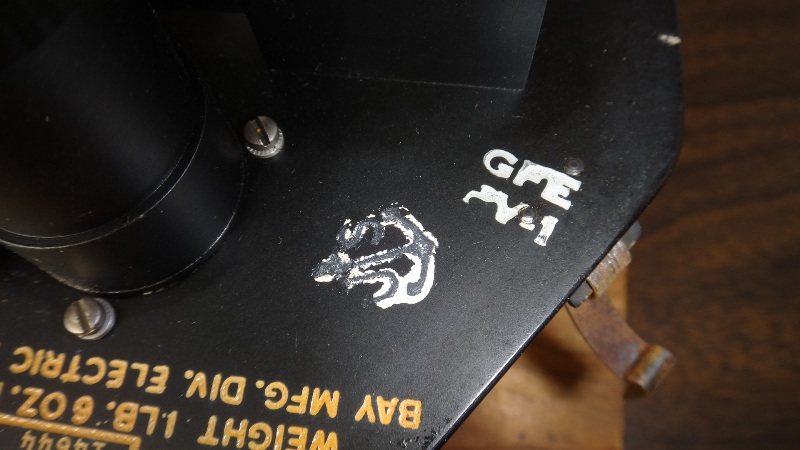
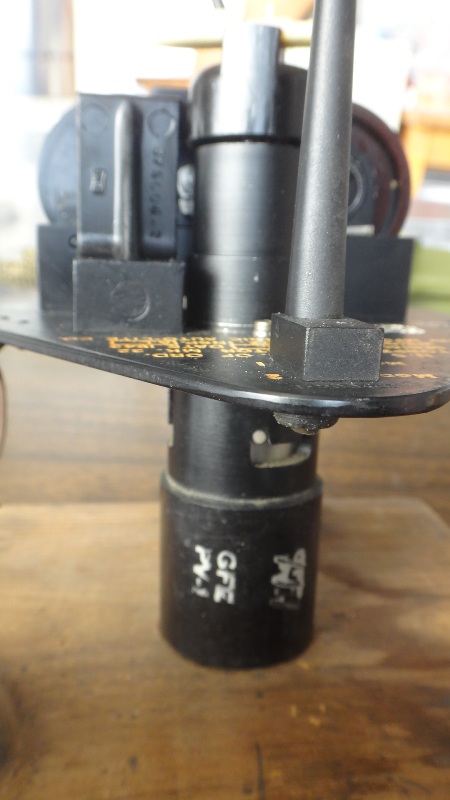
What is the next best thing to having a MK 32 torpedo director? Having one that was stamped GFE PV-1.

GFE is for Government Furnished Equipment which means the parts that were supplied to the aircraft manufacturer from the Army or Navy. GFE included engines, guns, radios, armament etc. It would be nice to find a director marked for a PV-2 but at least this one went through the Lockheed factory, just a few years before our Harpoon was carved out of aluminum.

Image

Image

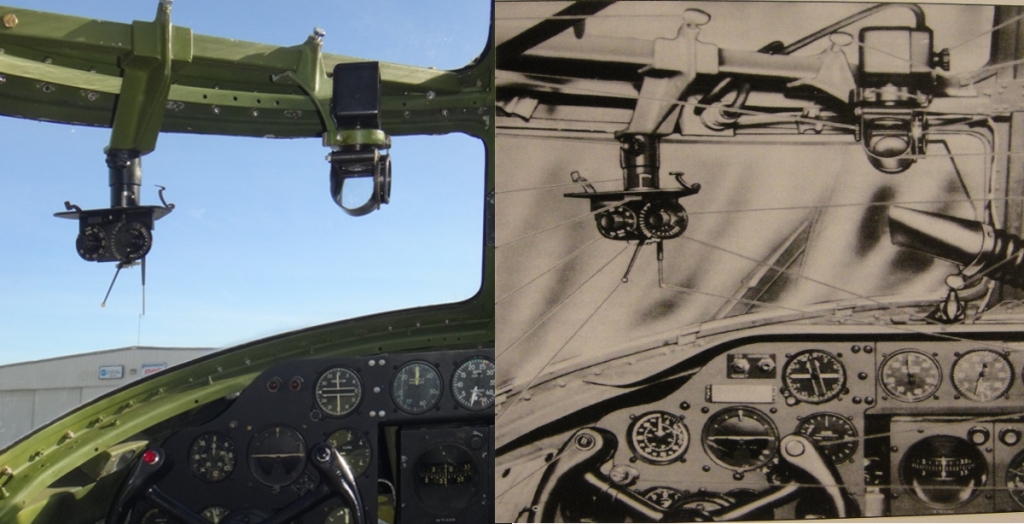
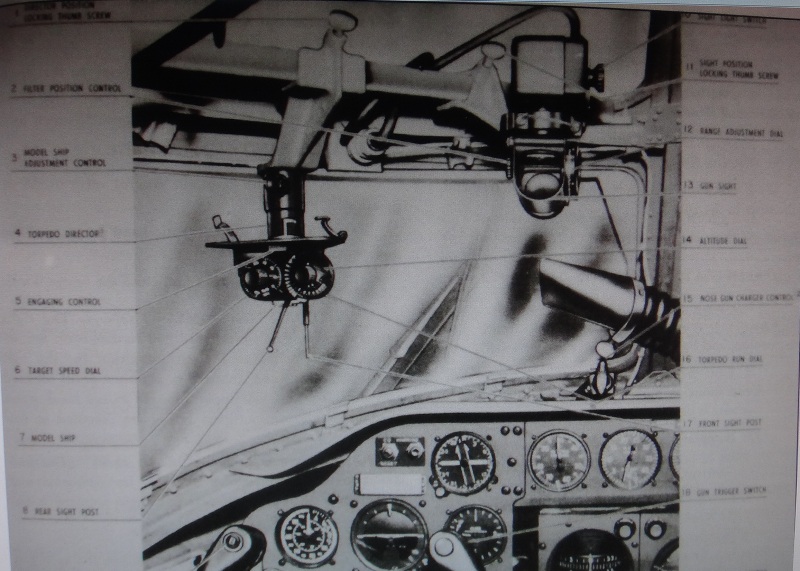
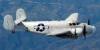
With the torpedo director in hand I have been itching to install it along with the gun sight. Here is the only shot I have found of the Torpedo director installed and the gun sight is on the right

Image

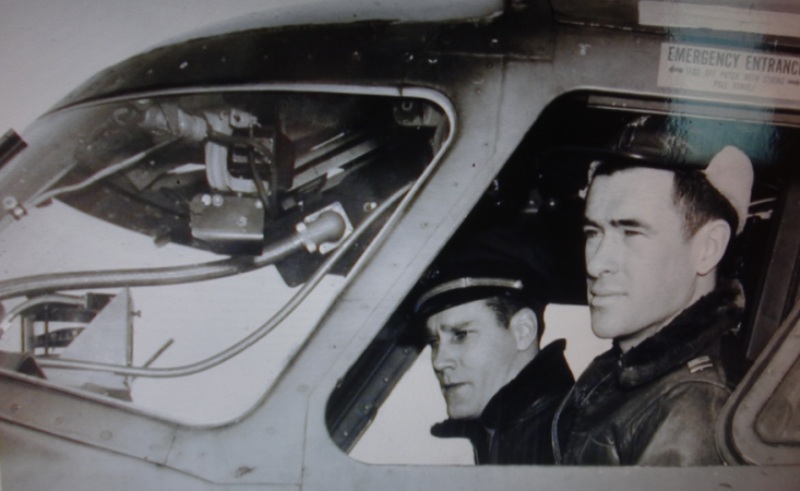
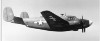
Here is a good shot with the crew in the cockpit and you can see the gun sight in the stowed position.

Image

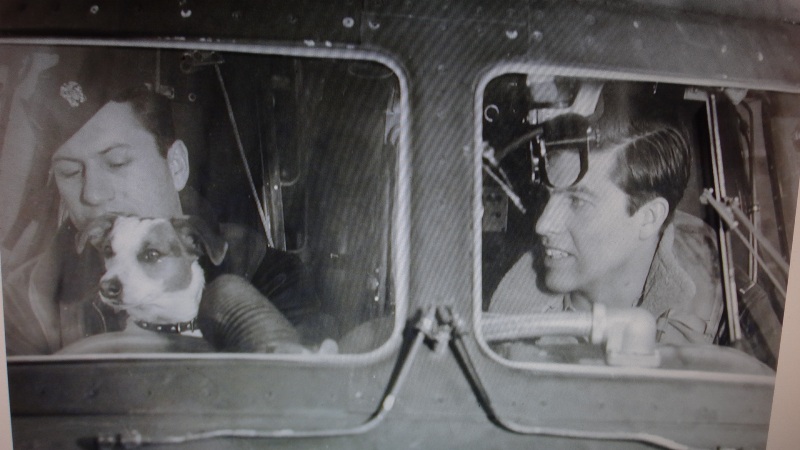
Another cool shot where the Mk 9 gun sight is visible on the pilots forehead. I guess I will need to find the appropriate dog to recreate this picture!

Image

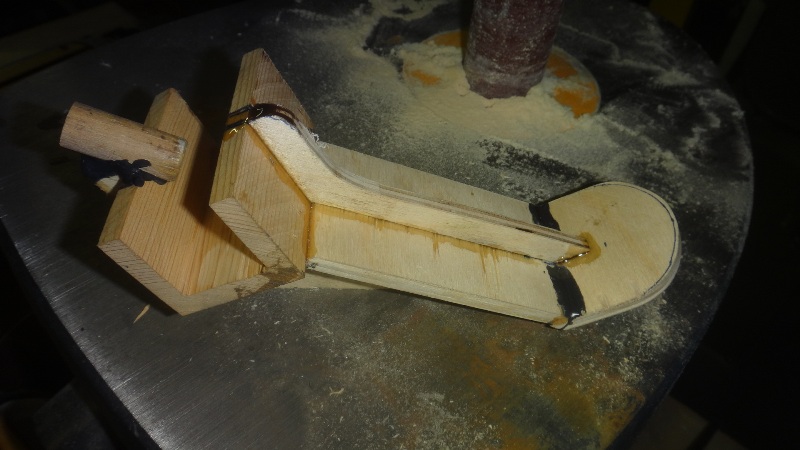
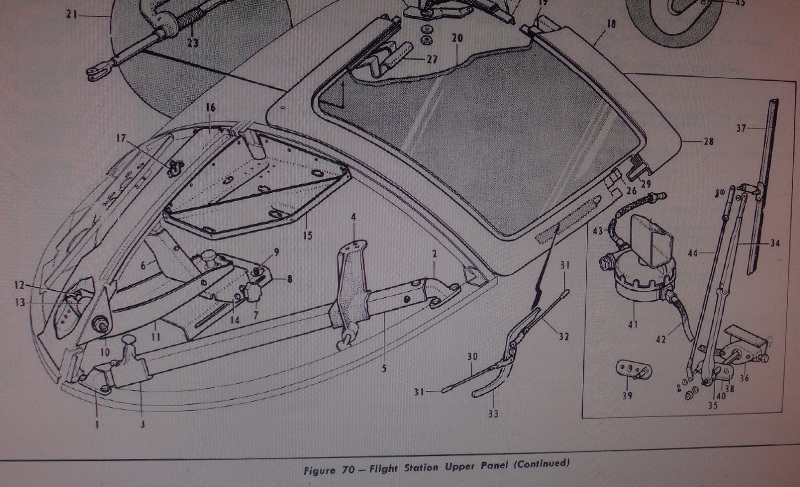
I only have the gun sight mounting bracket, and since I couldn't find the rest of it; the end castings, cross bar and torpedo director bracket will have to be fabricated. In this shot from the parts manual you can see the whole sight bar assembly.

I will need to make items 1,2,4 and 5...and 6 through 17 but that's for another day...

Image

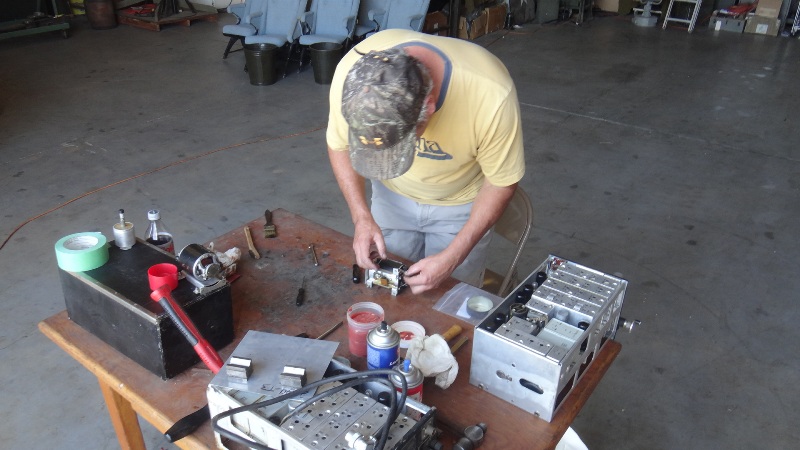
The end mountings and TD brackets are castings so it is time to break out the foundry equipment and re learn the process since it has been a while. Most folks would go right to the CNC and machine one out of a billet of aluminum which is one way to go but machined parts never seem to look quite like the original castings. Besides, the museum has no money to go through the CNC process or have a pattern/casting made elsewhere so we have to do things in house and as cost effectively as possible.

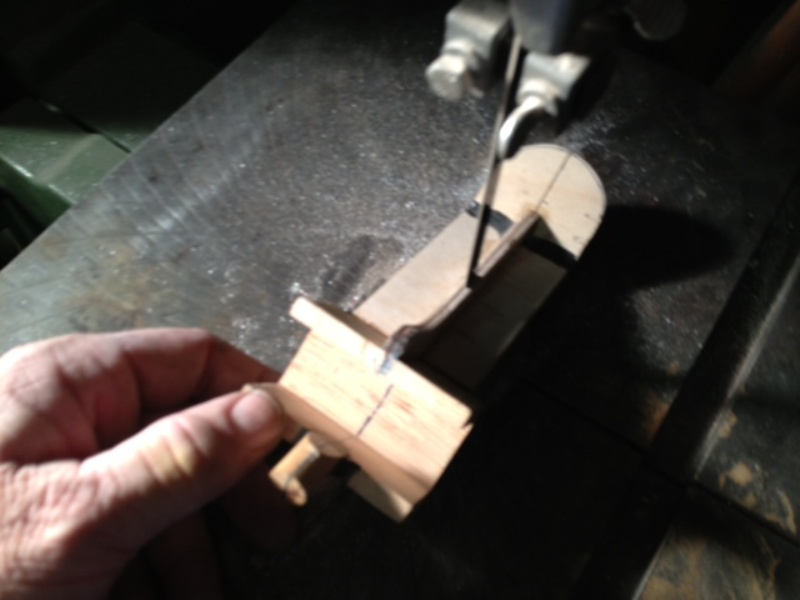
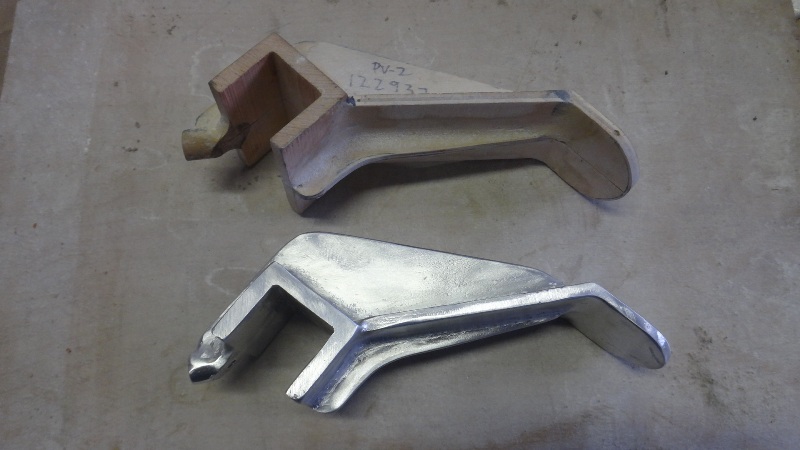
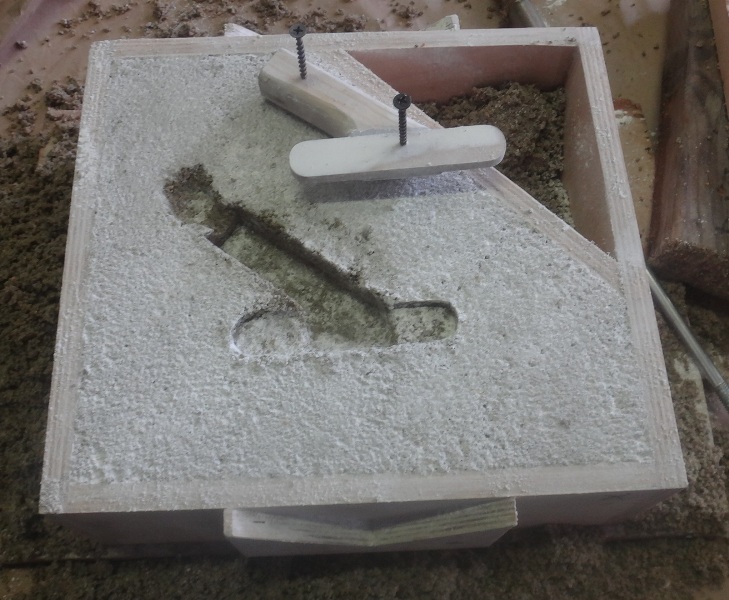
First I need to make a pattern to use as a mold for the casting process. The easiest way is to do make the pattern out of wood. Here is a pattern for one of the ends made from wood and MDF.

Image

The pattern is made oversize to compensate for aluminum shrinkage and my way too coarse sand. I was finally able to use the shrink ruler that has been sitting in the machinist box for way too long. Aluminum shrinks about 3/16 of an inch to a foot so you need to keep this in mind when pattern making. There are shrink rulers made just for pattern making to the scale you need so you will end up with the correct measurements after the parts are cast.

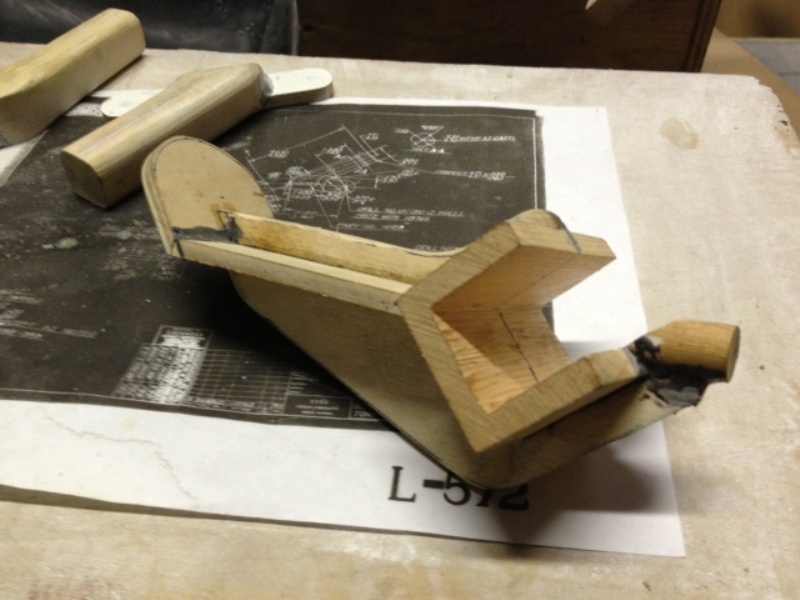
Shrinkage is not so much of a big deal on small parts but I also have to take into account the kind of sand I had to use. Since I was not willing to drive 2 plus hours each way to the Bay Area just to get the proper sand and clay I picked up "fine" sand at the local hardware store and clumping kitty litter for the clay needed to make quick and dirty greensand for casting. This is very crude but it's cheap and readily available for my afternoon project. The next time I need to go to the Bay Area I will pick up the good stuff.

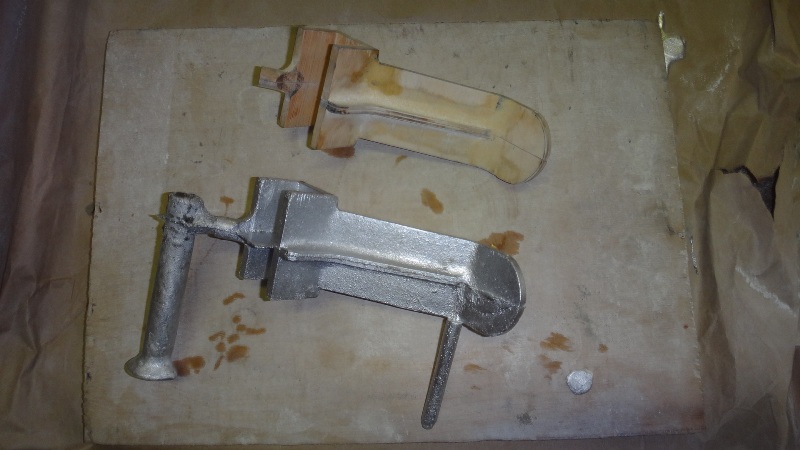
The coarse sand and cat litter makes for real rough surfaces so a lot of sanding will be necessary to clean up the parts.

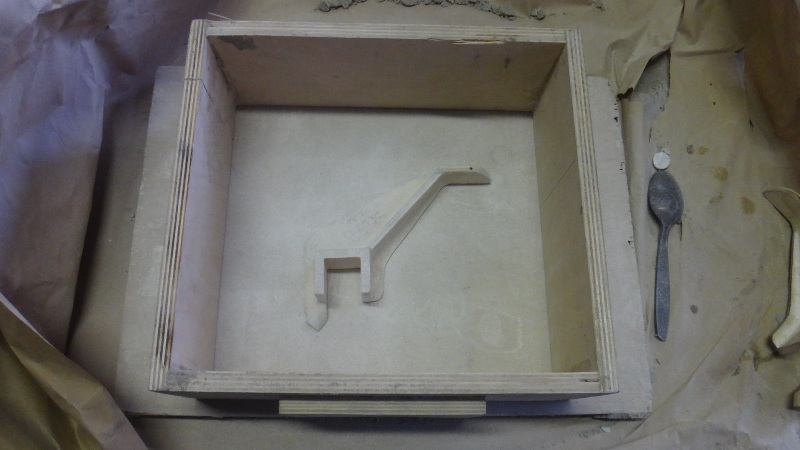
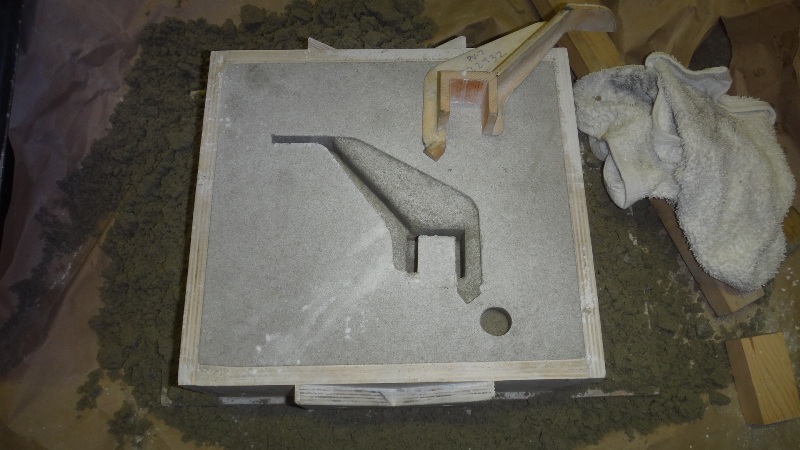
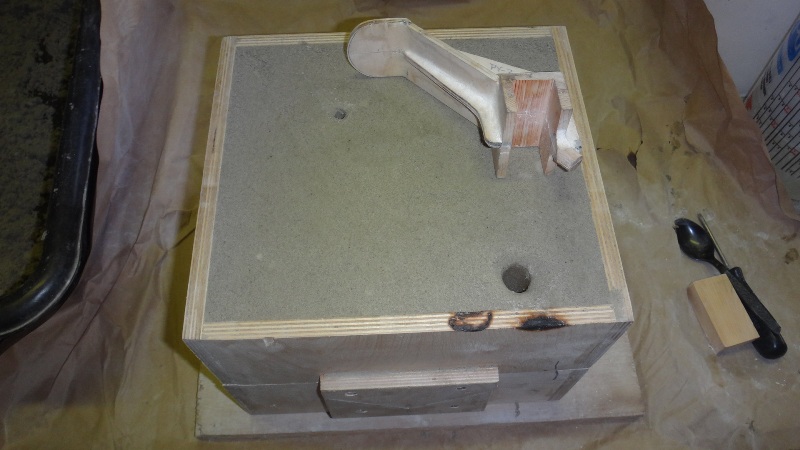
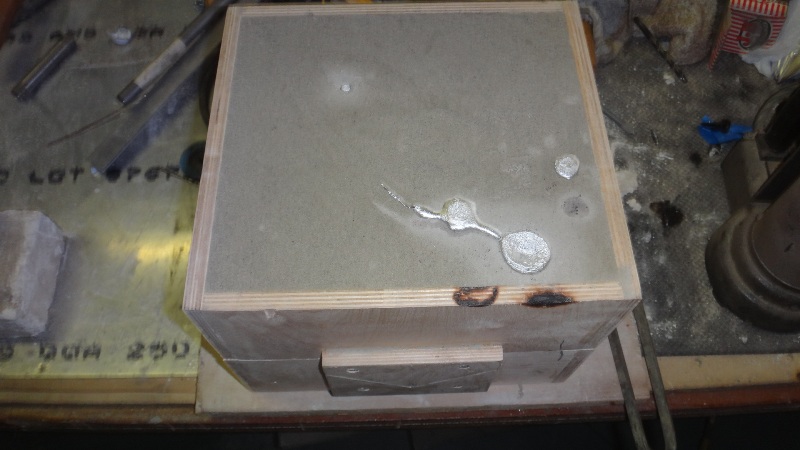
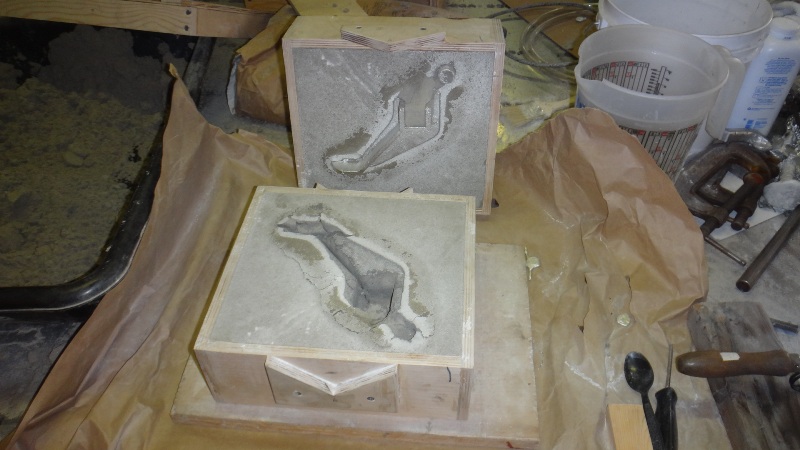
First the box for the casting process is made up from plywood. Then the pattern is used to make a mold in the sand

Image

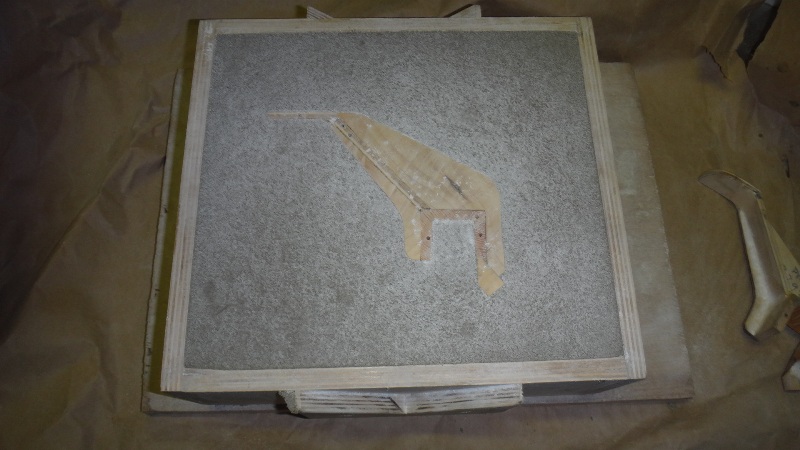
Sprue and vent holes are made in the sand which is where the metal will be poured.

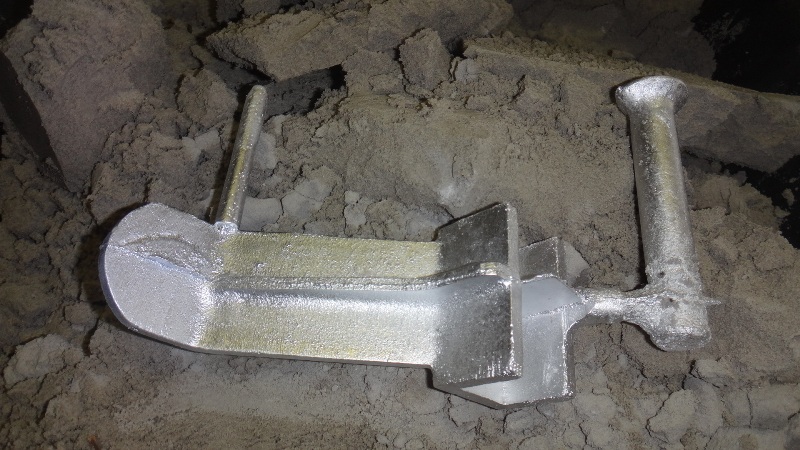
Aluminum from various old shop projects was melted down in the electric crucible

Image

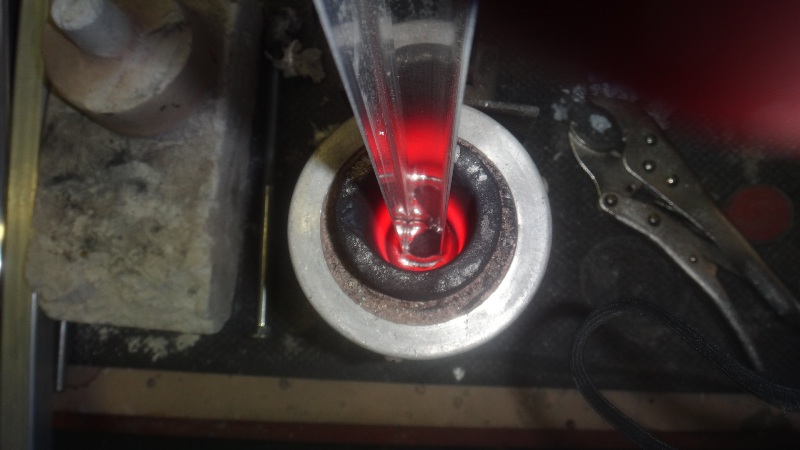
And then poured into the mold

Image

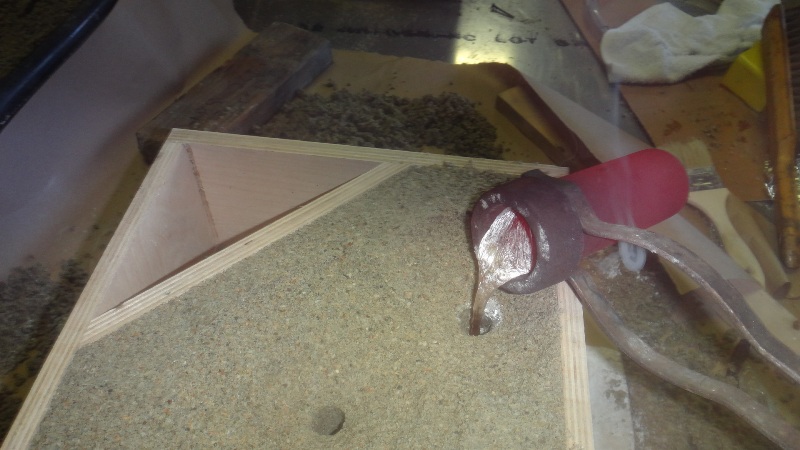
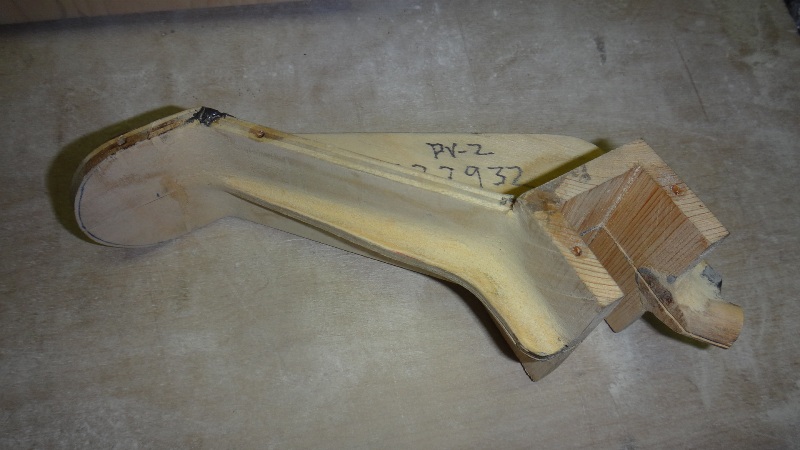
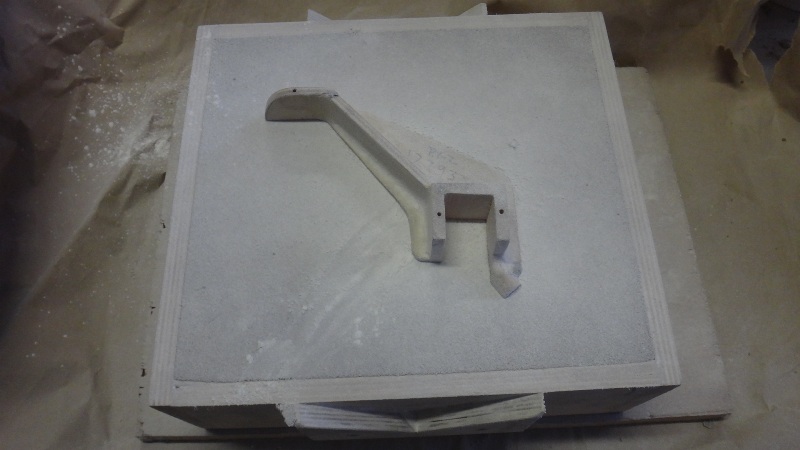
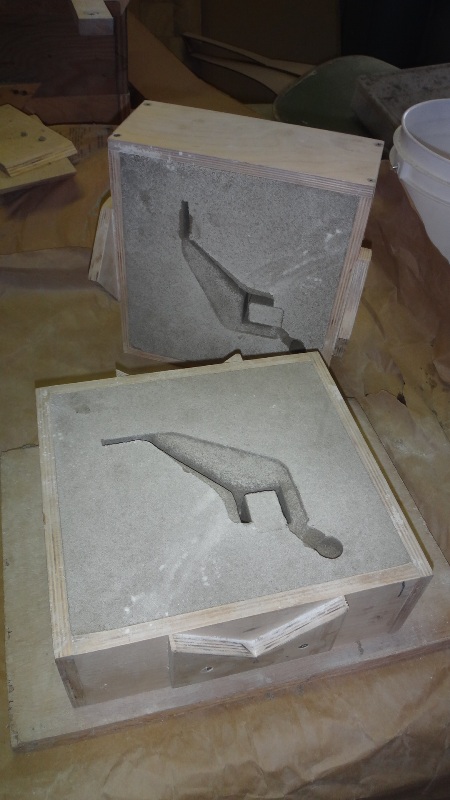
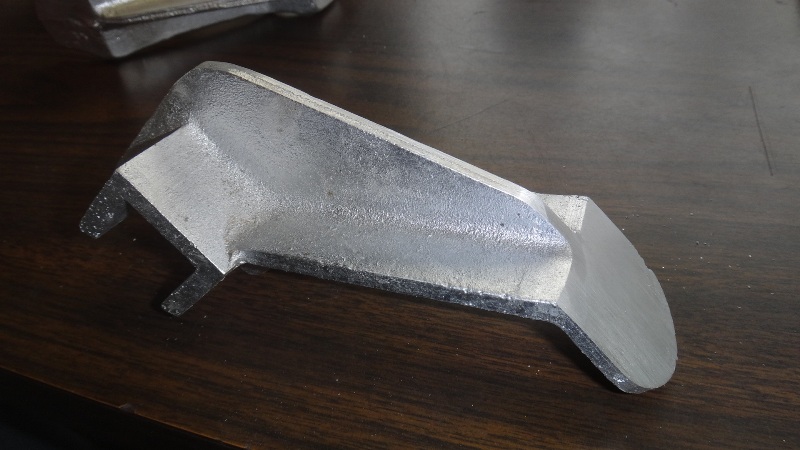
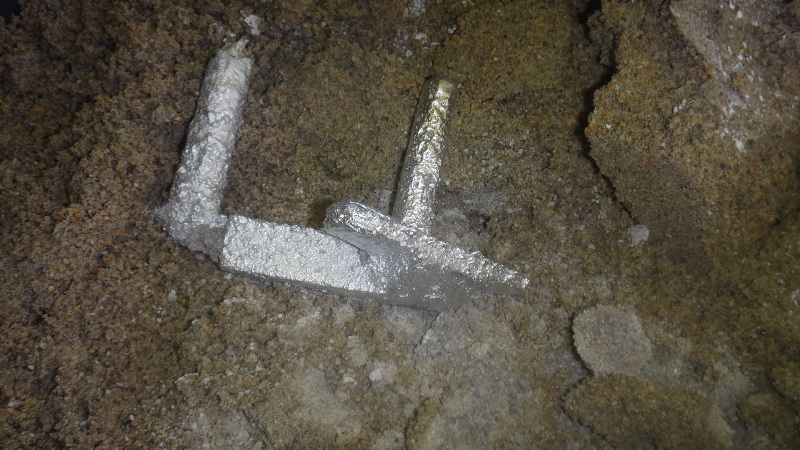
The "rough casting" is pulled from the sand. The sprue is sawed off and the clean up process begins. Man, I can't wait to get the proper sand and clay.

Image

Image

After the parts are cleaned up and painted they are ready for fitting

Image

Image

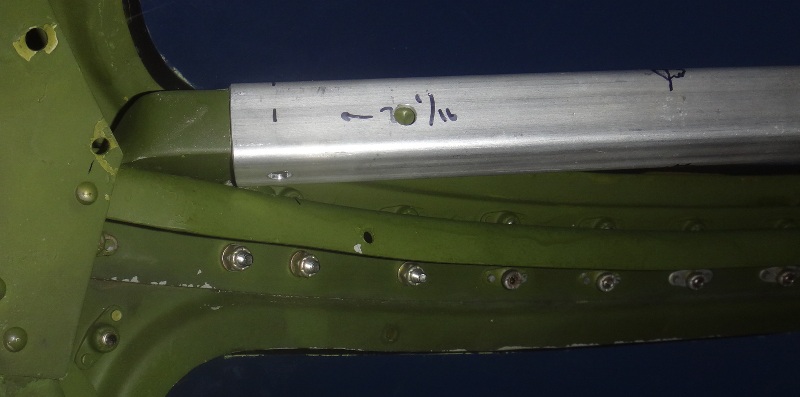
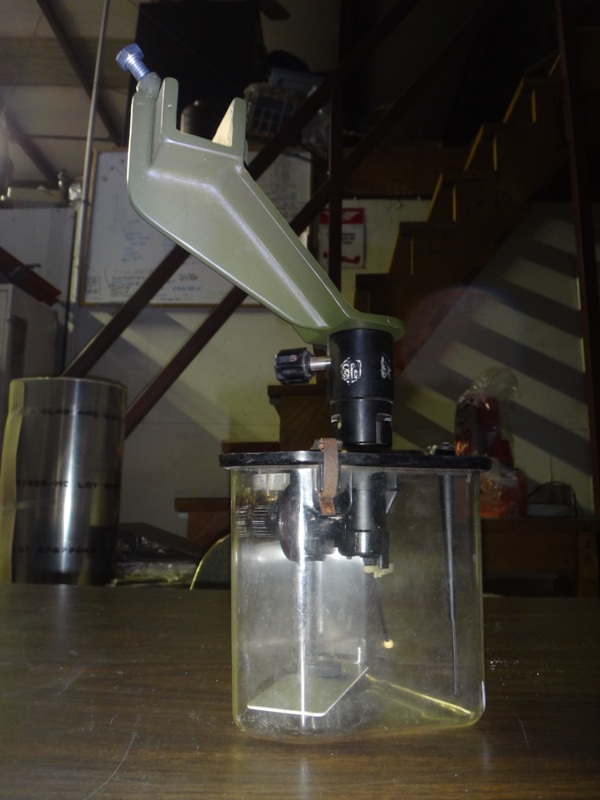
The assembly is then ready for installation

Image

The only Mark 9 gunsight I had near by was missing the light housing so this one is not complete but it still looks pretty good

Image

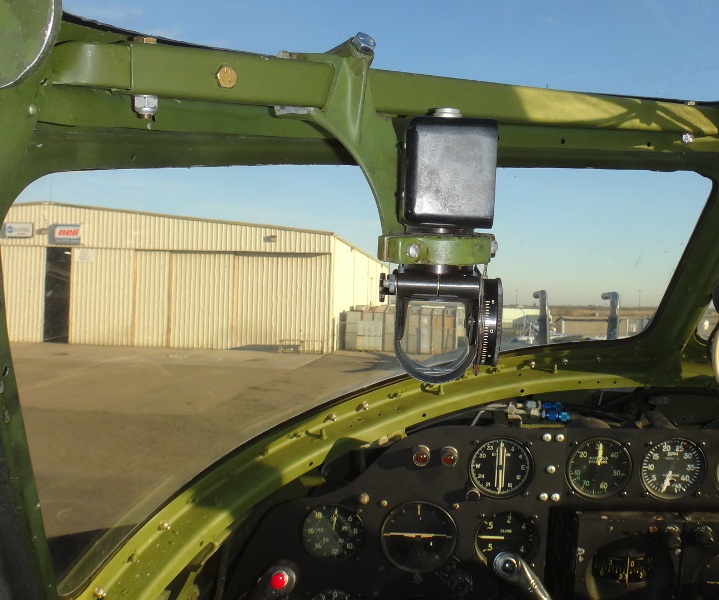
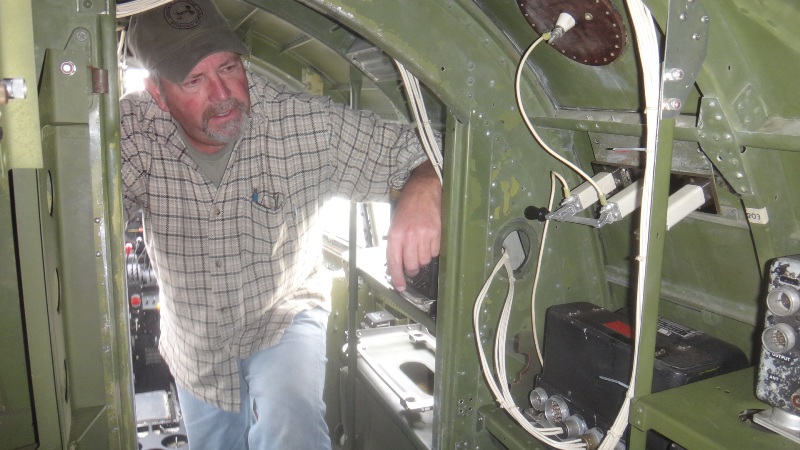
Now that I have something to hang it on, It's time to make the mounting bracket for the torpedo director.

_________________
To donate to the PV-2D project via PayPal click here http://www.twinbeech.com/84062restoration.htm

We brought her from: Image to this in 3 months: Image Help us get her all the way back Image

All donations are tax deductible as the Stockton Field Aviation Museum is a 501c3 nonprofit organization. Tell a friend as the Harpoon needs all the help she can get.

Thank you!

Taigh Ramey
Vintage Aircraft, Stockton, California
http://www.twinbeech.com
'KEEP ‘EM FLYING…FOR HISTORY!'


Last edited by Taigh Ramey on Mon Dec 10, 2012 7:40 pm, edited 3 times in total.

Top
 Profile  
 
PostPosted: Sun Dec 09, 2012 8:11 pm 
Offline
User avatar

Joined: Fri Oct 28, 2005 10:46 pm
Posts: 612
Location: Arizona
OUTFRICKENSTANDING! (As usual), as I said we here are ALWAYS waiting to see updates to get our "Harpoon fix". :drink3: pop2 :drinkers:

Scott

_________________
Scott Dunkirk
AZGCLHU Inc.

http://arizonagroundcrew.org/

1940's Army Air Force ground crew living history
(A 501 C 3 organization)
(IYAMYAS)

"Yes sir, it's suppose to look like that"


Top
 Profile  
 
PostPosted: Sun Dec 09, 2012 8:53 pm 
Offline
1000+ Posts!
1000+ Posts!
User avatar

Joined: Wed Aug 17, 2005 9:29 pm
Posts: 1484
Location: Stockton, California
A recent trip with my wife to a doctors appointment in the Bay Area allowed me to swing by a foundry supply place for some real "fine" sand. 120 mesh silica and a great powdered clay called Bentonite. Now I have the ingredients to cook up some proper green sand.

First the pattern is made for the bracket which is a bit more complex than the end castings but still pretty simple

Image

Image

The fillets are blended and sanded

Image

Then the pattern needs to be cut down the middle to make the two pieces needed for the casting. One will go in each side of the box called the cope and the drag

Image

Aligning pins will be set in to the halves to keep the parts true to each other.

Image

Then the female half is placed in the drag and is covered with sifted green sand to get the finest particles against the pattern.

Image

Then the sand is packed down around the pattern and the drag is turned over

Image

The male pattern is placed on the female and the cope is placed. Sifted sand is packed around the pattern in the cope

Image

When the cope and the drag are separated the the pattern halves are carefully removed and the sprue and vents are cut.

Image

Image

Now the cope and drag are put back together and it is ready for the pour

Image

Andrew is a 16 year old good kid who has come out a few times to help on the Harpoon. He was working on cleaning the nose...

Image

I asked him to come and give me a hand with the pour. It was his first time with a torch and pretty much any metal work so we broke him in properly. My small electric crucible didn't have the volume needed for this pour and since I was too lazy to dig out the furnace I had Andrew keep some molten aluminum hot while I made some more.

He did a great job. Thanks Andrew!

Image

All hands were busy for the pour so no action shots available

Image

Once cool enough the cope and drag are separated to see how it turned out

Image

A bunch of flash to take care of but it looks like it worked

Image

Image

And the clean up begins

Image

Image

Drill the holes and a little paint and its time for the torpedo director

Image

Image

Need to make some proper thumbscrews to replace the 5/16-18 hardware store bolts. Slow but sure...

Image

Now look at all the other stuff I need to put in! The shot of the left looks too clean. These aircraft were jammed with gear and our plan it to have it as jammed up as it was. Check out the defroster panel covering the whole windshield. The spring clips hold it in. The glare shield. The windshield wiper. The nose gun charging handle. The bracket for the gun sight cannon plug. Carbon monoxide detector indicator and switch. Airspeed correction card holder. The proper mic button and torpedo release button. What the heck is that bar crossing across the upper left corner of the old photo?

Part of the fun of this giant puzzle is looking at the same photo you have gone over 30 times before only to spot something new. The littlest thing will all of the sudden become a recognized part and may answer a question about something else. Answer one question and come up with a dozen more.


Taylor: T shirt will be on the way soon and a special thanks for the extra donation!.

_________________
To donate to the PV-2D project via PayPal click here http://www.twinbeech.com/84062restoration.htm

We brought her from: Image to this in 3 months: Image Help us get her all the way back Image

All donations are tax deductible as the Stockton Field Aviation Museum is a 501c3 nonprofit organization. Tell a friend as the Harpoon needs all the help she can get.

Thank you!

Taigh Ramey
Vintage Aircraft, Stockton, California
http://www.twinbeech.com
'KEEP ‘EM FLYING…FOR HISTORY!'


Last edited by Taigh Ramey on Tue Dec 11, 2012 7:44 pm, edited 2 times in total.

Top
 Profile  
 
PostPosted: Sun Dec 09, 2012 9:07 pm 
Offline
1000+ Posts!
1000+ Posts!
User avatar

Joined: Wed Aug 18, 2010 12:51 pm
Posts: 1185
Location: Chandler, AZ
Taigh,

Do you have, or need a torpedo/strike camera?
http://www.ebay.com/itm/WW2-1944-DATED- ... 2a26bdd21a

_________________
Lest Hero-worship raise it's head and cloud our vision, remember that World War II was fought and won by the same sort of twenty-something punks we wouldn't let our daughters date.


Top
 Profile  
 
PostPosted: Sun Dec 09, 2012 9:18 pm 
Offline
1000+ Posts!
1000+ Posts!
User avatar

Joined: Sun May 02, 2004 10:14 am
Posts: 1692
Location: canada
Wow Taigh.. your updates continue to impress... well done!!

_________________
Cheers,
Peter

________


Top
 Profile  
 
PostPosted: Sun Dec 09, 2012 9:52 pm 
Offline
User avatar

Joined: Tue May 04, 2004 1:49 am
Posts: 659
Amazing stuff! Thanks for the update.

It's refreshing to have folks like yourself who let us mortals go along for the ride, with all the 'top secret" hush hush warbird stuff that's been going on lately

We REALLY appreciate that your door is open for us to look through :)


Top
 Profile  
 
Display posts from previous:  Sort by  
Post new topic Reply to topic  [ 1322 posts ]  Go to page Previous  1 ... 52, 53, 54, 55, 56, 57, 58 ... 89  Next

All times are UTC - 5 hours


Who is online

Users browsing this forum: No registered users and 275 guests


You cannot post new topics in this forum
You cannot reply to topics in this forum
You cannot edit your posts in this forum
You cannot delete your posts in this forum
You cannot post attachments in this forum

Search for:
Jump to:  
Powered by phpBB® Forum Software © phpBB Group