A place where restoration project-type threads can go to avoid falling off the main page in the WIX hangar. Feel free to start threads on Restoration projects and/or warbird maintenance here. Named in memoriam for Gary Austin, a good friend of the site and known as RetroAviation here. He will be sorely missed.
Post a reply

Sat Dec 30, 2006 6:12 pm

http://www.nps.gov/archive/yuch/Expanded/b24/b24_graphics/august_2004_pics/Panarama_Main_Entry_Hatch_large.jpg
Image

Gary;
The wire is running along the front support tube to a bracket. just to the right of the ammo feed belt. I hope the link works.
Scott.....


I wasn't here - Scott WRG Editor

Rear gun position pics

Sat Dec 30, 2006 7:12 pm

Gary do you ahve pics and drawings of the rear gun position? I came across one in a magazine and it shows nice detail on the gun mount

Sat Dec 30, 2006 9:46 pm

For those interested, the Liberator at Charly River is/was a B-24D-110-CO, 42-40910.

From Joe Baugher's site:

40910 crashed near Charly River, Alaska Dec 21, 1943, with crew of 5. MACR 1505.
When it crashed, the crew was conducting a test flight and propeller tests following some
sort of maintenance work. They had a prop specialist on board from Wright Field in Dayton
when it crashed. An explosion took place and aircraft went into a spin and the pilot
gave the order to bail out. Three crewman bailed out, but only one of them survived by
walking out after spending 83 days in the woods. The wreck is still there.

Sat Dec 30, 2006 10:38 pm

To whom ever;
Thank you for putting the arrow in the photograph. I can work on 20 million dollar airplanes, but I am still an bonehead when it comes to working on the confuser and photoshop.
Scott.......

Sat Dec 30, 2006 11:03 pm

RNDMTRS4EVR wrote:To whom ever;
Thank you for putting the arrow in the photograph. I can work on 20 million dollar airplanes, but I am still an bonehead when it comes to working on the confuser and photoshop.
Scott.......


My pleasure. :)

Lil

Sun Dec 31, 2006 1:08 am

Peter, I don't think Gary has any pics (internal), only 2 or 3 pics (external) and just a few drawings of the rear gunners station.... that being said, I am not answering for him, but I know that I would like to see that picture. Alan

Sun Dec 31, 2006 1:27 am

Looks to me that the "little stuff" in that wreck would be worth their weight in gold to Gary's effort. Heck, he might even be able to replace the A-26 hinges on the tunnel gun hatch with the real ones!

Sun Dec 31, 2006 7:36 am

Holy sh*t Gary...I can't believe what you've been able to do with that spinner and the tail gunner's poistion. Looking at your last posting it looks as though the tail cone was original to Lil all along. We're going to have to start calling you the "MacGiver" of warbird improvisation! 8)

I know you mentioned that you weren't completely satisfied with the tail cone but hey...those slight imperfections just blend in with the character of that old bird. Kepp up the good work and thanks again for sharing the progress photos with all of us. I look forward to reading this more than my early morning coffee! :wink:

John

Sun Dec 31, 2006 7:37 am

There is no doubt that I'd be able to use every single little bracket, angle, and widget I can from wrecks like that, but I simply don't have the time and the CAF doesn't have the money to send me up there to do recover anything from a wreck like this. Heck, that's not even mentioning what kind of political B.S. we'd have to go through. I've been in contact with three different places here in the Lower 48 that have B-24 parts, and only one (Yankee Air Museum) has been helpful by returning calls and e-mails. In other words, if I can't obtain stuff that is "relatively easy" to get that already belongs in private hands, I'm worried that I'd have even more difficulty obtaining stuff from a wreck site up in Alaska somewhere.

Now, don't get me wrong. I'm not saying I'm giving up on the idea, but I just don't think it's going to be something that will happen quickly.

And peter......please, please send me the drawings of the tailgunner's stuff you found! I have ZERO drawings or pictures of the inside of that compartment.

Gary

Sun Dec 31, 2006 7:58 am

This is great stuff. You are doing an awesome job! I enjoy reading it myself every morning while I eat my "Lucky Charms" before work...

Sun Dec 31, 2006 9:08 am

I just went out to the hangar to continue the inspection portion of this project. I've been putting this off for too long now and must get it done. It's just that the way I look at the airplane so closely, it takes up so much time. Time I could be building something that we know needs to be done. But anyway, it's obviously an important part of the process. After all, that's how I found all of the "Uh-oh's" with FIFI's airframe back in the winter of '04.

Anyway, when I got out to the airplane this morning, I noticed yet again at how fortunate we are to have Daniel Collier working with us. I've said it before, but he gets more done in a shorter period of time than I could ever do. I'm glad he's part of the team here.

So, I went around the airplane and took some pictures of some items that I don't think I've updated on yet. Here they are........

I know y'all have seen the tunnel gun position over and over, but if you look at this shot, you'll see that there are no more clecos! Daniel and I finished shooting the rivets on this piece yesterday. With the exception of a few Cherry (blind) rivets that need to be pulled, this piece is officially finished, with it's edge sealing compound curing as I type this! :P
Image


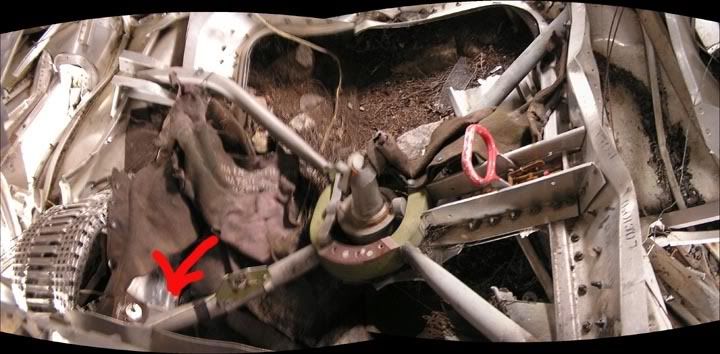
Another piece that is near completion (will be done today, hopefully), is the lower fuselage plug that used to be where the bottom of the old transport door was. Daniel shot on what rivets he could the other day (see previous post), and has got it all edge sealed as well. There are a few blind fasteners that will need to be applied here and he and I will shooth the remaining 20 or so rivets across the bottom in an hour or so....
Image


I know I mentioned it in an earlier post, but didn't have a photo, so here's the main entry door with it's outer skin all riveted on now. I've got some more painting to do on the inside structure (will do that today as well), and then it'll be ready to continue with it's interior fabrication (steps, hold-up cables, etc.)...........
Image


And finally, while Daniel was waiting for edge sealer to dry and for us to both be working here together (I get here early in the morning, he stays until late at night...kind of like two shifts), I had him start fabricating more of the structure for the new, raised floor for the waistgunners. In previous posts, you'll see that I had built the first bulkhead and some attach and support angles, but he's taken over and continued the process. It looks to me like he'll be done with the fabrication of this project later today. I'll just have to prime it all up and shoot it in place.....
Image


Our corrugated floor material is being fabricated right now and should be delivered here sometime during the second week in January. That will be a major step forward, as I will be able to put some more closure on some of these little projects like this.

Gary

Sun Dec 31, 2006 9:15 am

Looks great! One question, I see almost the whole interior is bare metal. Will this all be re-primed and painted? I imagine places like frames under the floor would need some corrosion protection?

gary...

Sun Dec 31, 2006 9:59 am

The photo I found was from the rear looking at the gun installation not an interior shot but it shows the gun installation etc will digi a copy of it out of the mag in a few mins

Sun Dec 31, 2006 10:09 am

Fouga23 wrote:Looks great! One question, I see almost the whole interior is bare metal. Will this all be re-primed and painted? I imagine places like frames under the floor would need some corrosion protection?


Good question, thanks for asking.

Yes sir, the basic structure of the aircraft got a good coat of that dark green Consolidated paint originally (although some were left bare). I do intend to paint the inside of the airplane with this paint, however, I just do not know if I'll be able to get to all of it this year. Painting that structure uses up a buttload of paint, not to mention how long it takes to prep and shoot it.

The bombardier's section alone took just over a gallon of (mixed) paint and I noticed some spots that I didn't get covered well just the other day. Daniel and I stood there for a good twenty minutes after I had painted it initially, looking for areas that I missed. After touching up all of the areas we saw, I come back a little while later and see that there are more. So it's all just going to depend on how much time I have as we get closer to our deadline. Remember, I won't be able to completely finish this project this year, but I'll try to get as much done as possible.

Gary

Gary check your email

Sun Dec 31, 2006 10:16 am

Sent you two copies of the pic of the rear gun position to you by email Gary. I hope they help a little bit. Interestingy it shows no nav/formation lights below the gun position but does show nice rivet detail for mounting that new build section you manufactured.

Gary have you seen this also? not sure if you plan on doing her front end liek this or not??
http://images.google.ca/imgres?imgurl=http://www.liberatorcrew.com/15_Gunnery/Turrets/Nose/Greenhouse.jpg&imgrefurl=http://www.liberatorcrew.com/15_Gunnery/03_nose.htm&h=773&w=600&sz=82&hl=en&start=3&tbnid=A_mBAWl-iA9giM:&tbnh=142&tbnw=110&prev=/images%3Fq%3Db24%2Bgun%2Bposition%26svnum%3D10%26hl%3Den%26lr%3D%26sa%3DN
Post a reply