Hello WIXers,
Time for yet another weekend maintenance report!
It seems like hardly any time ago, we were complaining about the cold, wearing our wooly undies, parts of ourselves stuck frozen to airplane parts. and now here we are with summerlike weather, just like that. But I don't think the novelty's worn off yet--nobody's complaining, anyhow!
It was a fine beautiful maintenance day Saturday, even though the core maintenance team hardly knows when it's "maintenance day" lately--we've had people out there almost continuously for a month now. It's paid off, too. Once our two gauges (manifold pressure and triple engine indicator) come back from the overhaul shop Tuesday or Wednesday, and get installed, the list of discrepancies will stand at precisely zero. Ready in all respects.
Let's see, now--I finally remembered to carry the camera out there with me Friday, so let's start there, shall we?
The project was to address a long-standing problem we've had with our fuel quantity senders. They've always worked, after a fashion, but they've never been exactly optimal. Long Tall Glen, Electrical Guru Roy, PJ and Scotty have been working long and hard to change that.

There's Roy at his electrical bench, going over one of the eight fuel level transmitters. They are variable resistance float-type senders. The four inboard tanks have identical units. The outboard (aux) tanks are long and shallow, and have two senders each.
Roy's looking at the output of the sender, finding the bad spots in the variable resistor, and polishing them out until the signal is smooth and uninterrupted.

There's Glen on the wing, testing the repaired senders in the left outboards. He's temp-fitted them, with wire tied to the float arm and snaked up through an unused bolt-hole. this allows him to pull it up to "full," and lower it back to "empty," while I'm in the cockpit telling him what the gauge reads. He'll then adjust the unit until the gauge agrees with the float position.
Sounds simple, and it basically is, but it takes a pretty long time for all the necessary repetitions. There's nothing quite like sitting out on a dark blue wing in the hot sunshine, too. This is the kind of work that puts you in the hot seat!
While all this is going on, we had a couple picturesque visitors on our ramp ...

The Lone Star Flight Museum was out with their Doolittle commemorative B-25, plus the B-25 "Take Off Time," to open the Indy 500 race. They were out there for most of the week, flying media rides. Made for pleasant background noise, hearing those radials.
Having the visiting warbirds usually brings out the gawkers, and they'll frequently wander over to see what's going on with this big blue bomber. (Often enough, they'll want to know why our B-25 has a tailwheel, and what's up with the blue paint job? Explanations and education ensues.)
One such gawker, who didn't make such mistakes, was WIXer Warren, who crews a T-6 racer at Reno. He showed up at the trailing edge, looked up and me 'n' Glen, and said, "you must be IndyJen."

There's Warren, who was quickly enlisted into the project. He's a FedEx A&P, but unlike our man Johnny Gearpin, who's a flight-line guy, Warren is a back-shop mechanic. He was happy enough to get up on a hot warbird and turn a few wrenches.
That was basically the story of Friday. When we wrapped it up, somewhere around nine p.m., there was only the left aux senders left to calibrate. All of the auto-transfer functions were set up and perfect, the gauges were reading accurately with smooth needle movements ... very promising.
Saturday, then, was more of the same, but we had a few other projects to keep people busy, too.

There's Rich No. 1, the Official Dad of IndyJen, taking care of a little fastener problem at the right empennage fairing. He's just getting started, as you can see by his use of a power-driver. On our ramp, power drivers are only for removing fasteners that have been broken loose.
The old man had spent the previous day (Carb Day) out at the track, I think, and by the end of the morning, he had wrapped up the project, communed with Glen and Machine Shop Gaylon on his PX project, and hauled out boxes of materials to his car. He's making some bookends out of condemned R-2800 pistons, which have been cleaned and plasma-cut in half. They are going to be darn cool, in fact, and I already have my order in for a set.
I meanwhile spent the morning and part of the afternoon taking care of a nagging thing that's been annoying me for some time: our rear upper windows had some rusty fasteners, which have been calling out for replacement. About a quarter of them needed a little EZ-out treatment, but they all came out in the end. Cleaned up and replaced with nice shiny stainless screws, it makes me feel much better, looking at that area.
PJ and Hot Rod Steve were doing some cosmetic work on the nacelle panels, some of which have been banged up plenty--they get a lot of handling.

There they are, pulling the RH oil cooler covers. They were concentrating on lower panels (white) this time round; they've previously touched up various others. We've had talks with an area FBO who may donate a full-blown repaint, which will be great, but in the meantime, PJ and Steve are doing good work, improving the looks and protecting the metal.
Machine Shop Gaylon spent his morning working on the upper nose-gun loading hatches, which have had no attention at all in too long.

One good result of tending to them (dzus replacement, hinge repair, and seal replacement) is that we can open them when we're working in the nose. Ventilation is good!
The other big project on hand, as I mentioned last time, was in getting the old girl back on her feet again.

There's a look at the sad state of affairs left us by Mr. Valve-Stem Vandal. The tire is flat as can be, but we've propped up the strut to keep from damaging the sidewall too awfully much.

There's the other side of things. The tire looks all right, but it's going into the hangar as a spare. We have a few others in there, too, against future recap or trade-in.
We do have a new set of main gear tires on hand--DC-3 tires, which are as close as you can get to PV tires. PJ and I went to dig them out of the hangar, which is currently stuffed to the gills with stuff that might not normally be in there, but needs to be stashed out of sight due to the upcoming airshow.

There's PJ with the tug and trailer. We'll haul those tires over to the shop, and before the day is over, one of them will be mounted. At this point, we were still waiting for Barnstormer Joe to show up with our tube, which was kindly donated to us by Basler of Oshkosh. Another one will arrive this week, donated by Desser. It is great to get such support.

So, the tube arrived, and there's the gear sans wheel. The wheels are magnesium, and the first thing that had to be done was to get that rubber off of there, and inspect that wheel. Magnesium is susceptible to corrosion, and we hadn't seen inside that wheel for a long time.

There's your basic wheel componentry, right there. IndyJen has changed tires and wheels on F-16s, F-4s, her own Grumman, other light planes ... but never have I seen one that goes together like this Lockheed wheel.
It consists mainly of the big inboard portion, the outboard flange (which is a slip-fit on the inboard part), four locating/lock pins, which fit into matching half-moon grooves in the previous two parts, and a lock ring. When the bead of the tire seats, the outboard flange is jammed into place, prevented from departing the wheel at high speed by the four pins and the lock ring.
It is the darndest thing, and hardly looks up to the task, but it has worked like a champion for sixty years, so who am I to judge?

I think Gaylon and Glen are working on getting the wheel apart in this pic. After letting all the air out (not an issue with this wheel), you have to break the bead and collapse the tire (see Glen hopping up and down on it, above). Then you can tap the outboard flange down far enough to expose the lock ring, which comes out easily enough.
Then you carefully lever up the flange until it ... well, until it pops off and the lock pins go here and there. Live and learn.
We'll take the cleanup, inspection, chromating, and repainting of the wheel as read, shall we? Here's the assembly going back together.

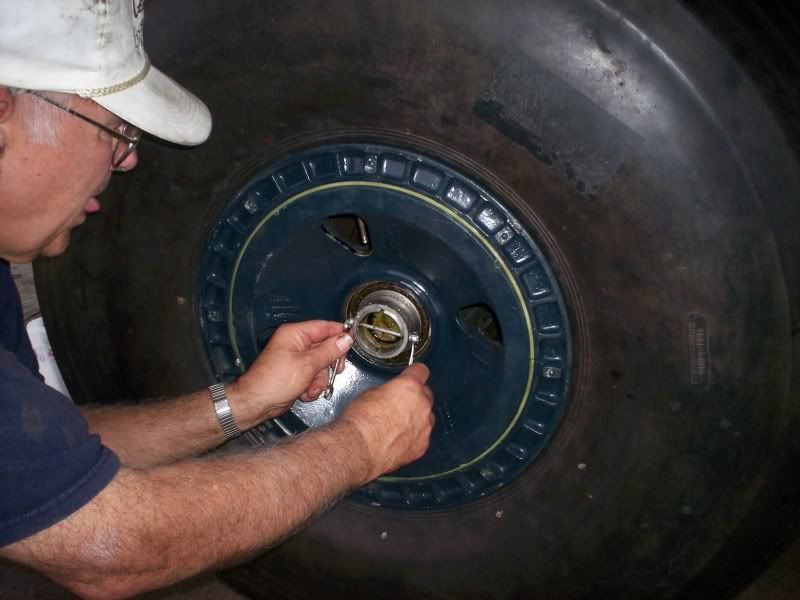
Tire talc inside the tire, tube inside the tire and inflated to de-wrinkle it. Valve stem's located at the red balance mark on the tire. Then you stand the tire up, as above, and insert the wheel.
One thing about this wheel design: without the outboard flange in place, it's not too difficult at all to get the valve stem into position and through the hole.

Now we've laid the tire down. Make sure that the valve stem is in the correct position, wheel clocked exactly so, and we can start assembling the outboard part.

Place the flange on the wheel with the lock-pin slots aligned (Glen's holding one of the pins, there) and slip the pins into place.

Press (or use a soft mallet to rap) the flange down on the wheel until the lock-ring slot is exposed, then put the ring into place. It only installs one way.

Then you can start putting air in. When the tire gets pressure enough, it'll shove the flange home. Even though you're expecting it, you may jump--it's an emphatic "bang" when it pops into position.
Air up the tire, grease the bearings, and install as usual. Get those boards out of there, remove the jack, and look at the plane, on her own feet again and looking good!
Which, unfortunately, that picture didn't come across. Seems to be corrupted in some way. So it goes.
Next weekend, as I say, we'll be putting new rubber on the other side, too, and installing those gauges. With the airshow coming up, we'll wash her and spruce her up, and then--when the circus is done--we can turn our attention back to the restoration projects we've had on hold for so long.
The turret is one: making the manual drive operational, and installing our overhauled MK18 predictor sight harness and its associated control boxes.
The radio operator compartment is another: fabricate the bulkhead, install table and control boxes.
Plenty of other work awaits, too. But it's good to look back and see how far she's come. All we need now is income, enough to turn on the insurance. It's time to see air under the mains.
Till next time,