Warbird Information Exchange

DISCLAIMER: The views expressed on this site are the responsibility of the poster and do not reflect the views of the management.
It is currently Sat May 10, 2025 2:49 am

All times are UTC - 5 hours


Classic Wings Magazine WWII Naval Aviation Research Pacific Luftwaffe Resource Center
When Hollywood Ruled The Skies - Volumes 1 through 4 by Bruce Oriss


Post new topic Reply to topic  [ 447 posts ]  Go to page Previous  1 ... 5, 6, 7, 8, 9, 10, 11 ... 30  Next
Author Message
 Post subject:
PostPosted: Mon Feb 09, 2009 7:47 pm 
Offline
3000+ Post Club
3000+ Post Club
User avatar

Joined: Fri Mar 02, 2007 6:52 pm
Posts: 3410
Location: Wichita Falls, Texas, USA
Jeff Blakey said he knew about a dozen ways of pre-oiling the engine himself. Everyone I've heard though basically just says that as long as it's not a "no-no" in the engine book, then you're probably okay. :)


Top
 Profile  
 
 Post subject:
PostPosted: Tue Feb 10, 2009 4:21 am 
Offline

Joined: Fri Nov 30, 2007 10:52 am
Posts: 13
Location: Indy, IN
To clarify my position, we used a cart that preheated the oil and pumped into the engine from somewheres back in the engine. I know, about as vague as one can be. It was a few years ago working with experienced mentors.

The prop breather nut was removed (I wished we had a hose of somesort to extend the flow of oil outward)and the oil puked on the blades as we hand propped. This was on the TBM. I know there are others who have done preoiling more than I (once) and can offer better and more accurate advice. It was a mess.

We shall clean up oil before failing to preoil that is for certain.


Top
 Profile  
 
 Post subject:
PostPosted: Tue Feb 10, 2009 6:31 pm 
Offline
User avatar

Joined: Thu Feb 28, 2008 6:46 am
Posts: 267
Location: Indianapolis, Indiana
Thanks for the clarification, J.G.

The instrument port is definitely the right place to pump the oil in. I think it was the overhaul manual that said to look for oil coming out at a rocker box. The servicing manual says to pull the main sump plug and look for oil coming out there.

I suppose we could experiment, and pull both the sump plug and the breather nut, and see if oil comes out both places at the same time. If oil flowed from the dome simultaneously with oil coming out the sump--or even better, shortly after oil started coming out the sump--I think we might start thinking we were on to something.

But we've got to be sure we're getting the result we're supposed to be getting. I totally do not want to replace any more engines.

_________________
IndyJen

------------------------------

Support "Hot Stuff"
Lockheed PV-2 Harpoon of the
American Military Heritage Foundation
http://www.amhf.org


Top
 Profile  
 
 Post subject:
PostPosted: Mon Feb 16, 2009 7:34 pm 
Offline
User avatar

Joined: Thu Feb 28, 2008 6:46 am
Posts: 267
Location: Indianapolis, Indiana
Hey WIXers,

Time for the weekly update!

Last week I kicked it off with a pseudo-riddle, and I thought about doing another one this time: What's cold, and frozen, and miserable, and ... but I've whined about the outdoor conditions in the winter in central Indiana often enough, that everyone would know that the answer is "IndyJen, and everyone out there with her." So we'll take that as read.

I'll tell you, though: when the cold winds blow, and all the work is out in the middle of them, it just makes everything more difficult, and everything takes longer. It is what it is. But it's hard for IndyJen to do too much complaining, because the crew keeps on showing up, and endures, and works, and deals with it. So I think I'd best shut the heck up, and get tough, and endure, too.

Hooking up the engine compartment was the main task today. A short-handed crew is what we had, due to people being out of town/out of the country (Scotty, Machine Shop Gaylon and Long Tall Glen), busy showing their shiny hot rods at the big hot rod show (Hot Rod Steve), and whatnot. So, we had IndyJen, P.J., and Rich No. 2 to attack the engine compartment.

Image

There's a view of the office, all uncowled except for the little panel with the air-scoop that cools the exhaust collector. That one's about to come off, because the first thing that needed doing was installing the exhaust ball joint.

Image

There's the space it goes in. The exhaust ring on the engine collects into one pipe, and it will join (via the ball joint) with the airframe-mounted pipe. The "ball joint" is a slip joint that connects the two pipes.

Image

There's Rich, tightening things down. Six AN-6 bolts are what hold things together up there. Next week, we'll build up the heat shroud around that pipe.

Once that was done, we moved down to the firewall. We intended to hook up all the lines and control cables, but it took us an unbelievably long time to get even part of them done. Like I say, in the cold, everything is more difficult. All you can do it keep plugging.

Image

There's the main oil inlet, being tightened after an endless battle to get the big B-nut installed without cross-threading. Seems like a difference in tolerance stack-up with this engine vs. the old one--a fraction of an inch's difference in where that 90-degree hard line lands, and now there's interference and impingement. I installed that line last time we went through this, and it just doinked right on there before I'd even had a cup of coffee. I thought it would never go on this time. But as you can see, it by golly did go on at last.

Image

Next thing to go on was the outlet line from the prop feathering pump, and again, that thing just insisted on cross threading itself. You can't get impatient and force it, or then you've got a real problem. Patience paid off in the end, but man. Maaan. Little things sometimes make for the worst ordeals!

Meanwhile, PJ was off working on her projects. She was painting the new cockpit floorboards, and those will be installed next weekend. They represent a huge improvement over the old ones, which I think have been in there since the plane was a Hirth sprayer. Machine Shop Gaylon fabricated them, and they are beautiful. I'll do a little spread on them next week.

She also installed her second newly overhauled bomb-bay light. She's undertaken to do all the dome lights in the airplane, and they will all presently be looking like this one:

Image

Nice, eh? One little thing at a time.

Next week, we'll hopefully finish hooking up inside the accessory compartment, and rig the engine controls as well. Those floorboards will go in, and if we have people and time enough, the seats can go back in, too.

We've fallen a little behind, but no need to panic. We still plan to be running this engine by the beginning of March.

Image

See you next time,

_________________
IndyJen

------------------------------

Support "Hot Stuff"
Lockheed PV-2 Harpoon of the
American Military Heritage Foundation
http://www.amhf.org


Top
 Profile  
 
 Post subject:
PostPosted: Sun Mar 01, 2009 11:57 am 
Offline
User avatar

Joined: Thu Feb 28, 2008 6:46 am
Posts: 267
Location: Indianapolis, Indiana
Hello WIXers,

Time for an update about what's been going on with the ol' PV-2, so here goes ...

Work continues on the annual and on the engine change. It's all necessary and important work, but we're down in the weeds of details now, so not al of the accomplishments are highly visible. Still, it's all part of getting her back in the air.

It is no longer February in Indiana, so we've got that going for us. Conditions out there on the ramp vary this time of year, but it's creeping back towards the "tolerable" side of the dial.

Since we put the engine and prop back on the plane, the shop seems pretty roomy. Most of the work is outside now, but we still have components that come up needing repair.

Image

There we see the air scoop for the oil cooler being test-fit. Messing about with it revealed three bad nutplates, so back into the shop with it. John FedEx drilled out the rivets holding them on last week near the end of the day, and Rich The Official Dad and IndyJen put on fresh ones yesterday. It'll be installed immediately before we put on the oil cooler, which we're holding off on until all the firewall work is done. Much easier to work behind the engine without that big can in the way'!

While all that was going on, Machine Shop Gaylon and PJ pressed ahead with their cockpit floorboard replacement project. The floors up there were most likely put in back when the plane was an ag sprayer, after her Navy days. Original materials would have been half-inch armor plate, and what we had was quarter-inch plywood with various stiffeners/shim strips glued on. Far too weak to deal with rudder gust-lock loads, the left side floorboard was cracked and weak in the area of the gust lock, which hasn't been usable in ages.

Gaylon and PJ have been attacking that problem for a few weeks, and they've done a good job of improving things.

What we have now are full-thickness floorboards, made up of a composite sandwich of aviation plywood and aluminum overlay. Strong as hell, but lightweight. We expect to be able us use that gust lock again, now. Here's a look at them:

Image

PJ and Rich no. 2 have them in the correct L/R orientation from their point of view, but from ours, they're backwards. That's the left-seater's floor on the right side, and there's the gust lock, installed and pinned in the stowed position.

Image

Several test-fits later, our floorboard crew has about got the fit all set.

There's PJ inside the nose bay, wedged up underneath the copilot's position, in the midst of one of those test-fit tries. She's just found a cracked support bracket, and is getting it out of there. John FedEx, who is a sheetmetal man, was mostly done fabricating its replacement by the end of the his day. Those floorboards ought to be in next weekend, and then the seats can go back in.

Meanwhile, we've pretty much completed all the engine fluid and electric hookups.

Image

There's Hot Rod Steve and Rich No. 2 working on the main fuel supply connection. They also took care of the oil tank vent-to-engine connection, which someone who shall remain nameless, 'cause she writes these reports, like a bonehead installed in the "RH engine" location instead of the correct "LH" engine location. A good many items that hang from or screw into the accessory case of the engine can go in either of two locations, depending on where the engine will be installed.

While those guys were doing that, I was up on the stand, hooking up the topside connections--starter and generator electric, main j-box ground, hydraulic pump in 'n' out, manifold, fuel, and oil pressure indicator lines, and whatnot. Everything's still finger-tight. We'll go around and inspect all connections and torque 'em properly next weekend.

After a fine lunch break at the neighborhood Mexican place, which recently opened and is both delicious and cheap, Rich the Official Dad and CAP Cadet Erin prepared the exhaust heat shroud for installation.

Image

This item is a little bit of a jigsaw puzzle, but they've got it sorted out and ready to fit. It'll be on there next weekend, too.

Right now, we're expecting next Saturday's work to close out with the plane real close to "ready for test runs" status. Apart from the things previously mentioned, we have prop, mixture and throttle to rig--and blower control, let's not forget that, and the oil cooler/oil cooler airscoop to install. We're about a week behind schedule, by my reckoning, but in good shape overall.

We did unfortunately lose our temporary hangar space in Anderson, but what can you do? We had intended our initial test flight to coincide with a ferry hop up there, but that won't be happening.

We'll be working out how to pull the stress panels from the tops of the wings--necessary for the fuel tank inspection portion of the annual--outdoors, looks like. That will no doubt make things take a little longer than planned, but it won't be a show stopper.

See you next time,

_________________
IndyJen

------------------------------

Support "Hot Stuff"
Lockheed PV-2 Harpoon of the
American Military Heritage Foundation
http://www.amhf.org


Top
 Profile  
 
 Post subject:
PostPosted: Sun Mar 01, 2009 12:17 pm 
Offline
3000+ Post Club
3000+ Post Club
User avatar

Joined: Thu Sep 28, 2006 12:56 pm
Posts: 3442
Location: North of Texas, South of Kansas
Thanks for the great update. Sorry to hear about losing the hangar space. Hopefully something will present itself in the future, but it won't make pulling the tank access panels any easier now, will it? :?

I have one observation to make, not a criticism, just a practice I picked up many years ago. You mentioned hooking up a variety of connections finger tight and that you'd go over them next weekend. I always connect whatever I am connecting and cinch it down immediately. If I know I won't be tightening it, I let the line, tube, wire harness or whatever disconnected so there is zero chance of missing it on the final installation check. Alternatively, you could mark each loose connection in some fashion (red tape etc.) to draw attention to it. Of course, writing down all the fittings that need torquing on the checklist is a good practice also. Just a random thought.......

Scott


Top
 Profile  
 
 Post subject:
PostPosted: Sun Mar 01, 2009 12:44 pm 
Offline
User avatar

Joined: Thu Feb 28, 2008 6:46 am
Posts: 267
Location: Indianapolis, Indiana
I appreciate that Scott, and there's nothing wrong in what you say, and I agree with the thrust of your point.

But I left them all finger-tight for the same reason you cite, and wasn't clear on why I did so. So here's my reasoning:

It was late in the day before I was able to get up there and connect all those items, and the other maintenance chiefs were gone before I'd hardly begun. Nothing happens on our plane that isn't QA'd by a maintenance chief, and we don't QA our own work--"QA" always means "a second pair of eyes." What will happen is, next weekend I'll go around with Glen or Gaylon, with the firewall diagram in our hands, and we'll verify and torque each individual electrical and fluid connection, each in turn, and check it off as we go. This QA's both location and torque for each item.

If I (or anybody else, for that matter) torqued 'em down, how will the torque be verified? Putting a torque wrench on there and pulling till it clicks only tells you that the connection is at least that tight; doesn't prove that it's not over-torqued.

So anyhow, that's the reasoning. Just trying to idiot-proof the process as much as possible. Flagging items for attention later is something we do, actually, and writing it down on the checklist would also be a good method. But, it makes more sense to do this when you've got an anomaly to deal with. Since we're going to go over every single connection in any case, I didn't see the point--what's the substantive difference between having everything flagged, and nothing flagged? A hundred percent is still a hundred percent.

Anyhow, thanks for the thoughtful comment.

_________________
IndyJen

------------------------------

Support "Hot Stuff"
Lockheed PV-2 Harpoon of the
American Military Heritage Foundation
http://www.amhf.org


Top
 Profile  
 
 Post subject:
PostPosted: Sun Mar 01, 2009 12:58 pm 
Offline
3000+ Post Club
3000+ Post Club
User avatar

Joined: Thu Sep 28, 2006 12:56 pm
Posts: 3442
Location: North of Texas, South of Kansas
I LOVE to hear people tell of their quality assurance program and inspectors. That is the best extra pair of eyes that any big (or small, for that matter) project can have. I've worked around people in the past that were absolutely scared or indignant when an inspector had to buy off what they were doing, and I never could figure out why they wouldn't want an extra brain working with them on safety-of-flight items. Sounds like you folks have a great program going! Sorry if I was out of line with my comment, but this conversation may be a good thought starter for others out there in maintenance-land.

Looking forward to your next update,
Scott


Top
 Profile  
 
 Post subject:
PostPosted: Sun Mar 01, 2009 1:05 pm 
Offline
User avatar

Joined: Thu Feb 28, 2008 6:46 am
Posts: 267
Location: Indianapolis, Indiana
Quote:
Sorry if I was out of line with my comment,


Not at all! Sorry if I left any impression that I'd taken it amiss.

_________________
IndyJen

------------------------------

Support "Hot Stuff"
Lockheed PV-2 Harpoon of the
American Military Heritage Foundation
http://www.amhf.org


Top
 Profile  
 
 Post subject:
PostPosted: Sun Mar 08, 2009 8:44 pm 
Offline
User avatar

Joined: Thu Feb 28, 2008 6:46 am
Posts: 267
Location: Indianapolis, Indiana
Hello WIXers,

Another week gone by, another couple maintenance days out at the MQJ ramp. Time for another Hot Stuff update ...

Saturday was the first morning I've noticed waking up to the singing of the birdies, so Spring is on its way here in central Indiana. We're going to be spending a lot of time chasing those birdies out of the nooks and crannies of Hot Stuff, however--you know how they can be.

So, on to the report. First things first was wrapping up last week's projects. First thing for me was to get the firewall connections properly torqued and checked. All that stuff will be gone over at least a couple times more by other eyes before we're running.

Image

Also wrapping up his project from earlier in the week was Rich No. 1, who's been installing the heat box around the exhaust. It's all stainless steel, like the main heat shield, and consists of three main pieces plus several little brackets. None of it is ever very willing to line up properly, and takes lots of coaxing.

This is the second time Rich no 1 (the Official Dad) has allowed himself to get roped into this job. Next time we have to do this, he hopes maybe we'll let someone else have the pleasure!

Image

Meanwhile, up in the cockpit, there's John FedEx, working on the copilot's side floorboard bracketry. We found one cracked bracket, and then another, and then yet another. FedEx is taking care of the whole business, but it's just one thing after another. While he was in there, we had a visit from some FedEx representatives. John's a flight-line mechanic with their Indianapolis Hub in real life, and he was able to get their management to donate the shipping of that engine when it came back to us from Idaho. The bosses were pleased to see the progress, and we were pleased to see them, you bet.

Image

We finally got the oil-cooler airscoop, with its endless series of bad nutplates, repaired and ready to install, so that became the next job. First thing required was to open up the cowl flaps, which the picture above shows. That's Electrical Guru Roy's homemade cowl flap test set/driver in action, there.

With the flaps open, the air scoop could start going in. About eighty percent of it is not really all that difficult, but there are a couple impossible-to-reach bolts that take as long as the whole rest of the job.

Then came lunch break at the current favorite restaurant: El Nopal, a local Mexican eatery that opened a few months ago.

Image

The only downside to having this be our lunch hangout is that, since we still have airplane work awaiting us, we can't have any of those Margaritas. It's a cross we have to bear.

Image

Back from lunch, we set about mounting the oil cooler. There's a bolted flange on the exit side, and hoses connecting the cooler valve to the engine and the oil tank. First order of business is to get it temporarily mounted, so we can figure out the clocking. The two Riches are holding it it place, I believe while I am running to get the strap and two bolts that will secure it.

Image

Now that it's in there, we rotate the can until the hose flanges mate up properly. That's done in short order, and then we secure it.

It's in there now, and next week we'll install the air-gap seal, and that will be done. Engine and prop control rigging is about all we have left to do in the nacelle, now, so that's a long job nearly done.

Last thing for the day was putting on the new cockpit/turret covers. Our old ones were getting pretty shabby, and Electrical Guru Roy took it upon himself to fix them up. He has a brother-in-law in the boat cover business, and he was able to make us up a new and improved set in about 48 hours. They still need a little tailoring, but they're already a big change for the better.

Image

Nice, eh? We're looking into engine covers as well, if we can swing it.

Till nex time,

_________________
IndyJen

------------------------------

Support "Hot Stuff"
Lockheed PV-2 Harpoon of the
American Military Heritage Foundation
http://www.amhf.org


Top
 Profile  
 
 Post subject:
PostPosted: Sun Mar 15, 2009 6:07 pm 
Offline
User avatar

Joined: Thu Feb 28, 2008 6:46 am
Posts: 267
Location: Indianapolis, Indiana
Hello again, WIXers,

IndyJen here with the more or less weekly report from the MQJ maintenance ramp. Conditions here are nothing to complain about; the reenactment of Aleutians Aircraft Maintenance is apparently done, and we actually had a fine springlike day to wrap up the engine change project.

Which, to tell the truth, that engine change is not quite wrapped up. Hot Stuff always wishes to challenge her keepers right to the end of any given project, and will never let you be done. This project is as full of surprises now as ever.

One such surprise came in the course of rigging the engine controls, at the end of the day. Here's what I came upon:

Image

That's the throttle pulley, one of four control pulleys that cause the engine to do what needs to be done: prop, mixture, throttle, and blower controls. They all are set up in the same general way: a loop of cable around the pulley, ending in turnbuckle terminals, with a pinch-bolt setup in the middle of the pulley to lock things down after rigging.

Broken strands under that pinch bolt, which you can see. A full strand broken altogether, and that's a reject for certain. Both are left-hand swaged terminals, which are on order. We'll make that up and finish the rigging for Saturday's inspection. I'll do up a photo essay on making up swaged cables while we're at it.

As long as I'm talking about cable rigging, here's what goes on up there at the top of the nacelle:

Image

IndyJen is a gadgeteer, as you know, and this is one of my favorite gadgets in Hot Stuff's tool collection. Not only does it keep the turnbuckle terminals stable while you easily adjust the tension, but it is a cute a tool as you please, a fine ingenious thing.

Control cables of all kinds need continuous inspection, and especially whenever they're being handled like this. The pinch bolt is a known wear point, so you have to loosen that pinch bolt and pull the cable out of there to see how it's taking being pinched.

Wednesday's work team will be fabricating the line for the feathering pump inlet, and we will most likely be making up the throttle pulley cable Saturday. George, our long-time volunteer AI, and who is also a restorer of amazingly gorgeous Wacos, is coming for final inspection of the engine install.

The morning was mostly all about the oil cooler, which went together with its usual balky quirks. The many bits of rubber padding are typically troublesome, but we did have some luck using a few dabs of Parker Fuel Lube to stick 'em in place.

Image

The aft cooler mount has the rubber stuck in there. It's waiting for the cooler itself, which we had OH'd by Pacific Oil Coolers.

Image

There it is, looking good. Pacific always give you back a nice looking oil cooler. Temp-fitting it last week told us how it needed to be clocked. Then there's just the suspension to be padded, and you--all at once, --persuade the mount castings to be where they're supposed to be, and get the can up in there, and get all the fiddly bits fiddled into place all at the same time, and attach the suspension straps--and [i]their[*i] balky rubber bits--attached.

It is easier than it sounds. You just use the three arms god gave you and hold your mouth just right.

Image

The two Riches were our battlin' oil cooler men. There's Rich no. 2 there putting in flange bolts. About ten AN-3's, they mount the can to the exit duct.

Image

And there's Rich no. 1, putting 'em in on the other side.

We'll come back to the oil cooler install. Meanwhile, Hot Rod Steve and PJ were in the cockpit, installing the last cover plates under the pilot's seat.

Image

There goes Steve with a floorboard, which I'm not sure but looks like the co-pilot's floor to me, so perhaps this was a test fit.

Image

It's awkward, working up in the cockpit. Sometimes you just have to be willing to stand on your head. PJ's a good one for getting into awkward places, though.

Image

Now that the weather has begun to ease up, our friends the birdies have returned, and that will be a constant battle until Summer. PJ pulled out about half a bale of straw from the the right nacelle later in the day. Yesterday was a good day for opening things up.

Image

Kerosene for degreasing, per the book, and soap and water for de-bird-pooping. There'll soon be a Harpoon wash party, with the temps rising.

Image

There's pretty much the finished installation of the oil cooler. The lower duct was a heat exchanger duct, back when the plane had hot leading edges and cabin heat, which hasn't been the case for decades.

Image

There's Machine Shop Gaylon, going around QA'ing the firewall connections, the oil cooler, and everything in the vicinity. And there's me, apparently climbing back down for yet another rigging tool.

The Wednesday work crew has projects finishing up, so there'll soon be more, but that's about it for this one.

See you next time,

_________________
IndyJen

------------------------------

Support "Hot Stuff"
Lockheed PV-2 Harpoon of the
American Military Heritage Foundation
http://www.amhf.org


Top
 Profile  
 
 Post subject:
PostPosted: Sun Mar 15, 2009 9:16 pm 
Offline
1000+ Posts!
1000+ Posts!

Joined: Sun Apr 08, 2007 1:38 am
Posts: 1425
Location: LONE JACK Mo.
Thanks for the up-date, as usual, first rate.....By the way..make sure you keep your reciept on the O.H.'d oil cooler.....


Top
 Profile  
 
 Post subject:
PostPosted: Sun Mar 22, 2009 7:07 pm 
Offline
User avatar

Joined: Thu Feb 28, 2008 6:46 am
Posts: 267
Location: Indianapolis, Indiana
Hello WIXers,

We're running late with the weekly Hot Stuff report, but it is what it is. And what it is a glorious spring weekend in central Indiana.

A small Saturday workgroup is what we had, and Wednesday's crew was chased off the ramp by a barrange of thunderstorms. Overall, we've got most of the remaining details wrapped up, but we were presented with some technical difficulties that we're going to have to work out.

The prop feathering pump inlet line is still not fabricated. The less said about that debacle, the better. Sometimes you get dirty and sweaty, and the line is still not in your hands, you know?

The throttle pulley cable is another technical difficulty. First thing IndyJen did last week, on discovering the bad cable, was to drag out (with Gaylon's help) the high-dollar (and fairly heavy) pneumatic swaging tool from the back shelves.

Image

There it is, with the swaging dies appropriate to the no. 3 terminals that finish this cable.

Set the machine up according to its book. This is the first time we've had this gadget off the shelf in six years.

So--you connect the foot pedal, and the 90 psi air source, and put the two dies into their keyways in the cylinder. Then you insert the cable into the terminal--put a little kink in the cable as it goes in, to help it stay in there--and carefully place the assembly into the die.

Image

Slip your protective cover into place, and get PJ to give you the countown--the book calls for 15 seconds duration on the swage to fully seat the terminal.

Hit it, and the dies come together, and hold that position for the requisite interval. Three, two, one, and release the pressure, and there you are, ladies and gentlemen ... not one tiny bit of usable swage. I could've swaged the terminal better with my teeth. Gum would stick the cable in there better.

A couple more tries, and re-check the instructions to make sure we're not missing something, and nope. Same result. No doubt about it--this thing just puts the "non" in "non-airworthy."

Ach, the swearing, and the abbreviated troubleshooting. We seem to have an air leak past the piston.

So, only three people out there at that point (Scotty showed up shortly after, to make it four), and we need to accomplish something, and this machine isn't going to help us accomplish anything today. We left the problem for Wednesday, when it's probably going to storm and keep people indoors anyhow, and moved our attention out to the plane.

Image

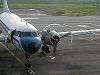
Finishing the engine plumbing were Rich1 and Scotty. They had the oil tank vent-to-engine line to connect, and after that, the return line from the air/oil separator to the engine accessory case needed to be fitted. They located the necessary materials, fit 'em up, and those items are checked off now.

Down below, the last adjustments to the oil cooler mounting were done Wednesday afternoon, before the storms drove the people to button her up and get off the ramp. Still remaining was one pair of mount-cap screws.

Image

None of these items are particularly easy--they're buried in there, hard (or practically impossible) to see. There you see the finished product. It takes a little while to get the wire started at that inboard screw. This particular corner of the mount--forward inboard--is the worst of the four, because of the plumbing that's in your way.

Image

Inside the shop was Roy the electrical guru, improving our tug. It has more electrical problems than it has electrical functions, but Roy has been correcting things as we go. Yesterday it was the headlights. Now that we're on daylight savings time, we may not see the dark for some while yet, but when we do, we'll be able to see where we're going.

Image

Up in the cockpit, PJ was installing the last cover under the left-seat area. You see it above, being finally assembled after painting in the shop. With that item in place ouboard of the seat position, we could put the seat in at last.

Image

The seat's not terribly difficult, but it's a two-person job. Dual rollers in four positions lock the seat to the rails, and a lift spring makes it adjustable in height. That lift spring is the thing--it's a heavy one, and it fits over a hook in the bulkhead behind the pilot. It helps a lot, when getting those spool-rollers installed, if you can stretch that spring a bit, and that's what makes it a two-person job.

Image

The cylinder head temperature probe is a bimetal sparkplug gasket type. It's another item that's simple, but it takes some time and finagling to get it where it goes.

Image

There's Scotty and IndyJen, having snaked the lead through the securing zip-tie loop (installed loosely to a rear-row pushrod tube, back when the engine was in the shop sans exhaust--this is a lesson learned the hard way), between the cylinders, and up to the spark-plug position (aft cylinder 18). It's odd to me, that it's to an aft plug of a _forward_ cylinder that we're installing this item, but that is exactly what the book calls for and no mistake.

Anyhow, we get it up there, and connect the leads, and then insulate them fully with heat-shrink tubing.

Then we can install the final plug at last, and we're good to go.

Image

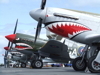
There we see our new cowl plugs, provided courtesy of PJ. We're taking up a collection, because she was a bit blind-sided on the price. But thanks to PJ, Roy, and the boat-cover-making brother in law of Roy, we have nice new cockpit and turret covers, and these plugs, which all look great. Those plugs will help keep the damnable birdies out of there, and there are yet more plugs coming.

And that, I think, is the news for this time. George the inspector couldn't make it this weekend, so we will have him look things over most likely next Saturday. All that's left if for John FedEx's floor bracket replacement project to be complete, and we'll have the copilot side of the cockpit done and ready.

And then it will be time for engine running!

I'm looking forward to it. I believe we will have a cookout on the day we run. According to my photobucket file, we've been at this project for 18 weeks, and we will be ready to have a fine celebration. And there'll be a full description right here of all that occurs when we do.

Till next time,

_________________
IndyJen

------------------------------

Support "Hot Stuff"
Lockheed PV-2 Harpoon of the
American Military Heritage Foundation
http://www.amhf.org


Top
 Profile  
 
 Post subject:
PostPosted: Mon Mar 23, 2009 1:49 am 
Offline
Long Time Member
Long Time Member
User avatar

Joined: Tue May 11, 2004 5:42 pm
Posts: 6884
Location: The Goldfields, Victoria, Australia
Great stuff.

I really appreciate the insight into how it really goes - the big shiny tool din't work stuff...

_________________
James K

"Switch on the underwater landing lights"
Emilio Largo, Thunderball.

www.VintageAeroWriter.com


Top
 Profile  
 
 Post subject:
PostPosted: Mon Mar 23, 2009 11:20 am 
Offline
3000+ Post Club
3000+ Post Club
User avatar

Joined: Thu May 18, 2006 3:08 pm
Posts: 4542
Location: chicago
Lookin' good!

_________________
.
.
Sure, Charles Lindbergh flew the plane... but Tom Rutledge built the engine!

Visit Django Studios online or Facebook!


Top
 Profile  
 
Display posts from previous:  Sort by  
Post new topic Reply to topic  [ 447 posts ]  Go to page Previous  1 ... 5, 6, 7, 8, 9, 10, 11 ... 30  Next

All times are UTC - 5 hours


Who is online

Users browsing this forum: No registered users and 261 guests


You cannot post new topics in this forum
You cannot reply to topics in this forum
You cannot edit your posts in this forum
You cannot delete your posts in this forum
You cannot post attachments in this forum

Search for:
Jump to:  
Powered by phpBB® Forum Software © phpBB Group