Warbird Information Exchange

DISCLAIMER: The views expressed on this site are the responsibility of the poster and do not reflect the views of the management.
It is currently Fri Jun 06, 2025 3:43 pm

All times are UTC - 5 hours


Classic Wings Magazine WWII Naval Aviation Research Pacific Luftwaffe Resource Center
When Hollywood Ruled The Skies - Volumes 1 through 4 by Bruce Oriss


Post new topic Reply to topic  [ 40 posts ]  Go to page 1, 2, 3  Next
Author Message
PostPosted: Mon Feb 28, 2011 3:41 am 
Offline
1000+ Posts!
1000+ Posts!
User avatar

Joined: Sun Nov 15, 2009 12:57 pm
Posts: 1263
Location: Lacombe, Alberta, Canada
Gentlemen (and Jeff) :D

I'm re-skinning an all metal set of elevator trim tabs for my project Stearman (early ones were metal, later ones wood) but I've hit a bit of a snag: how to buck the rivets in the tab that run down the leading edge. I have several bent and battered tabs and the ones that appear to be original are all riveted with a mixture of regular, old, 1/8 and 3/32 AN455 Brazier head AD rivets (1/8 where the hinges attach, 3/32 where they don't). I just know that some little old gray haired Wichita sheet metal wizard who long ago went to his reward had a way to do this that was simple and fast, but I'm stuck. Anybody got any ideas? I know there's a lot of talent and experience here on the WIX board so I'm throwing this out there. See the pics below.

Image

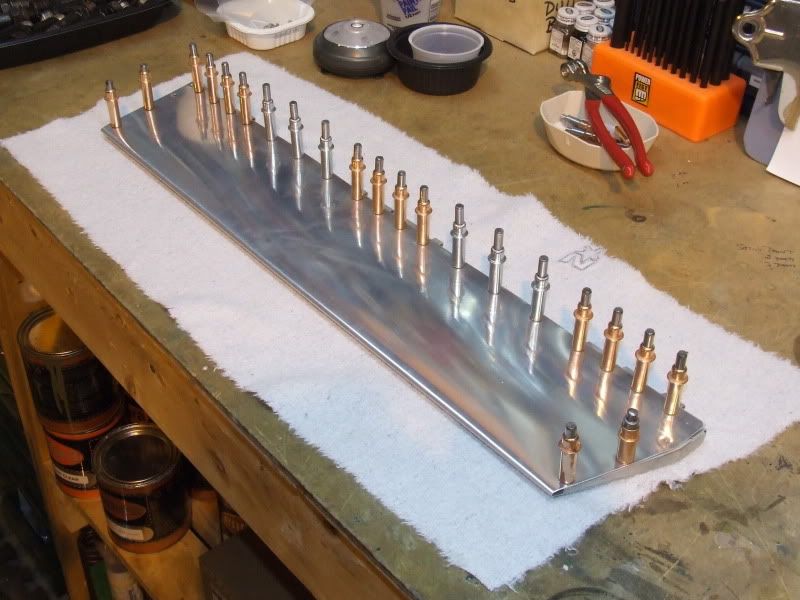
This is the new left hand tab going together, top view. I've stuck a few extra clecos in it so you can see where the sizes change (not that that matters a whole lot). The solid end pieces go in last after the leading edge is buttoned up.

Image

Bottom of new tab - note how the rivets won't penetrate both skins on the leading edge.

Image

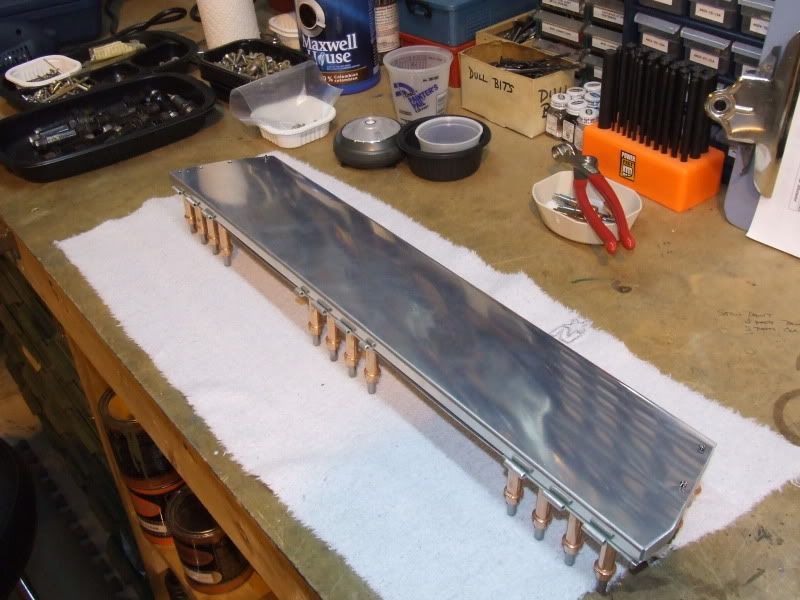
Looking down the inside of the tab.

Image

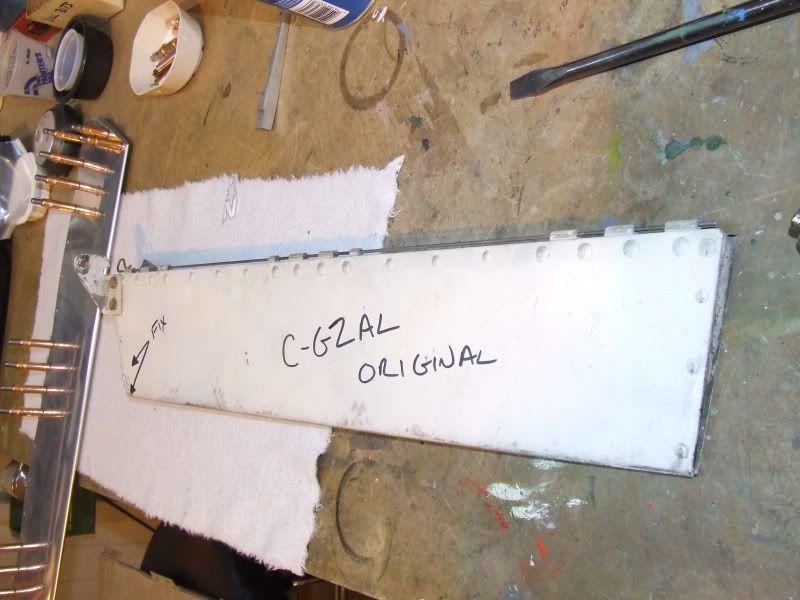
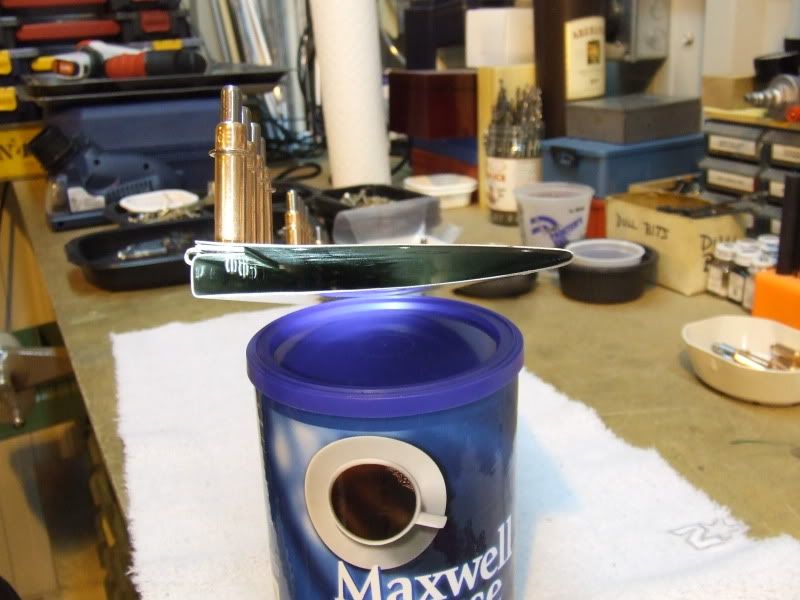
An original tab with standard AN 455 Brazier head AD rivets.

Image

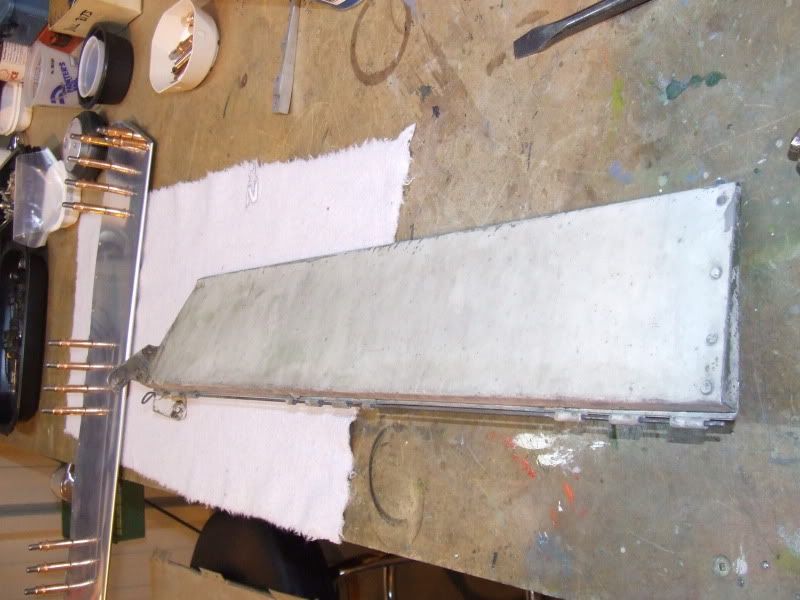
Bottom view of the original tab.

If anyone has got any ideas I'd sure appreciate hearing from you. I know the answer has to be simple - Boeing made thousands of these things - but I'm stumped. My one caveat is that it has to be done the way that it was done originally, so no Cherries or pop rivets allowed! A squeezer would work great, but I'm not aware of one long enough or skinny enough to fit. If anyone is just lurking and doesn't want to post their advice please just email me at warbirds@shaw.ca

thanks,
Dan

_________________
Defending Stearmans on WIX since Jeff started badmouthing them back in 2005.


Last edited by Dan Jones on Tue Mar 01, 2011 2:08 am, edited 3 times in total.

Top
 Profile  
 
PostPosted: Mon Feb 28, 2011 8:14 am 
Offline
1000+ Posts!
1000+ Posts!
User avatar

Joined: Wed Aug 18, 2010 12:51 pm
Posts: 1185
Location: Chandler, AZ
Just speculating here.
I'm guessing a long custom made bucking bar for the leading edge. As you said they made bunches of them, spending a couple of hours making a custom tool would save a lot of time in a long production run.
Could it be that the rivets that hold the end plates on are 'self bucked'? - extra long rivets that are upset against the skin in the opposite surface? I've seen that on Schweitzer gliders where the a skin panel is riveted to a steel tube that only has a hole on one side - the rivet was extra long and bucked itself against the inside of the tube. It wasn't structural and it worked.

Wartime production and modern 'best practices' may not jive sometimes. My project has window sash locks as canopy latches (original factory) but that would draw odd looks now.

_________________
Lest Hero-worship raise it's head and cloud our vision, remember that World War II was fought and won by the same sort of twenty-something punks we wouldn't let our daughters date.


Top
 Profile  
 
PostPosted: Mon Feb 28, 2011 9:42 am 
Offline
1000+ Posts!
1000+ Posts!
User avatar

Joined: Mon Jun 14, 2004 8:41 pm
Posts: 1467
Location: North Texas
Dan: They probably just used a long flat bar that would reach all the way through the tab. Thickness would be just a little less than space left between the correct rivet length ( unbucked ) and the opposite skin. Also, they were probably shot alternating from the center line out. I would also suspect that they used either soft or icebox rivets too.


Top
 Profile  
 
PostPosted: Mon Feb 28, 2011 11:26 am 
Offline
1000+ Posts!
1000+ Posts!
User avatar

Joined: Sun Nov 15, 2009 12:57 pm
Posts: 1263
Location: Lacombe, Alberta, Canada
They definitely used AD rivets, neither soft nor icebox. The rivets that attach the end fittings pass through both skins so that's just a normal job and they go on last - no problems there. My idea is to use a square steel tube or solid bar (1/2" is too big so I'm off to town today to find something smaller) that has short slots milled in one face to accept the cleco tips and is long enough to pass right through so it can be supported on both ends. The hole spacing varies slightly so the relief holes will have to be slotted to allow for that and square tube that small might be more rigid than solid stock. I think it'll have to be re-cleco'd (is that a word?) every time you move the bar but maybe not. If that doesn't work it's "back to the drawing board". So far this even has the SRA bulletin board stumped, but the answer has to be simple. I have this feeling in the back of my mind though that the bucking tool might end up having to be made from a piece of cast iron to get rid of any flex or sag. :rolleyes:

Shrike - next time you see a Stearman go look at the baggage door lock. You'd swear it came right off a 1930's suitcase (and probably did!) but that was also original equipment. I'd like to see a picture of your canopy locks.

_________________
Defending Stearmans on WIX since Jeff started badmouthing them back in 2005.


Top
 Profile  
 
PostPosted: Mon Feb 28, 2011 1:04 pm 
Offline
Long Time Member
Long Time Member

Joined: Sat Dec 22, 2007 12:36 am
Posts: 7961
Location: Mt. Vernon, WA.
I'd speculate that the original factory method probably involved a long fixture that pretty much filed the inner space of the tab so the assembler would slide the part on, it may have even had a 'step' or relief to accommodate the flange and run the depth of the tab so that the assembler could do the riveting as quickly as possible with a minimum of futzing around locating the part sort of like a shoe repair shops nailing steel last. If you look @ some of the pictures from the GRUMMAN 'sticky' thread you'll see that tasks were broken down and simplified and usually one step operations to speed production. The original factory bucking tool might have even used one CLECO on each end and one or two in the middle using holes drilled in the fixture to clamp the part to the bucking bar and locate the part, and it might even have had a groove cut into the surface so the tails had someplace to 'work' while being shot by a former dress clerk or housewife.

_________________
Don't make me go get my flying monkeys-


Top
 Profile  
 
PostPosted: Mon Feb 28, 2011 1:14 pm 
Offline
1000+ Posts!
1000+ Posts!
User avatar

Joined: Sun Nov 15, 2009 12:57 pm
Posts: 1263
Location: Lacombe, Alberta, Canada
The Inspector wrote:
The original factory bucking tool might have even used one CLECO on each end and one or two in the middle using holes drilled in the fixture to clamp the part to the bucking bar and locate the part, and it might even have had a groove cut into the surface so the tails had someplace to 'work' while being shot by a former dress clerk or housewife.


I think you just cut my machining work in half! :D Thanks - I'll let you know how I make out. I'm off to brave the snow.

_________________
Defending Stearmans on WIX since Jeff started badmouthing them back in 2005.


Top
 Profile  
 
PostPosted: Mon Feb 28, 2011 3:31 pm 
Offline
Long Time Member
Long Time Member

Joined: Sat Dec 22, 2007 12:36 am
Posts: 7961
Location: Mt. Vernon, WA.
Dan,
If you're low on snow, I've got the sloppy, slushy remains of 16 inches of 'Winters bliss' laying around here I'd be glad to send to you FOB. :lol: :lol: :wink:

_________________
Don't make me go get my flying monkeys-


Top
 Profile  
 
PostPosted: Mon Feb 28, 2011 7:21 pm 
Offline

Joined: Mon Jun 16, 2008 9:29 pm
Posts: 56
Location: Breckenridge,Tx
Dan,
It looks like fun. I would put a rivet of the correct length and measure how thick of strap would fit in tab. I would then weld a tab to strap about 3/4" wide and 2" long. I would then radius corners and cover with tape backside of strap. The L shaped bar would only have to be half the length of tab plus a section to clamp in vise. Shoot rivets from center to edge then reverse bar and shoot other side. With the bar being L shaped you will only have to remove clecos in area that you are shooting. Good luck.

Randy Tait


Top
 Profile  
 
PostPosted: Mon Feb 28, 2011 9:15 pm 
Offline
Long Time Member
Long Time Member

Joined: Sat Dec 22, 2007 12:36 am
Posts: 7961
Location: Mt. Vernon, WA.
lusc10,
Good thinking! I'd consider 'stitching', install about every 4th rivet in a back and forth pattern so the part doesn't curl or grow while riveting, kind of like tacking with a MIG welder

_________________
Don't make me go get my flying monkeys-


Top
 Profile  
 
PostPosted: Mon Feb 28, 2011 10:53 pm 
Offline

Joined: Thu Oct 28, 2004 10:28 am
Posts: 354
Location: Sunny Arizona
Dan, this is a very similar question to the one I had, which is how were T-6 control surface ribs riveted to the tubular spar. Same technique, I suspect. I think you may run into a problem with the bar flexing if you use only 1/2 length - because the bar is going to be thin. You may be better off making a full size bar with a couple of inches on each size, which you can then support on steel blocks. I'll be interested in how you make out, too. Your piece looks great so far - very nice and precise.

_________________
Rob C

Historically, the claim of consensus has been the first refuge of scoundrels; it is a way to avoid debate by claiming that the matter is already settled. “

– Michael Crichton


Top
 Profile  
 
PostPosted: Mon Feb 28, 2011 11:00 pm 
Offline
2000+ Post Club
2000+ Post Club
User avatar

Joined: Thu May 10, 2007 6:08 pm
Posts: 2595
Location: Mississippi
JB Weld that sucker! :P

_________________
"I knew the jig was up when I saw the P-51D-20-NA Mustang blue-nosed bastards from Bodney, and by the way the blue was more of a royal blue than an indigo and the inner landing gear interiors were NOT green, over Berlin."


Top
 Profile  
 
PostPosted: Tue Mar 01, 2011 12:56 am 
Offline
Been here a long time

Joined: Sun May 02, 2004 1:16 am
Posts: 11324
I'll bet they riveted a hollow tube, then put it in a press to form it down to the proper shape over a mandrel. I'm guessing the trailing edge was formed last.


Top
 Profile  
 
PostPosted: Tue Mar 01, 2011 1:03 am 
Offline
1000+ Posts!
1000+ Posts!
User avatar

Joined: Sun Nov 15, 2009 12:57 pm
Posts: 1263
Location: Lacombe, Alberta, Canada
Hi Guys,

Thanks for all the advice. Between what Scott PM'd me and the Inspector and CV said this morning, a light bulb came on and I found a piece of steel that I think is going to do it. I'll post some pics when I get it happening but today wandering through the hardware store I found a half inch square, steel "L" shaped extrusion about three feet long and nice and stiff (ladies, insert snicker here!) Half inch is too big vertically but will fit inside the tab horizontally, so tomorrow I'm going to run it through the milling machine and make it 1/2" x 1/4". The hole to hole distance varies along the length of the tab due to the rivet size changing from 3/32 to 1/8 and back again, but if I mill a set of slots about 3/16" wide x 1/4" long that will accept two 1/8", two 3/32", or an 1/8" and a 3/32" cleco with a gap between the two slots big enough to buck the rivet about to be driven, I should be able to polish that area up to make a suitable tool. And if I do that in three places, the middle and halfway out to either end from the middle, and then insert it through the tab that will be held closed by exterior clamps, I should be able to position that tab somewhere on that bar for each rivet. You should be able to drive whichever rivet you desire by just straddling the hole with the two clecos like you normally do except that you're only ever going to have two clecos in the tab. Each end of the extrusion will be clamped in a vice which will be hanging onto the vertical web (one end I'll leave 1/2" for a better bite). Then you hold the tab in position with one hand and run the gun with the other. The two ends, which rivet normally right through both skins, will go on last after the tool is removed from the tab.

That's the PLAN, but we'll see what actually happens tomorrow. Knowing Murphy will turn up sooner or later I bought two pieces of steel! :D

_________________
Defending Stearmans on WIX since Jeff started badmouthing them back in 2005.


Last edited by Dan Jones on Tue Mar 01, 2011 10:48 am, edited 12 times in total.

Top
 Profile  
 
PostPosted: Tue Mar 01, 2011 1:05 am 
Offline
1000+ Posts!
1000+ Posts!
User avatar

Joined: Sun Nov 15, 2009 12:57 pm
Posts: 1263
Location: Lacombe, Alberta, Canada
bdk wrote:
I'll bet they riveted a hollow tube, then put it in a press to form it down to the proper shape over a mandrel. I'm guessing the trailing edge was formed last.


Drove the rivets first and then gave up the clearance when they formed the tab? Interesting idea, but one h--- of a pile of work!

_________________
Defending Stearmans on WIX since Jeff started badmouthing them back in 2005.


Top
 Profile  
 
PostPosted: Tue Mar 01, 2011 1:19 am 
Offline
3000+ Post Club
3000+ Post Club
User avatar

Joined: Thu Sep 28, 2006 12:56 pm
Posts: 3442
Location: North of Texas, South of Kansas
Keep us posted!

Scott


Top
 Profile  
 
Display posts from previous:  Sort by  
Post new topic Reply to topic  [ 40 posts ]  Go to page 1, 2, 3  Next

All times are UTC - 5 hours


Who is online

Users browsing this forum: No registered users and 9 guests


You cannot post new topics in this forum
You cannot reply to topics in this forum
You cannot edit your posts in this forum
You cannot delete your posts in this forum
You cannot post attachments in this forum

Search for:
Jump to:  
Powered by phpBB® Forum Software © phpBB Group