Fri Oct 26, 2007 11:41 am
Ooooookay. I reckon it's time to start back with the photo updates on the ol' B-24, huh? Well, I'm gonna just ease back into this with a short one that describes the removal of the #3 engine, followed by the installation of an overhauled unit. Now, I've never done an engine change on this ol' pig before, so y'all follow through with me as I tackle this project for the first time. 
The first thing I did was to run the engine up yesterday and wash it off. I figured there was simply no need to get any dirtier than necessary, particularly since we're not in a huge rush (I have just under two weeks to get this done)...but don't think that there won't be some oily messes and ruined clothes in this process. This morning, I ran the engine up one more time, just to warm the oil up a bit. This is cheating a little, since the warm oil tends to drain faster than cold oil and I just didn't feel like working around draining oil all day.
Once we got the airplane reshuffled back into the hangar, I dragged an empty drum over to the airplane and got ready to start draining the oil. The first step was to open up the two lower cowl panels that give access to the oil tank and system drains. These first few shots are difficult to see exactly what's going on, since some knucklehead painted them all black recently. Basically, these are simply held on with dzus fasteners (pronounced "zoose" by us Southern boys). A quick quarter turn to the left, and the dzus fasteners are released. These particular panels are hinged on one side and simply swing down. I opted to remove the forward panel, so that it wouldn't be a "head knocker" and so that it wouldn't be a contributing factor to making a mess when the oil is drained. It was removed by pulling the hinge pin out, followed by setting the panel aside for reinstallation later........


Next, I cut the safety wire from the "Y" drain, followed by taking the drain plug out. This drain is sometimes known as the "system" drain, as it is (in theory) one of the low spots for oil to collect from the oil tank to the engine. So oil drained from here will come not only from the tank, but from a portion of the engine as well (essentially the inlet side only). But be ready when taking the drain plug out, as there is a fair amount of head pressure on that oil that'll be coming out of there. Yep, it's gonna be messy.....


Now, one thing I do when I take any drain plug out is look at it closely before setting it aside and/or cleaning it. Even though we already know we're replacing this engine, it would be nice to know if there are any big chunks of metal in the system. And since this is a low spot in the system, there is a chance that you could find some nasty surprises here. Fortunately, this one looks fine.......

The next drain plug to remove is the oil tank drain. This one is directly under the oil tank and will simply drain any oil captured in the lower reservoir that isn't drained from the "Y" drain. This one has an internal hex (allen) plug in it and was rather tight. I had to use a little cheater bar to break it loose, but other than that, it was no problem. You also need to look at the bottom of this plug for any unwanted sediment or particles. I also try to look at the first bit of oil that comes out of these low points, as it may carry big chunks out with it. Again, everything looked fine here.....


And while the oil was draining from both drains, I cleaned up my mess. It never fails that I miss the doggone oil funnel when the first bit of oil comes out. ..........

So, that's all I have for now. I'm going to remove the prop next, just so it's out of the way. It needs to come off at some point, so there's no since in having to work around it. I've shown y'all the removal and installation of these props before, but if y'all want, I'll go ahead and go through that process again for y'all later.
Gary
The first thing I did was to run the engine up yesterday and wash it off. I figured there was simply no need to get any dirtier than necessary, particularly since we're not in a huge rush (I have just under two weeks to get this done)...but don't think that there won't be some oily messes and ruined clothes in this process.
Once we got the airplane reshuffled back into the hangar, I dragged an empty drum over to the airplane and got ready to start draining the oil. The first step was to open up the two lower cowl panels that give access to the oil tank and system drains. These first few shots are difficult to see exactly what's going on, since some knucklehead painted them all black recently.
Next, I cut the safety wire from the "Y" drain, followed by taking the drain plug out. This drain is sometimes known as the "system" drain, as it is (in theory) one of the low spots for oil to collect from the oil tank to the engine. So oil drained from here will come not only from the tank, but from a portion of the engine as well (essentially the inlet side only). But be ready when taking the drain plug out, as there is a fair amount of head pressure on that oil that'll be coming out of there. Yep, it's gonna be messy.....
Now, one thing I do when I take any drain plug out is look at it closely before setting it aside and/or cleaning it. Even though we already know we're replacing this engine, it would be nice to know if there are any big chunks of metal in the system. And since this is a low spot in the system, there is a chance that you could find some nasty surprises here. Fortunately, this one looks fine.......
The next drain plug to remove is the oil tank drain. This one is directly under the oil tank and will simply drain any oil captured in the lower reservoir that isn't drained from the "Y" drain. This one has an internal hex (allen) plug in it and was rather tight. I had to use a little cheater bar to break it loose, but other than that, it was no problem. You also need to look at the bottom of this plug for any unwanted sediment or particles. I also try to look at the first bit of oil that comes out of these low points, as it may carry big chunks out with it. Again, everything looked fine here.....
And while the oil was draining from both drains, I cleaned up my mess. It never fails that I miss the doggone oil funnel when the first bit of oil comes out.
So, that's all I have for now. I'm going to remove the prop next, just so it's out of the way. It needs to come off at some point, so there's no since in having to work around it. I've shown y'all the removal and installation of these props before, but if y'all want, I'll go ahead and go through that process again for y'all later.
Gary
Last edited by retroaviation on Fri Oct 26, 2007 12:59 pm, edited 1 time in total.
Fri Oct 26, 2007 11:53 am
Woot!
B-24 Update!
Love it!
Thanks Gary!
B-24 Update!
Love it!
Thanks Gary!
Fri Oct 26, 2007 12:24 pm
hooray my daily fix is back thanks gazza
Fri Oct 26, 2007 3:10 pm
Well, I was going to post the prop removal pictures today, but my Photobucket account is excruciatingly slow today and I just don't have the patience to wait on it to upload the pictures. Maybe I'll get it done tomorrow.
Gary
Gary
Fri Oct 26, 2007 6:41 pm
retroaviation wrote:-
Here's a closer shot of the tail. Now do you see it?
It's interesting that I haven't heard it mentioned one time this year that someone "saw Kilroy" when making photo passes and such. I wanted it to blend in, but I thought it would've been more noticable than it actually is. I reckon that's why it's camoflauged though.
On another note, when I painted Kilroy on there, I added the fingers to make sure folks got the idea of what I was doing. However, I've never really liked them, as they look out of place to me. They may just disappear this winter. What do y'all think?
Gary

I saw this at an Airport this week and thought of you Gary, not that I’m implying I think of you a lot or anything but it was pretty funny to see Kilroy on another Tail somewhere in the country. Seems to fit Ol’ 927 a bit better IMO
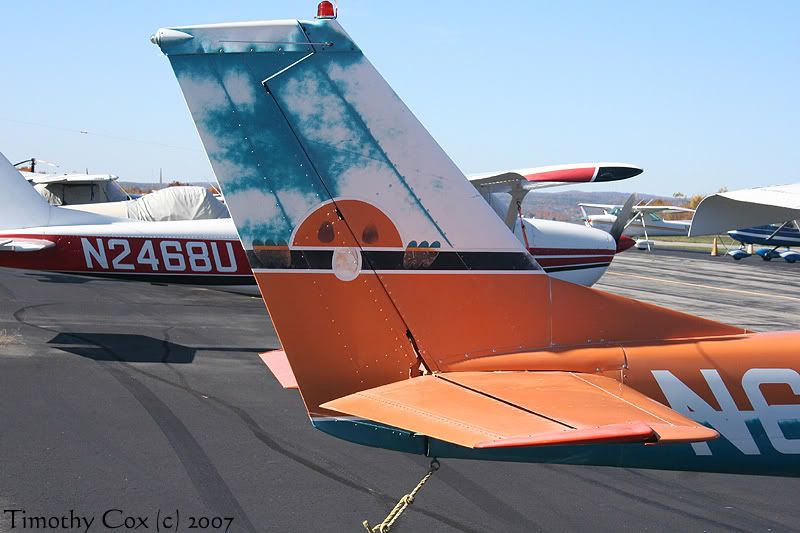
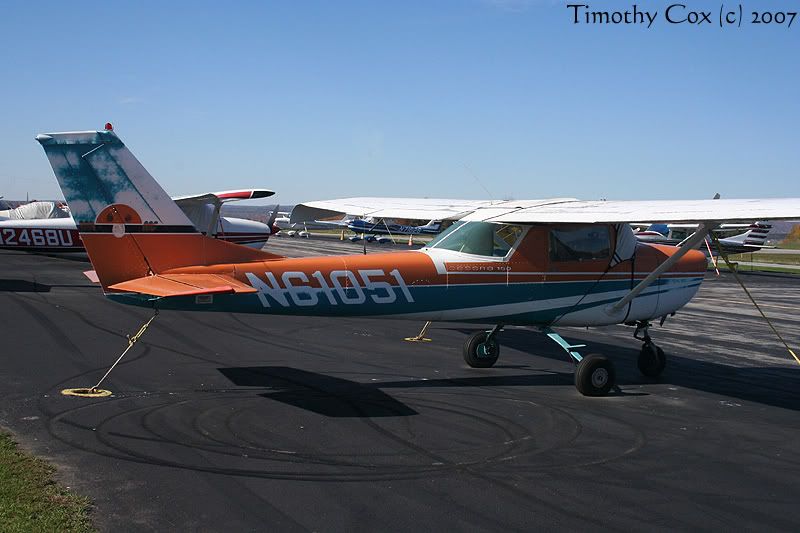
Tim
Sat Oct 27, 2007 9:25 am
Okay, time to remove the prop on the #3 engine. The most difficult thing about this whole project was to find all of our stinkin' tools here in the hangar to complete the task at hand.  Boy, I've really got to get organized around here.
Anyway, step one is to remove the dome cap retaining clip, followed by the removal of the dome cap itself. Be sure to have a bucket, drum, or whatever underneath the prop, as it's likely going to dump a little oil (however, on conventional gear [taildragger] aircraft, the oil will typically be at the rear of the dome and won't make quite the mess at this point). I try to spoon out the majority of oil at this level, so that it's not constantly dripping. Then I put on the dome handle to make it easier to remove and whatnot.....


The next step is to cut the safety wire from the dome nut lock, followed by the removal of the lock itself. As you can see, this is a special little screw, so it's important not to lose it......


Next, you just slide the dome nut wrench over the dome (duct tape on the inside of the wrench helps assure that you won't scratch the dome during it's use). Then, while putting pressure on one side of the wrench, you give it a good whack on the other side with a fairly heavy hammer. After it's broken loose, it should simply unscrew with ease. It's a good idea to hang on to the dome when getting close to the end of the threads while unscrewing, however, there are some dowel pins that are typically long enough to hold the dome in place. But I still always get nervous about dropping the dome, so it's just good practice to be careful here.........


And then I carefully ease the dome forward, while keeping it on it's dowel pins. You don't want the dome to rest on the distributor shaft inside. I will typically allow some time to let the majority of oil drain before removing the dome completely......

When removing the dome, be mindful that it's heavy! This one weighs between 40 and 50 pounds (depending on how much oil is left in it), and the dome on a real propeller, like on the B-29, is in the neighborhood of 80-90 pounds! Don't allow it to drop down on the distributor shaft as it slides off of it's dowel pins. And be aware that it's going to be an oily mess (stinkin' Hamilton Standard props
  ) when lowering from the airplane. I always try to set it down in a bucket, or in this case, the oil drum funnel. This allows it to completely drain while you are working on other things. Also, there will likely be at least one or more brass shims beneath the dome. Make sure that you retain those shims, as it is crucial that they go back under the dome upon reassembly. These are put in place by the prop shop when they set up the backlash on the gears of the dome and prop blades. The shim stayed with the dome upon removal this time.........

The now exposed "guts" of the propeller are going to continue to drip oil now. What I typically do to get this process overwith quickly, is to spoon out as much oil as I can. I know a lot of the "old timers" roll their eyes at me when they see me worrying so much about making a mess...and perhaps if I were in more of a hurry, I'd not be so concerned about it. However, in this case I'm just taking my time and it's much nicer to work in a "not-so-oily" environment.........


Once you've gotten the majority of oil drippage stopped, you can go ahead and remove the distributor shaft (also known as the "stalk") and retaining nut lock. If you don't take this locking ring/pin out before trying to remove the distributor shaft, you'll start tearing the locking teeth out of it. It's not unusual to see a stalk come out with some broken or missing locking teeth. The removal of this lock is simple. Just slip a hook (or small screwdriver) under the ring and pry it out of it's groove. The rest of it will just pull right out with ease.........


Once the lock is out, you can put the special wrench on the distributor shaft and give it a little whack with the hammer. This too, should break loose fairly easily and should then unscrew quite simply by hand. If it doesn't...you've forgotten to remove the lock! There will be a copper gasket beneath the stalk. It's a good idea to go ahead and remove it at this time as well.......


And just as I mentioned before, this stalk has had one of it's locking teeth displaced from a previous attempt to remove it with the lock still installed. This isn't anything to be too concerned about, as long as this damaged tooth isn't used when locking the stalk back in place during reassembly.........

Okay, so now that everything else is out of the way, it's time to loosen the prop retaining nut. This is what actually holds the prop to the engine. It too, is a fairly simple process, but requires two people (minimum). First, you place the retaining nut tool over the nut. Then you find someone who's not doing anything (Mark is always a good source for that around here ). The first thing your helper can do is to place a ladder under the lowest prop blade, to hold it in place while breaking the nut loose. It's obviously important to place a rag, or other form of padding between the blade and the ladder..........


Next, you get your helper to hand you one end of the prop bar. Place it in the tool and have your helper put pressure on it on the other end. While he's got a pretty substantial amount of force on the bar, you can give your end of it a good whack or two with the hammer. It should break loose eventually.....


Now, initially broken loose, the retaining nut will be quite easy to turn for about a rotation or so. However, once the backlash tightens up against the prop, it'll take a bit of force to "pop" the prop loose from the cone it rests on. Once the prop breaks loose from the engine, you should be able to run the retaining nut the remainder of the way loose with placing a pry bar or similar through the retaining nut tool. You can also watch the back of the prop to see that it is indeed getting further away from the engine.........


And finally, once you have the retaining nut completely loose, just sling up the upper blades to the forklift and ease the prop off the airplane. Once it was sitting on the floor, I decided to go ahead and put the dome back on temporarily, just to keep the guts of the prop covered up. Nothing to it............


I'm removing the engine cowling and other odds and ends next, so stay tuned...
Gary
Anyway, step one is to remove the dome cap retaining clip, followed by the removal of the dome cap itself. Be sure to have a bucket, drum, or whatever underneath the prop, as it's likely going to dump a little oil (however, on conventional gear [taildragger] aircraft, the oil will typically be at the rear of the dome and won't make quite the mess at this point). I try to spoon out the majority of oil at this level, so that it's not constantly dripping. Then I put on the dome handle to make it easier to remove and whatnot.....
The next step is to cut the safety wire from the dome nut lock, followed by the removal of the lock itself. As you can see, this is a special little screw, so it's important not to lose it......
Next, you just slide the dome nut wrench over the dome (duct tape on the inside of the wrench helps assure that you won't scratch the dome during it's use). Then, while putting pressure on one side of the wrench, you give it a good whack on the other side with a fairly heavy hammer. After it's broken loose, it should simply unscrew with ease. It's a good idea to hang on to the dome when getting close to the end of the threads while unscrewing, however, there are some dowel pins that are typically long enough to hold the dome in place. But I still always get nervous about dropping the dome, so it's just good practice to be careful here.........
And then I carefully ease the dome forward, while keeping it on it's dowel pins. You don't want the dome to rest on the distributor shaft inside. I will typically allow some time to let the majority of oil drain before removing the dome completely......
When removing the dome, be mindful that it's heavy! This one weighs between 40 and 50 pounds (depending on how much oil is left in it), and the dome on a real propeller, like on the B-29, is in the neighborhood of 80-90 pounds!
The now exposed "guts" of the propeller are going to continue to drip oil now. What I typically do to get this process overwith quickly, is to spoon out as much oil as I can. I know a lot of the "old timers" roll their eyes at me when they see me worrying so much about making a mess...and perhaps if I were in more of a hurry, I'd not be so concerned about it. However, in this case I'm just taking my time and it's much nicer to work in a "not-so-oily" environment.........
Once you've gotten the majority of oil drippage stopped, you can go ahead and remove the distributor shaft (also known as the "stalk") and retaining nut lock. If you don't take this locking ring/pin out before trying to remove the distributor shaft, you'll start tearing the locking teeth out of it. It's not unusual to see a stalk come out with some broken or missing locking teeth. The removal of this lock is simple. Just slip a hook (or small screwdriver) under the ring and pry it out of it's groove. The rest of it will just pull right out with ease.........
Once the lock is out, you can put the special wrench on the distributor shaft and give it a little whack with the hammer. This too, should break loose fairly easily and should then unscrew quite simply by hand. If it doesn't...you've forgotten to remove the lock! There will be a copper gasket beneath the stalk. It's a good idea to go ahead and remove it at this time as well.......
And just as I mentioned before, this stalk has had one of it's locking teeth displaced from a previous attempt to remove it with the lock still installed. This isn't anything to be too concerned about, as long as this damaged tooth isn't used when locking the stalk back in place during reassembly.........
Okay, so now that everything else is out of the way, it's time to loosen the prop retaining nut. This is what actually holds the prop to the engine. It too, is a fairly simple process, but requires two people (minimum). First, you place the retaining nut tool over the nut. Then you find someone who's not doing anything (Mark is always a good source for that around here
Next, you get your helper to hand you one end of the prop bar. Place it in the tool and have your helper put pressure on it on the other end. While he's got a pretty substantial amount of force on the bar, you can give your end of it a good whack or two with the hammer. It should break loose eventually.....
Now, initially broken loose, the retaining nut will be quite easy to turn for about a rotation or so. However, once the backlash tightens up against the prop, it'll take a bit of force to "pop" the prop loose from the cone it rests on. Once the prop breaks loose from the engine, you should be able to run the retaining nut the remainder of the way loose with placing a pry bar or similar through the retaining nut tool. You can also watch the back of the prop to see that it is indeed getting further away from the engine.........
And finally, once you have the retaining nut completely loose, just sling up the upper blades to the forklift and ease the prop off the airplane. Once it was sitting on the floor, I decided to go ahead and put the dome back on temporarily, just to keep the guts of the prop covered up. Nothing to it.
I'm removing the engine cowling and other odds and ends next, so stay tuned...
Gary
Sat Oct 27, 2007 9:52 am
Gary ~ great to have you back on this thread again showing us what's happening 
Sat Oct 27, 2007 2:42 pm
Happy one year Anniversary Gary and thanks.
Phil
and thanks.
Phil
Sat Oct 27, 2007 2:45 pm
phil65 wrote:Happy one year Anniversary Gary
Phil
Thanks Phil. I hadn't even thought about that, but today has been one year since bomberflight asked me the question that started this whole thread. Boy, y'all sure created a monster in me, huh?
Gary
Sat Oct 27, 2007 3:02 pm
Well, back to the engine removal process...
The next item to be removed is the wrap-around engine cowling and nosebowl assembly. The wrap-arounds on this airplane (same as a PBY Catalina) are quite simple. You just unsnap the three lower dzuses and swing the lower door down. This exposes two turnbuckle type devices that hold the two halves of the cowling together. All you need to do is to loosen each of them up (I typically loosen them as far as they go in order to make it easier for reassembly), and pop the end out of the lower portion of the cowling. The two halves will then seperate and hang there by their upper hinges.....


Then you just knock the upper hinge pins out and remove the cowl sections. No real rocket science here...........


Once the two halves are removed, just remove the screws from the upper, center piece of cowling (which is also a portion of the induction trunk for the carburetor), and remove it as well.......


Now to move on to the nosebowl. The first thing that needs to be done here is to put a cable block on the prop governor cables. There is a pulley bracket for these cables that is attached to the nosebowl that will need to be removed and if the cables are not held in place further down the line, there is the potential that one of them can "jump" a pulley. I installed this cable block right at a pulley bracket at the firewall.......

Here's the bracket on the inside of the nosebowl that had to be removed.......


Then it was just a feature of removing the bolts that hold the nosebowl attach brackets to each cylinder. Once that was done, the nosebowl simply lifted right off the front of the engine.........


So that's all for this update. I'm working on removing the cowl flap ring now, which is truly one of my least favorite things to mess with on this airplane. But more on that later.
Gary
The next item to be removed is the wrap-around engine cowling and nosebowl assembly. The wrap-arounds on this airplane (same as a PBY Catalina) are quite simple. You just unsnap the three lower dzuses and swing the lower door down. This exposes two turnbuckle type devices that hold the two halves of the cowling together. All you need to do is to loosen each of them up (I typically loosen them as far as they go in order to make it easier for reassembly), and pop the end out of the lower portion of the cowling. The two halves will then seperate and hang there by their upper hinges.....
Then you just knock the upper hinge pins out and remove the cowl sections. No real rocket science here...........
Once the two halves are removed, just remove the screws from the upper, center piece of cowling (which is also a portion of the induction trunk for the carburetor), and remove it as well.......
Now to move on to the nosebowl. The first thing that needs to be done here is to put a cable block on the prop governor cables. There is a pulley bracket for these cables that is attached to the nosebowl that will need to be removed and if the cables are not held in place further down the line, there is the potential that one of them can "jump" a pulley. I installed this cable block right at a pulley bracket at the firewall.......
Here's the bracket on the inside of the nosebowl that had to be removed.......
Then it was just a feature of removing the bolts that hold the nosebowl attach brackets to each cylinder. Once that was done, the nosebowl simply lifted right off the front of the engine.........
So that's all for this update. I'm working on removing the cowl flap ring now, which is truly one of my least favorite things to mess with on this airplane. But more on that later.
Gary
Sat Oct 27, 2007 4:04 pm
And where is Col. Skeeter during all this? I thought for sure he'd be lurking around somewhere, supervising the entire process!
#3 Engine Change
Sat Oct 27, 2007 7:08 pm
Gary, good luck with the engine change and look forward to seeing you in Vegas.
That's what I said Wixers! We are headed to Aviation Nation, Nellis AFB. Las vegas, Nevada. Nov. 10th and 11th.
This show is the Capstone event of the year for the 60th anniversary of the Air Force. It is also the finale performance of the year for the Thunderbirds back at there home base, Nellis AFB. The Heritage flights will be, historic! Check out there web site. If you can get there, we would love to see you.
Dave
Sun Oct 28, 2007 6:20 am
Well, I promised myself that I wasn't going to work the crazy hours on the B-24 that I worked last winter, but that promise didn't last too long. As usual, I couldn't sleep, so I was here at work around 2:30 or 3:00 this morning to continue work on the engine removal process. It's fairly dark inside the hangar when the sun isn't up, so I have to use "auxiliary lighting" to help me get the job done. I wasn't exactly "bright eyed and bushy tailed," so the little LED lights on the sides of the safety glasses work well and help brighten up areas inside the darker confines of the engine compartment...in case any of y'all mechanics out there were wondering about them...............

Step one this morning was to get some of the upper items removed from the cowl flap ring. This includes the top cowl flap and a couple of pieces of the induction trunk/cowling.........

Then it was time to tackle removing the cowl flap ring itself. Frankly, I don't care for the cowl flap setup on this airplane at all. It's sloppy and clunky on a good day...and ours are worn out. We replaced a few of the bolts and special hardware on some of the cowl flaps last winter, but they could really use a good "going over" on all four engines. That is likely going to be one of the projects for this winter. Anyway, since the cowl flap ring is in two halves (upper and lower), I needed to separate the two halves from one another before I could remove anything. The first thing to come off were two of these funky little pins that connect one flap to another.........


Next I needed to take one of the bolts out for where one of the cowl flaps from the upper section connects to the bottom section. This requires a ground down wrench to squeeze in between the cowl flap and it's attach bracket. It's really a quite unique and odd design..........


One thing I try to do while working on anything is to always keep my eyes open for any other problems that may have popped up. In this case, just forward of the cowl flap junk I was messing with, I noticed that one of the exhaust studs had fallen out of one of the cylinders. Not a huge deal at this point, since this engine is coming off anyway, but I mention it just to note how important it is to keep a watchful eye out for this type of thing.........

Now, I must admit, as I got all caught up in the moment of taking these cowl flap rings off, I forgot to take pictures of the bolts and bracketry that holds them to the cylinders. And frankly, they were so freakin' dirty and nasty that had I tried to even pick up my camera, I would've likely ruined it with the oil and grease that had accumulated from my fingertips to my armpits. But nonetheless, here's the upper section after removal.......

And the lower section..........

And that's it for now. With the cowl flap rings now removed, it sure helps with access to the back of the power section of the engine.........

I'll try to have another update for y'all soon. Oh, and Mosquito has been hanging around, but he got quite ill this summer and lost a ton of weight and energy. He's on the rebound, but doesn't come out to inspect my work as much right now. I'm sure he'll see the camera out soon though and want to get in the picture.
Gary
Step one this morning was to get some of the upper items removed from the cowl flap ring. This includes the top cowl flap and a couple of pieces of the induction trunk/cowling.........
Then it was time to tackle removing the cowl flap ring itself. Frankly, I don't care for the cowl flap setup on this airplane at all. It's sloppy and clunky on a good day...and ours are worn out. We replaced a few of the bolts and special hardware on some of the cowl flaps last winter, but they could really use a good "going over" on all four engines. That is likely going to be one of the projects for this winter. Anyway, since the cowl flap ring is in two halves (upper and lower), I needed to separate the two halves from one another before I could remove anything. The first thing to come off were two of these funky little pins that connect one flap to another.........
Next I needed to take one of the bolts out for where one of the cowl flaps from the upper section connects to the bottom section. This requires a ground down wrench to squeeze in between the cowl flap and it's attach bracket. It's really a quite unique and odd design..........
One thing I try to do while working on anything is to always keep my eyes open for any other problems that may have popped up. In this case, just forward of the cowl flap junk I was messing with, I noticed that one of the exhaust studs had fallen out of one of the cylinders. Not a huge deal at this point, since this engine is coming off anyway, but I mention it just to note how important it is to keep a watchful eye out for this type of thing.........
Now, I must admit, as I got all caught up in the moment of taking these cowl flap rings off, I forgot to take pictures of the bolts and bracketry that holds them to the cylinders. And frankly, they were so freakin' dirty and nasty that had I tried to even pick up my camera, I would've likely ruined it with the oil and grease that had accumulated from my fingertips to my armpits.
And the lower section..........
And that's it for now. With the cowl flap rings now removed, it sure helps with access to the back of the power section of the engine.........
I'll try to have another update for y'all soon. Oh, and Mosquito has been hanging around, but he got quite ill this summer and lost a ton of weight and energy. He's on the rebound, but doesn't come out to inspect my work as much right now. I'm sure he'll see the camera out soon though and want to get in the picture.
Gary
Tue Oct 30, 2007 3:49 pm
So there I was 1,500 Feet over Galveston Bay.
Water so polluted you could walk on it...
Beautiful Airplane Gary and EVERYONE who worked on it!!!
Water so polluted you could walk on it...
Beautiful Airplane Gary and EVERYONE who worked on it!!!
Tue Oct 30, 2007 4:30 pm
Thanks Spanner.
Just got the #3 engine off of the airplane and it's sittin' on the floor for now. The new engine should be here tomorrow and then we'll start getting it ready for installation.
Gary
Just got the #3 engine off of the airplane and it's sittin' on the floor for now. The new engine should be here tomorrow and then we'll start getting it ready for installation.
Gary