Please help
Thu Sep 23, 2010 6:54 pm
With rubber powered models, im new to the hobby (im only 14) experimenting with tissue paper isnt cutting it. So i need something lighter ive heard of microfilm but no info on how to make it. Also any websites with free plans for balsa rubber powered planes? Thanks
Re: Please help
Thu Sep 23, 2010 10:06 pm
Ultra light indoor fliers use lacquer thats sprayed onto a large pan of water and the flying surface is rolled across the surface to create the wing skin-
Re: Please help
Sat Sep 25, 2010 10:40 pm
Here is a great web site for all things related to free flight scale models.
http://www.ffscale.co.uk/
http://www.ffscale.co.uk/
Re: Please help
Sun Sep 26, 2010 4:52 pm
Head on over to Smallflyingarts.com and ask on the 'covering techniques' board. That forum is a great and friendly stick and tissue community.
BTW, what are you building? Guillow's 500 series warbird?
-Tim
BTW, what are you building? Guillow's 500 series warbird?
-Tim
Re: Please help
Sun Sep 26, 2010 6:01 pm
You know what? My last reply was lazy, plain and simple. I never meant to just give you a brush-off but that's the way it reads and I'm going to make things right. Here goes...
It's pretty cool to hear of someone new trying stick and tissue. There aren't nearly enough people doing that, especially when you can buy an all-foam electric RC warbird for cheap, take it to the park for an afternoon, smash it to smithereens and repeat as necessary. I don't find that kind of instant gratification to be very gratifying at all.
If you're new to free flight, I can guarantee microfilm isn't for you. I've been at it for a while now and that stuff still scares the hell out of me. You've probably heard it's light, really light, but the trouble is it's actually too light. You see, while it's basically clear it has a very slight hue to it, like a bubble. The hue is used to measure the thickness and believe it or not, microfilm is thinner than the wavelength of light which is what gives it a bit of colour in the first place. Because it's so thin, it is also extremely fragile. Like, the air movement from breathing on this stuff will wreck it. Microfilm basically has no place on scale models of any sort, leave it for the record-setting indoor stuff.
Now that the negative part is over and done with, let's talk about tissue covering. Tissue can be... interesting, but once you have a handle on it the stuff isn't so bad. The very best tissue for model airplanes is called Esaki; it has one shiny side, one dull side and has long fibres all arranged parallel to each other to form a grain and most importantly it behaves itself when wet, which is a real asset when applying it. This isn't to say that dollar store or other tissue won't work, it's just a little harder to deal with.
You may have tried some or all of this already, but bear with me and I'll try to walk you through the easiest way to cover a balsa frame with tissue. The first thing you want to do is build all of the sub-assemblies of the model (wings, fuselage, tail) but don't attach them to each other just yet, cover them first! Give all of the sub-assemblies a light sanding with about 220 grit sandpaper to get rid of any raised bits that seem to show up at glue joints and make sure to round-over all of your leading and trailing edges. Tissue doesn't like going around pointy stuff.
Let's cover the tail surfaces first, they're probably flat and easy to work with. Find the grain of your tissue. Tear a corner in one direction, then tear it the other way. Whichever tear is straighter is parallel to the grain of the tissue. You always want the grain running long ways on a part. Cut a piece of tissue about an inch bigger than your horizontal stabilizer around all the edges, this will give you some extra to work with. Got get a glue stick (you know, the ones like UHU), newer ones are better, and apply it all around the edges of the surface you'll be covering as well as the centre rib. Make sure you apply enough, but you don't want to see gobs of it on your structure. Have a toothpick handy to pick off any little gobs that show up. Once you're all glued up, lay the stabilizer carefully glue side down onto the piece of tissue you cut earlier. If any wrinkles somehow crept in during this process, carefully pull them out by pulling on the edges of the tissue. You just want the covering tight enough to be wrinkle-free at this point. Press down the tissue wherever there was glue to make sure it's good and stuck.
Now trim the tissue to leave about 3/32"- 1/8" around all the edges. Anywhere the edge of your stabilizer isn't straight you'll need to put a relief cut in the tissue perpendicular to the stab's outline. If you just have a pointed corner (think P-51 tail) you can just put relief cuts at the very corners but if the outline is curved (like a Spitfire's tail) you'll need a relief cut every 1/4" or so. Run your glue stick around the edge of the surface now and start working down the tissue that's left sticking out. Sometimes it will take some working to get rid of little folds and wrinkles but for the most part you'll never see them anyways, plus the alcohol present in the glue stick will soften the tissue fibres and make them cooperate.
There, now one side of your horizontal stabilizer is covered, repeat the process for the other side then do the whole works again for your fin/rudder and the underside of your wings.
For the top surface of the wings, you basically do the same thing but you'll likely need to do the job with a couple pieces of tissue. Remember that tissue paper can only handle a curve in one direction so you'll need to cover as far as a dihedral joint, for example, then use another piece. If you're covering a Hurricane wing, for example, do the centre section first, then the main wing panels, then the rounded tips.
By the time you've come this far you should have a decent feel for working with tissue and an idea of how to cover the fuselage. The places to join different pieces of tissue will vary from plane to plane but if you're building a Guillow's kit they usually show you somewhere on the plans. For anything else, just let me know what you're building and I'd be happy to suggest things.
So now assuming everything's covered, you can shrink the tissue and seal it. Take a scrap piece of tissue and get it wet. If the colour on it runs or if it turns to mush like wet toilet paper you'll need to be careful when shrinking. The careful way to do things is to hold each part in turn over a steaming kettle or to set it on a shelf or something in the bathroom when you're taking a hot shower. When tissue gets wet the fibres move apart and it goes all slack, but as it dries it becomes tighter than before. The tougher tissues out there can be sprayed with water from a spray bottle like an old Windex bottle or something. While the tissue is all loose and baggy, pin down the parts to a flat surface to hold them straight while the tissue shrinks. If you have any scrap balsa left over, have bits of it supporting the part just off the flat surface so air can circulate all around the part.
Once all is dry, get some Krylon Cristal Clear spray (it's a clear coat in the spray paint aisle) and spray it on to seal. Remember, less is more here. Too much and it will be heavy and brittle. Again, put it somewhere well ventilated to dry.
Now you can put all the parts together and go flying!
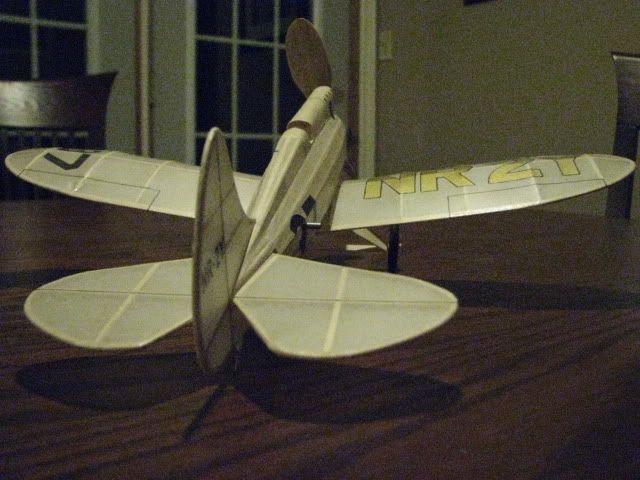
This is my latest effort, the covering was done using exactly the process described above, plus I added markings I cut from tissue before I sealed it with Krylon. Panel lines and stuff were done carefully with one of the thinner-inked ballpoint pens (a Sanford Uni-Ball, I think).
Any questions, just ask!
-Tim
It's pretty cool to hear of someone new trying stick and tissue. There aren't nearly enough people doing that, especially when you can buy an all-foam electric RC warbird for cheap, take it to the park for an afternoon, smash it to smithereens and repeat as necessary. I don't find that kind of instant gratification to be very gratifying at all.
If you're new to free flight, I can guarantee microfilm isn't for you. I've been at it for a while now and that stuff still scares the hell out of me. You've probably heard it's light, really light, but the trouble is it's actually too light. You see, while it's basically clear it has a very slight hue to it, like a bubble. The hue is used to measure the thickness and believe it or not, microfilm is thinner than the wavelength of light which is what gives it a bit of colour in the first place. Because it's so thin, it is also extremely fragile. Like, the air movement from breathing on this stuff will wreck it. Microfilm basically has no place on scale models of any sort, leave it for the record-setting indoor stuff.
Now that the negative part is over and done with, let's talk about tissue covering. Tissue can be... interesting, but once you have a handle on it the stuff isn't so bad. The very best tissue for model airplanes is called Esaki; it has one shiny side, one dull side and has long fibres all arranged parallel to each other to form a grain and most importantly it behaves itself when wet, which is a real asset when applying it. This isn't to say that dollar store or other tissue won't work, it's just a little harder to deal with.
You may have tried some or all of this already, but bear with me and I'll try to walk you through the easiest way to cover a balsa frame with tissue. The first thing you want to do is build all of the sub-assemblies of the model (wings, fuselage, tail) but don't attach them to each other just yet, cover them first! Give all of the sub-assemblies a light sanding with about 220 grit sandpaper to get rid of any raised bits that seem to show up at glue joints and make sure to round-over all of your leading and trailing edges. Tissue doesn't like going around pointy stuff.
Let's cover the tail surfaces first, they're probably flat and easy to work with. Find the grain of your tissue. Tear a corner in one direction, then tear it the other way. Whichever tear is straighter is parallel to the grain of the tissue. You always want the grain running long ways on a part. Cut a piece of tissue about an inch bigger than your horizontal stabilizer around all the edges, this will give you some extra to work with. Got get a glue stick (you know, the ones like UHU), newer ones are better, and apply it all around the edges of the surface you'll be covering as well as the centre rib. Make sure you apply enough, but you don't want to see gobs of it on your structure. Have a toothpick handy to pick off any little gobs that show up. Once you're all glued up, lay the stabilizer carefully glue side down onto the piece of tissue you cut earlier. If any wrinkles somehow crept in during this process, carefully pull them out by pulling on the edges of the tissue. You just want the covering tight enough to be wrinkle-free at this point. Press down the tissue wherever there was glue to make sure it's good and stuck.
Now trim the tissue to leave about 3/32"- 1/8" around all the edges. Anywhere the edge of your stabilizer isn't straight you'll need to put a relief cut in the tissue perpendicular to the stab's outline. If you just have a pointed corner (think P-51 tail) you can just put relief cuts at the very corners but if the outline is curved (like a Spitfire's tail) you'll need a relief cut every 1/4" or so. Run your glue stick around the edge of the surface now and start working down the tissue that's left sticking out. Sometimes it will take some working to get rid of little folds and wrinkles but for the most part you'll never see them anyways, plus the alcohol present in the glue stick will soften the tissue fibres and make them cooperate.
There, now one side of your horizontal stabilizer is covered, repeat the process for the other side then do the whole works again for your fin/rudder and the underside of your wings.
For the top surface of the wings, you basically do the same thing but you'll likely need to do the job with a couple pieces of tissue. Remember that tissue paper can only handle a curve in one direction so you'll need to cover as far as a dihedral joint, for example, then use another piece. If you're covering a Hurricane wing, for example, do the centre section first, then the main wing panels, then the rounded tips.
By the time you've come this far you should have a decent feel for working with tissue and an idea of how to cover the fuselage. The places to join different pieces of tissue will vary from plane to plane but if you're building a Guillow's kit they usually show you somewhere on the plans. For anything else, just let me know what you're building and I'd be happy to suggest things.
So now assuming everything's covered, you can shrink the tissue and seal it. Take a scrap piece of tissue and get it wet. If the colour on it runs or if it turns to mush like wet toilet paper you'll need to be careful when shrinking. The careful way to do things is to hold each part in turn over a steaming kettle or to set it on a shelf or something in the bathroom when you're taking a hot shower. When tissue gets wet the fibres move apart and it goes all slack, but as it dries it becomes tighter than before. The tougher tissues out there can be sprayed with water from a spray bottle like an old Windex bottle or something. While the tissue is all loose and baggy, pin down the parts to a flat surface to hold them straight while the tissue shrinks. If you have any scrap balsa left over, have bits of it supporting the part just off the flat surface so air can circulate all around the part.
Once all is dry, get some Krylon Cristal Clear spray (it's a clear coat in the spray paint aisle) and spray it on to seal. Remember, less is more here. Too much and it will be heavy and brittle. Again, put it somewhere well ventilated to dry.
Now you can put all the parts together and go flying!
This is my latest effort, the covering was done using exactly the process described above, plus I added markings I cut from tissue before I sealed it with Krylon. Panel lines and stuff were done carefully with one of the thinner-inked ballpoint pens (a Sanford Uni-Ball, I think).
Any questions, just ask!
-Tim
Re: Please help
Mon Sep 27, 2010 8:56 pm
Thanks for that Tiger Tim 
Re: Please help
Mon Sep 27, 2010 10:54 pm
As for free plans online, this should get you started
Old magazine plans from the 30's and early 40's
http://www.theplanpage.com/
Here's a monthly newsletter from one of the Flying Aces Club squadrons
http://www.windysock.net/
Old Australian plans
http://www.kurrawong.net/affp/index.php
Mike Stuart's House of french has some neat stuff
http://www.houseoffrog.co.uk/
More old magazine plans
http://www.ualberta.ca/~khorne/
French peanut scale (13" WS) plans
http://peanut.scale.free.fr/sommaire_plans.htm
Lots of more modern-ish plans
http://www.microflight.be/telechargements
Thought I had more links but I can't seem to find them at the moment. Those ought to be enough to get you started, though.
-Tim