Warbird Information Exchange

DISCLAIMER: The views expressed on this site are the responsibility of the poster and do not reflect the views of the management.
It is currently Mon May 12, 2025 7:25 pm

All times are UTC - 5 hours


Classic Wings Magazine WWII Naval Aviation Research Pacific Luftwaffe Resource Center
When Hollywood Ruled The Skies - Volumes 1 through 4 by Bruce Oriss


Post new topic Reply to topic  [ 8 posts ] 
Author Message
 Post subject: Getting FORT-ified
PostPosted: Sun Jan 04, 2009 1:47 am 
Offline
3000+ Post Club
3000+ Post Club

Joined: Thu Dec 21, 2006 8:32 am
Posts: 4324
Location: Battle Creek, MI
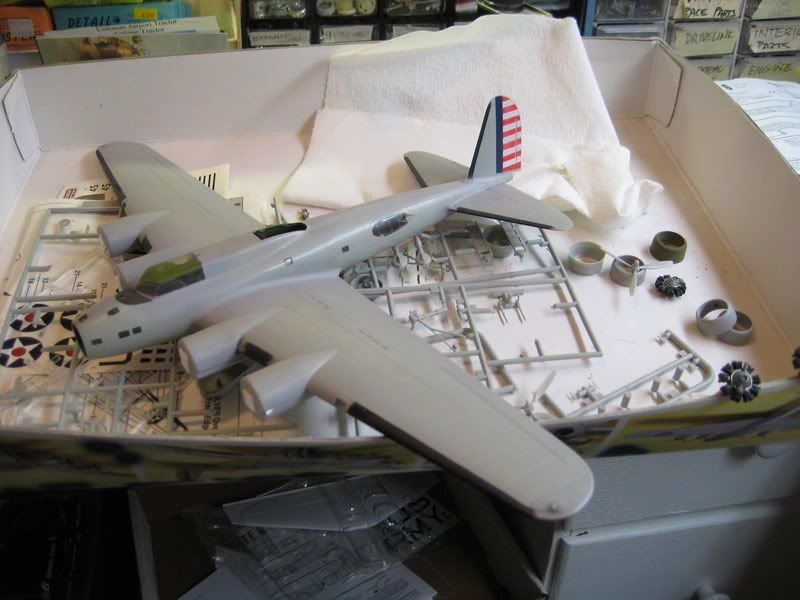
So this has what's been occupying me lately..another project ressurected from the "Partially Completed Kit Dungeon." This is a 1/72 Academy B-17C I started sometime in the late '90s. I'm building her as an RAF Fortress I..I just love that Dark Green/Dark Earth over PRU Blue scheme!

Anyway, since the interior is largely invisible, I'm sticking with the relatively decent kit parts. No need to do anything with the bombay, as I'm closing it up. I did add a floor and aft bulkhead to the radio compartment, since there's a big window on top.

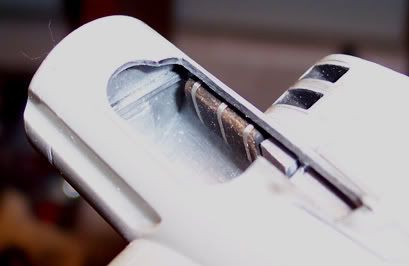
The main focus of my detailing efforts is the wings. First off, Academy molds the leading edge supercharger intakes as shallow depressions..these had to be opened up and boxed in. Here's the before and after..with the unaltered kit part underneath. Fortunately, the early 17s didn't have leading edge carberator intakes between the engines, so I didn't have to worry about those.

Image

Like most B-17 kits, the wheel wells were big empty holes, with some pegs to mount the gear struts on. Last spring I was able to get some great photos of Yankee Lady's nether regions for reference (she's a B-17G, but the wheel wells are pretty much identical.) I boxed in the wells, and added some detail (oil tank, exhaust pipe, and a few other fiddly bits.

Image

Image

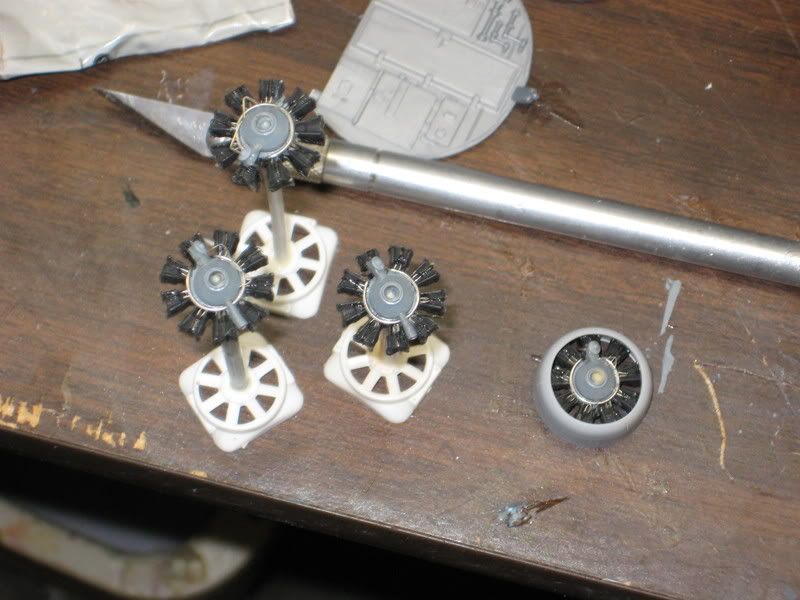
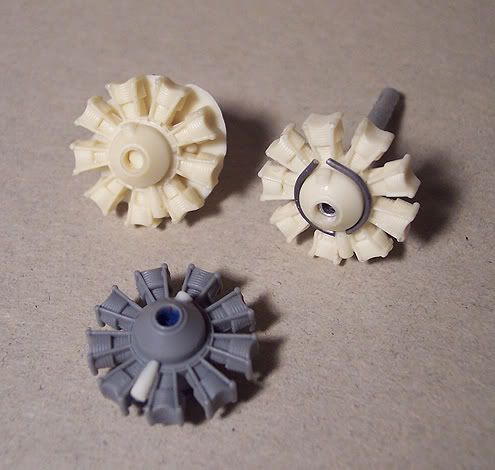
On to the engines. The kit ones are crap, so I modified the engine from a Hasegawa SBD, made an RTV mold, and cast Alumalite resin replacements. Here's the result, with the master below, a raw casting on the left, and the cleaned up casting with ignition harness made from lead wire on the right.

Image

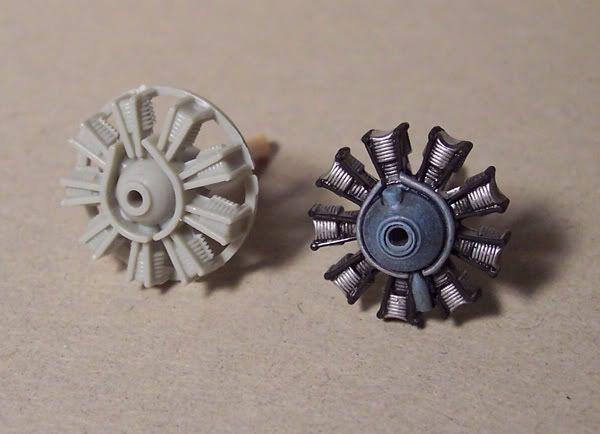
And the finished and painted product, next to the kit engine. To me, the engines are one of the most distinguishing features of the B-17, and if they don't look right, it just spoils the look of the whole bird.

Image

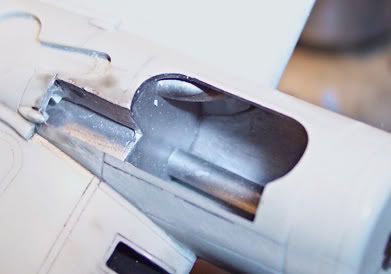
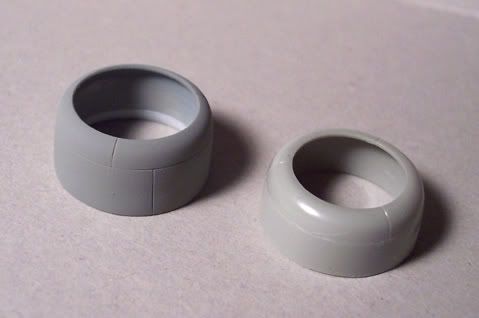
Oh, and the kit cowls also needed attention. They're noticably too short, and the opening is too small. I extended the trailing edges with a couple layers of .020 sheet styrene, opened them up a bit, and scribed new panel lines (x4!) The kit part is on the right, and one of my modified cowls on the left. Fortunately, I had plenty of spares, since every Academy B-17 comes with two complete sets of cowls (with flaps and without) and the early style aren't needed on the F and G.

Image

My modeling goal for 2009 is to finish a few long back-burnered projects before starting anything new. I'm planning to take another trip to the Air Force Museum this coming Friday to see the only surviving "shark tail" Fort..the B-17D "The Swoose" (I'm taking advantage of being unemployed to take the museum's restoration shop tour, which only runs on Fridays.)


Cheers!

Steve


Top
 Profile  
 
 Post subject:
PostPosted: Sun Jan 04, 2009 5:56 pm 
Offline
3000+ Post Club
3000+ Post Club
User avatar

Joined: Thu Sep 28, 2006 12:56 pm
Posts: 3442
Location: North of Texas, South of Kansas
I got a kick out of your engine update--I did the exact thing when I opened my first Academy B-17. Here are a couple of photos of my project--I had to find it and dig it out to use for reference for the big project on the other thread. It was originally going to be a NMF 7th Bomb Group D. Later on I found a great picture of a camouflaged B modified to more-or-less the C standard. If I ever work on it again that is what I'll probably finish it as.
Image
Image

Scott


Top
 Profile  
 
 Post subject:
PostPosted: Tue Mar 17, 2009 2:41 pm 
Offline
Account Suspended
User avatar

Joined: Wed Nov 14, 2007 3:06 pm
Posts: 2713
What is the best shiny aluminum finish out there? Other than foil?

Thanks

_________________
S.


Top
 Profile  
 
 Post subject:
PostPosted: Tue Mar 17, 2009 10:20 pm 
Offline
3000+ Post Club
3000+ Post Club

Joined: Thu Dec 21, 2006 8:32 am
Posts: 4324
Location: Battle Creek, MI
I've heard people swear by Alclad. I have some, but haven't tried it yet. I haven't done a natural metal finish in awhile, but I've used Floquil "Bright Silver" with pretty decent results. It's a lacquer, so it tends to be pretty tough once dry.

SN


Top
 Profile  
 
 Post subject:
PostPosted: Wed Mar 18, 2009 12:53 am 
Offline
3000+ Post Club
3000+ Post Club
User avatar

Joined: Thu Sep 28, 2006 12:56 pm
Posts: 3442
Location: North of Texas, South of Kansas
Alclad works great teamed with BareMetal Foil. You can really get the nice contrast on certain panels by using both. That is the plan with my YB-17 project. In fact, the YB will be almost entirely foil judging from the photos I have of the real thing.

If you use Alclad the prepared surface must be absolutely perfect or the blemishes really pop out at you when you buff the finish.

Scott


Top
 Profile  
 
 Post subject:
PostPosted: Wed Mar 18, 2009 8:44 am 
Offline
3000+ Post Club
3000+ Post Club

Joined: Thu Dec 21, 2006 8:32 am
Posts: 4324
Location: Battle Creek, MI
I understand you also need to use a primer with Alclad, since it's rather "hot" and attacks the plastic. Many folks say Tamiya Acrylic Gloss Black is a good barrier.

SN


Top
 Profile  
 
 Post subject:
PostPosted: Wed Mar 18, 2009 9:41 am 
Offline
3000+ Post Club
3000+ Post Club
User avatar

Joined: Thu Sep 28, 2006 12:56 pm
Posts: 3442
Location: North of Texas, South of Kansas
I've always used good old NAPA red oxide or grey primer. It's laquer based (or at least what I still have is) and it, too, will attack styrene. The key is to dust on a really light coat so that the thinner doesn't get a chance to attack the plastic. Just apply multiple light coats to get the buildup needed for filling the minute imperfections and then wet sand up to 2400 grit before applying Alclad. Alclad can be used directly on styrene by using the same method as I recall.

Scott


Top
 Profile  
 
 Post subject:
PostPosted: Wed Mar 18, 2009 4:00 pm 
Offline
Account Suspended
User avatar

Joined: Wed Nov 14, 2007 3:06 pm
Posts: 2713
Someone told me to use auto-trunk primer when using alclad.

_________________
S.


Top
 Profile  
 
Display posts from previous:  Sort by  
Post new topic Reply to topic  [ 8 posts ] 

All times are UTC - 5 hours


Who is online

Users browsing this forum: No registered users and 5 guests


You cannot post new topics in this forum
You cannot reply to topics in this forum
You cannot edit your posts in this forum
You cannot delete your posts in this forum
You cannot post attachments in this forum

Search for:
Jump to:  
Powered by phpBB® Forum Software © phpBB Group