Re: 1/48th Scale B-17C/D Conversion
Mon Jan 24, 2011 10:25 am
Holy Cow Scott!
That looks amazing!
Nice job!!!!
Congrats on finding the sphere you were looking for!
I certainly hope you are enjoying this half as much as we are (well, I am ).
Here is a shot i found of the nose gun rotated.., Looks like a REALLY comfortable firing angle for the gunner?! LOL . About as accurate as firing from the 'bathtub' underneath!

Best,
Smiz!
That looks amazing!
Nice job!!!!
Congrats on finding the sphere you were looking for!
I certainly hope you are enjoying this half as much as we are (well, I am ).
Here is a shot i found of the nose gun rotated.., Looks like a REALLY comfortable firing angle for the gunner?! LOL
Best,
Smiz!
Re: 1/48th Scale B-17C/D Conversion
Tue Jan 25, 2011 2:13 am
If you study that photo closely you'll notice that the ball is pretty much at the 12:00 position. The photographer is under the nose a little right of centerline. Notice the small window by the gunner's right hand--that is the top fuselage window. The window near his left elbow is the left side transparency.
Re: 1/48th Scale B-17C/D Conversion
Tue Jan 25, 2011 9:33 am
I thought it looked more like 10 O'clock to me. Because of the way the gunner is leaning and not directly in-line with his legs (It is nightime, so obviously 10 pm not am) :lol: 
Seriously.., It is just the first photo I have seen with the gun not in either the 12 or 6 position.
Keep up the good work.., we are all counting on you!
Then we expect a 1:32 scale conversion next!
Seriously.., It is just the first photo I have seen with the gun not in either the 12 or 6 position.
Keep up the good work.., we are all counting on you!
Then we expect a 1:32 scale conversion next!
Re: 1/48th Scale B-17C/D Conversion
Tue Jan 25, 2011 1:06 pm
Nearly as much fun as being forward gunner on a He-111
Re: 1/48th Scale B-17C/D Conversion
Thu Jan 27, 2011 1:34 pm
Speaking of the nose cone, here are the first nose piece and radio room blister that I vac'ed in clear plastic. I just popped them from the mold, cut them out, and set them on to see if the contours look close. I might have to do some more work on the master for the four waist blisters but at least it's getting closer. These two parts of the project have exercised my grey matter more than any other component.
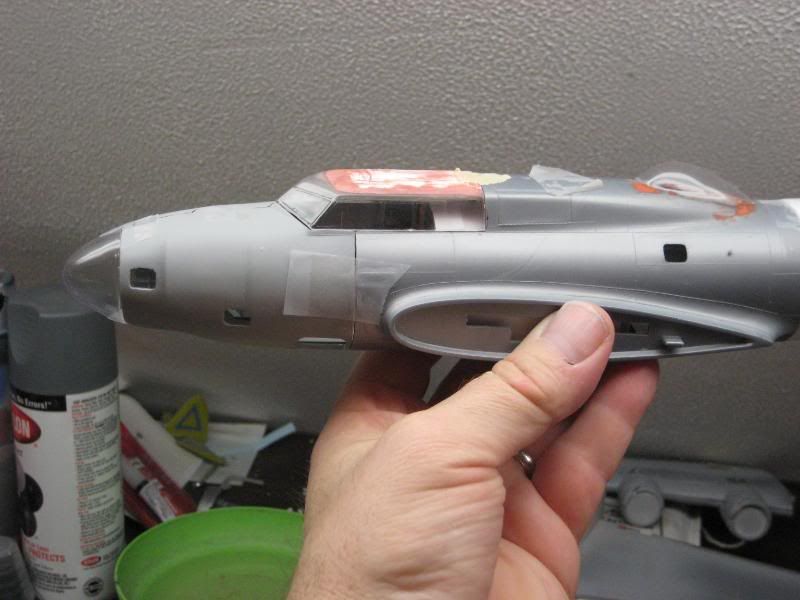
FYI, the gunner's ball for the nose is a separate mini-kit that will fit into a hole on the nose cone just like the original.
FYI, the gunner's ball for the nose is a separate mini-kit that will fit into a hole on the nose cone just like the original.
Re: 1/48th Scale B-17C/D Conversion
Thu Jan 27, 2011 3:35 pm
Fit great!
Re: 1/48th Scale B-17C/D Conversion
Thu Jan 27, 2011 4:52 pm
Looking good Scott.
I am just waiting to see the process of putting the turret in the nosecone. Cutting a round hole out of a cone should be quite entertaining to say the least!

I am just waiting to see the process of putting the turret in the nosecone. Cutting a round hole out of a cone should be quite entertaining to say the least!
Re: 1/48th Scale B-17C/D Conversion
Fri Jan 28, 2011 1:14 am
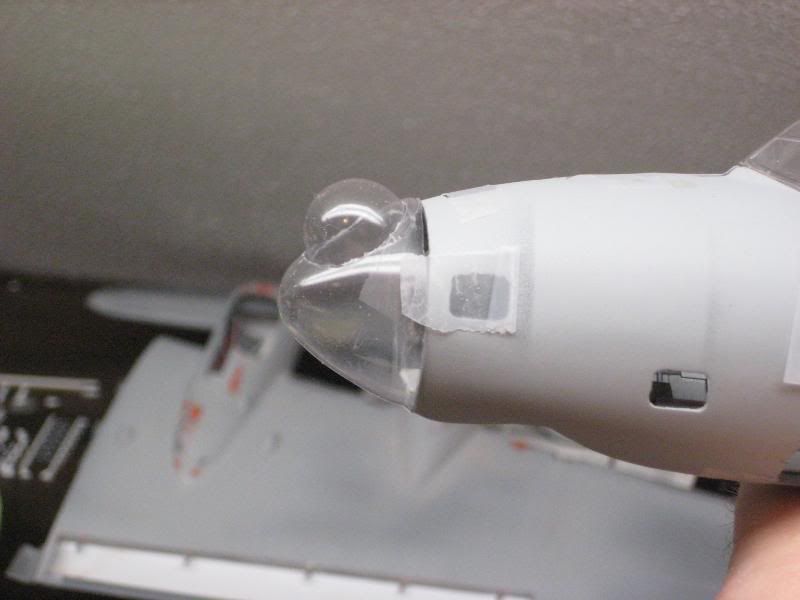
That's how I did the yellow mock-up on page 12, Smis. Just cut out a round hole with the Dremel until the ball fits into it. I must admit that the clear part is a little thinner, and thus flimsier, than the yellow material was, but it won't be hard to cut the hole. The hardest part of the nose will be the details inside of the ball portion and getting the framing just right on the cone.
S
S
Re: 1/48th Scale B-17C/D Conversion
Fri Jan 28, 2011 8:25 pm
Great work, Scott!
Re: 1/48th Scale B-17C/D Conversion
Fri Jan 28, 2011 9:15 pm
I'll be interested to see how you are going to attach a thin, flexible blister to a thin, flexible nose bowl. Are you cutting the traversing slot for the gun into the blister too? So far, this is like watching 'Twin Peaks' I can't wait for the next episode!!
Re: 1/48th Scale B-17C/D Conversion
Sat Jan 29, 2011 1:36 am
The ball is actually about 3/4 of a sphere so I'll use two halves and cut the gun slot in them at assembly. The circular frame inside the ball will support the halves and the pivot points will sit into the nose cone just like on the original. As for the flexibility of the nose cone, I'm planning on installing an attachment ring to the back end of the cone, both to stiffen the plexiglas and as the attach point to the fuselage. The ring will also replicate the roller/track setup that allowed the nose to rotate. That's the plan, anyway........... we'll see how it works in practice!
S
S
Re: 1/48th Scale B-17C/D Conversion
Sat Jan 29, 2011 9:52 pm
Y'all made me start thinking about the nose bowl parts so I did a quick practice set tonight. It went pretty much like I thought--just chopped a hole in the cone and stuck a ball into it. I didn't waste any time cleaning up edges since it was just a prototype/test shot.
S
S
Re: 1/48th Scale B-17C/D Conversion
Mon Jan 31, 2011 9:38 am
That was a piece of cake!
Re: 1/48th Scale B-17C/D Conversion
Wed Feb 02, 2011 9:01 am
Scott, this is just shockingly good work. Well done!!!
Lynn
Lynn
Re: 1/48th Scale B-17C/D Conversion
Wed Feb 02, 2011 9:27 am
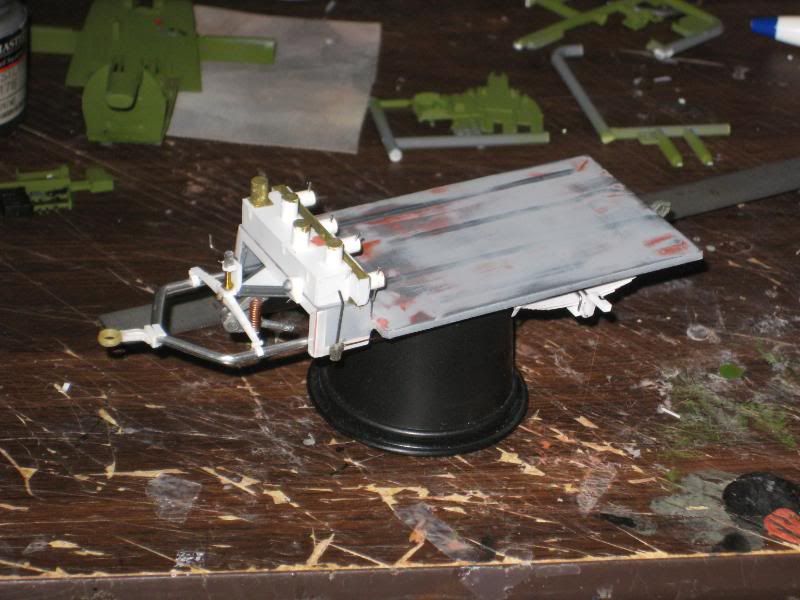
Thanks, Lynn. Now that I don't have a real Fortress to work on anymore  I might actually get this little one finished. That being said, I needed a break from the YB so I'm working on this little bomb trailer for a change-of-pace: