Resin Casting And Moldmaking
Thu Feb 24, 2011 12:10 pm
A while back on Warbird Kid's 144th thread viewtopic.php?f=15&t=39576 The Inspector and I encouraged Chris to "learn the ropes" of moldmaking and resin casting. I talked to Chris and we decided I'd do this thread to give basics of making parts at home. Bear in mind the method I'm going to show works best for short runs of parts for personal use.
First you'll need a source for RTV and resin. Many hobby shops and craft stores now carry RTV and resin kits that will work just fine. I prefer Alumilite resin (we used this by the gallon in our now-defunct model parts business) as it pours nicely and makes a nice finished product. For small mold projects I recommend Bare-Metal RTV, available at Hobby Lobby and many hobby shops. For this tutorial I decided to just pick up a small "starter kit" of Alumilite with their own RTV included. I'm not certain of the durability of this particular rubber but it does cure rapidly, something that can come in handy if you're impatient.
To make a mold, first you need to decide if your master part will require you to do a two-piece or one-piece mold. I'm using a tire/wheel assembly for this example so I'll need a two sided mold. Here are all the parts of the mold, including the blue modeling clay that serves as a base.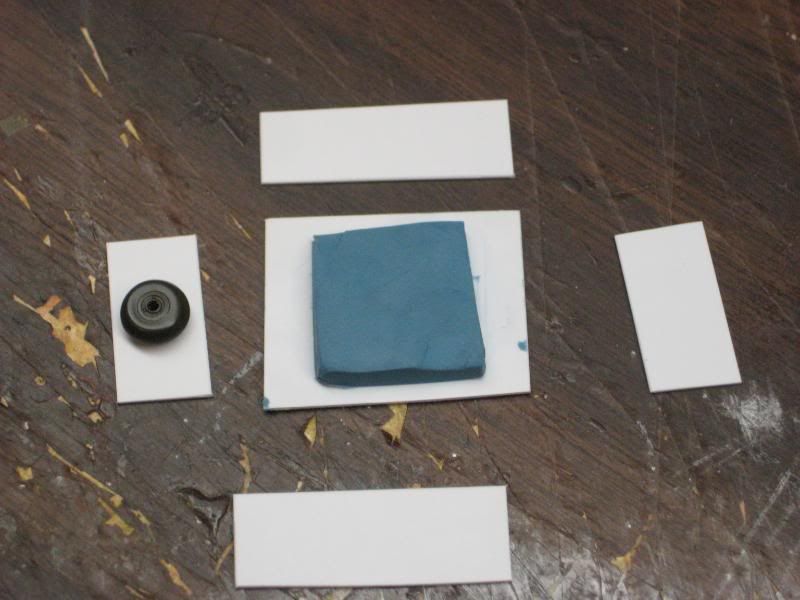
I use plain styrene for the box, and the cheapest way to do this is to buy a "for sale" sign at the local hardware store. For a buck or so you can make a lot of mold boxes and just throw away the scrap when you're done.
Next, embed the master halfway into the clay thusly:
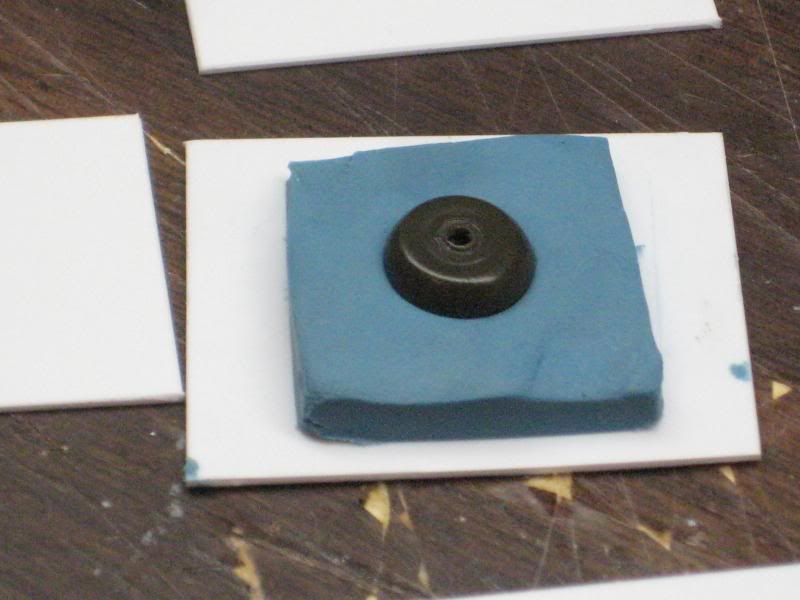
In most cases there will be a seam on the master part where it was originally cast and you can use that as a guide for how deep to insert the part into the clay.
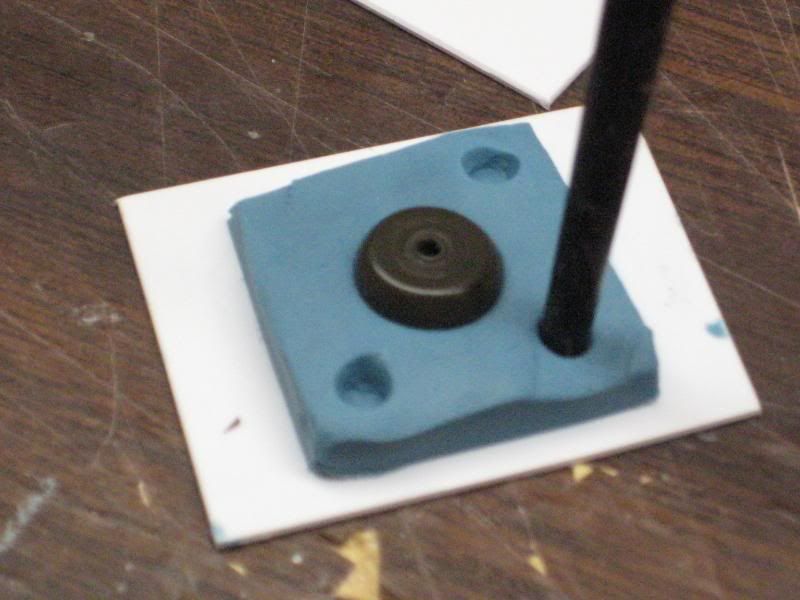
Now glue the sides of the box around the clay with superglue. In this instance I'm showing the process of making key holes into the clay before the sides are installed for clarity. I usually key the mold after the box is made. The three key holes will align the two mold halves during use:
Once the box is glued together securely it's time to pour the first half of the mold. Mix the RTV and hardener per the instructions (it will take a bit of time to learn how much to mix for a given part). Once satisfied with the mixing, pour a small amount of rubber over the entire face of the mold:
I have an old hard-bristled brush that I then use to carefully stipple the RTV into any holes and depressions in the master so as to remove any air bubbles:
Finally, finish pouring the RTV. Depending on the part, I usually pour enough that there is 3/8" of rubber above the top of the master part. This makes the mold more rigid and less prone to flexing during use.
More later,
Scott
First you'll need a source for RTV and resin. Many hobby shops and craft stores now carry RTV and resin kits that will work just fine. I prefer Alumilite resin (we used this by the gallon in our now-defunct model parts business) as it pours nicely and makes a nice finished product. For small mold projects I recommend Bare-Metal RTV, available at Hobby Lobby and many hobby shops. For this tutorial I decided to just pick up a small "starter kit" of Alumilite with their own RTV included. I'm not certain of the durability of this particular rubber but it does cure rapidly, something that can come in handy if you're impatient.
To make a mold, first you need to decide if your master part will require you to do a two-piece or one-piece mold. I'm using a tire/wheel assembly for this example so I'll need a two sided mold. Here are all the parts of the mold, including the blue modeling clay that serves as a base.
I use plain styrene for the box, and the cheapest way to do this is to buy a "for sale" sign at the local hardware store. For a buck or so you can make a lot of mold boxes and just throw away the scrap when you're done.
Next, embed the master halfway into the clay thusly:
In most cases there will be a seam on the master part where it was originally cast and you can use that as a guide for how deep to insert the part into the clay.
Now glue the sides of the box around the clay with superglue. In this instance I'm showing the process of making key holes into the clay before the sides are installed for clarity. I usually key the mold after the box is made. The three key holes will align the two mold halves during use:
Once the box is glued together securely it's time to pour the first half of the mold. Mix the RTV and hardener per the instructions (it will take a bit of time to learn how much to mix for a given part). Once satisfied with the mixing, pour a small amount of rubber over the entire face of the mold:
I have an old hard-bristled brush that I then use to carefully stipple the RTV into any holes and depressions in the master so as to remove any air bubbles:
Finally, finish pouring the RTV. Depending on the part, I usually pour enough that there is 3/8" of rubber above the top of the master part. This makes the mold more rigid and less prone to flexing during use.
More later,
Scott
Re: Resin Casting And Moldmaking
Thu Feb 24, 2011 1:02 pm
I'm going to be watching this thread!
Ryan
Ryan
Re: Resin Casting And Moldmaking
Thu Feb 24, 2011 1:21 pm
YOU ARE THE MAN!!!!! numero uno, the big cheese, Ted, have you ever been kicked with an iron boot? In the head..?
Seriously every one of us modellers will appreciate your thread Thanx!!
Seriously every one of us modellers will appreciate your thread Thanx!!
Re: Resin Casting And Moldmaking
Thu Feb 24, 2011 1:25 pm
Cool stuff
Re: Resin Casting And Moldmaking
Thu Feb 24, 2011 1:42 pm
I'm glad y'all are interested in this.
I know we're all grown-ups here, but I should mention a couple of things. If you need some particular part, and an aftermarket resin company makes the part you need, it's usually cheaper--and definitely easier--to just buy the stuff rather than go to the expense of buying or building a master and casting a duplicate yourself. If you need to make something that isn't out there anywhere, or you need multiple duplicates of some widget, this is the way to go. Also be careful about going into business making resin copies of currently available kit pieces. I don't know if it has happened, but I could imagine a manufacturer being a bit miffed at somebody directly copying their stuff and selling it. Many years ago I made upgrade kits for Winston Cup and BGN stock car kits. On one upgrade I happened to emboss a manufacturer's logo and they sent me a "nice" letter telling me I did not have the rights to their symbol. I simply eliminated the logo and recast the part. Use your best judgement on such matters.
Disclaimer complete.
Re: Resin Casting And Moldmaking
Thu Feb 24, 2011 3:49 pm
It is past some five years from my last mold and casting projects, nice to see that there is more people who work on project like this. Do you use vacuum chamber to clean molds from micro dispersed air in mixture?
Re: Resin Casting And Moldmaking
Fri Feb 25, 2011 1:49 am
I have never messed with a vacuum chamber, Mgawa. The molds I've made over the years are relatively small and air entrapment has never been too much of an issue. My brush method generally makes sure that the RTV has gone into all of the possible places that could harbor air bubbles. On large parts (model car bodies in the case of our business) I came up with a centrifuge rather than using a vacuum chamber.
Scott
Scott
Re: Resin Casting And Moldmaking
Fri Feb 25, 2011 2:36 am
Brush can also work good, you are right 
Re: Resin Casting And Moldmaking
Fri Feb 25, 2011 12:25 pm
The next step is to make the other half of the mold. After it's fully cured, disassemble the box so that you can separate the clay from the first RTV block and master part. Be extremely careful to not let the part come out of the rubber. At this point the master is sealed onto the RTV and that seal will keep the next RTV pour from getting between the first block and master:
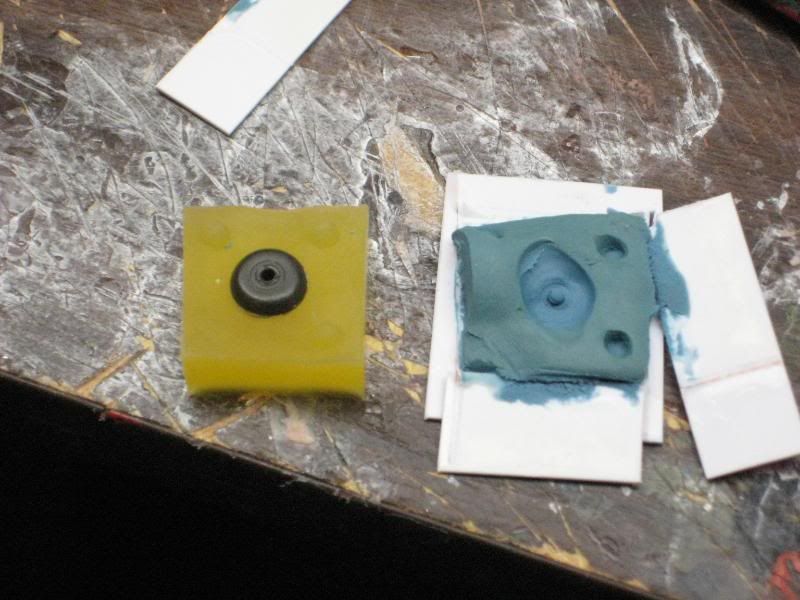
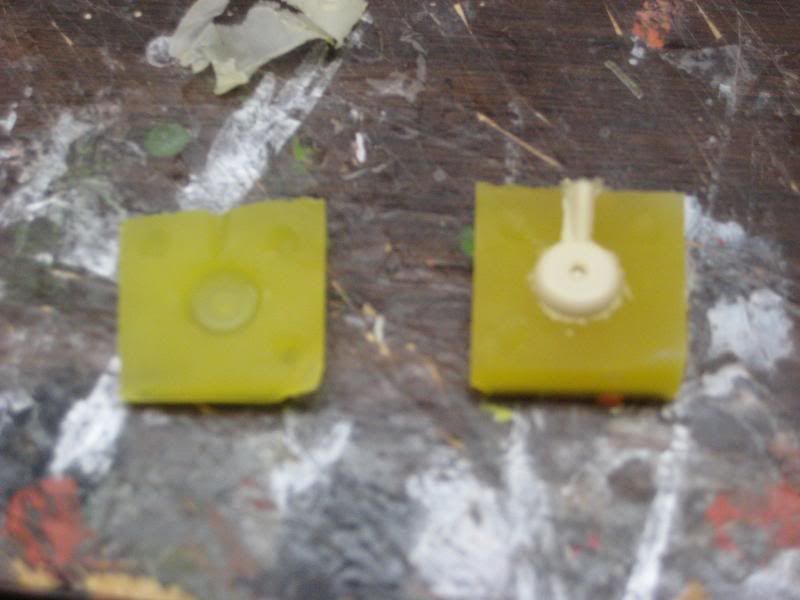
After you've gotten all the clay cleaned from both the master and the mold you'll be seeing something like this view. Brush on a coat of Vaseline or mold release to all of the exposed RTV of the first half, including the guide nipples. Be careful to NOT get any Vaseline on the master part or it will show the brush marks. Spray-on mold release can be sprayed lightly on the entire thing without a problem:
The final steps are to reassemble the box around the block, mix another batch of RTV, and pour the same way as the first half was done, remembering to get out any entrapped air bubbles:
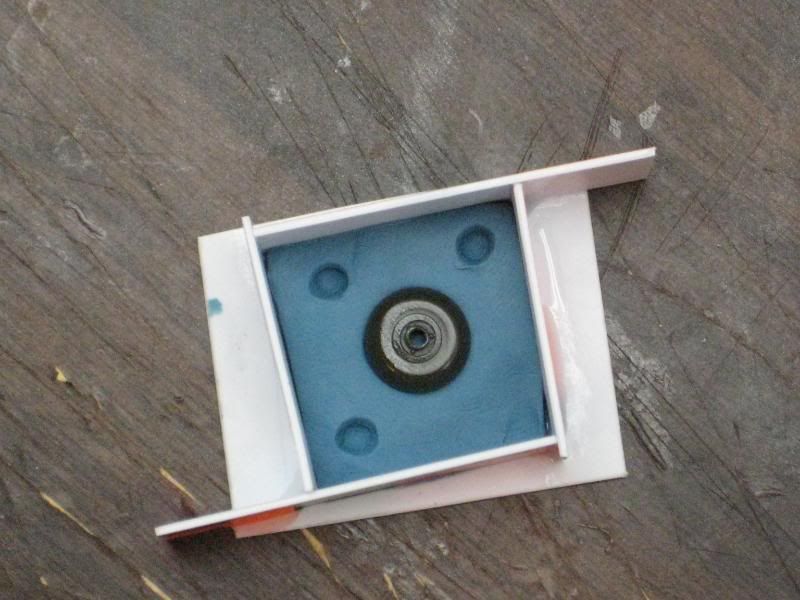
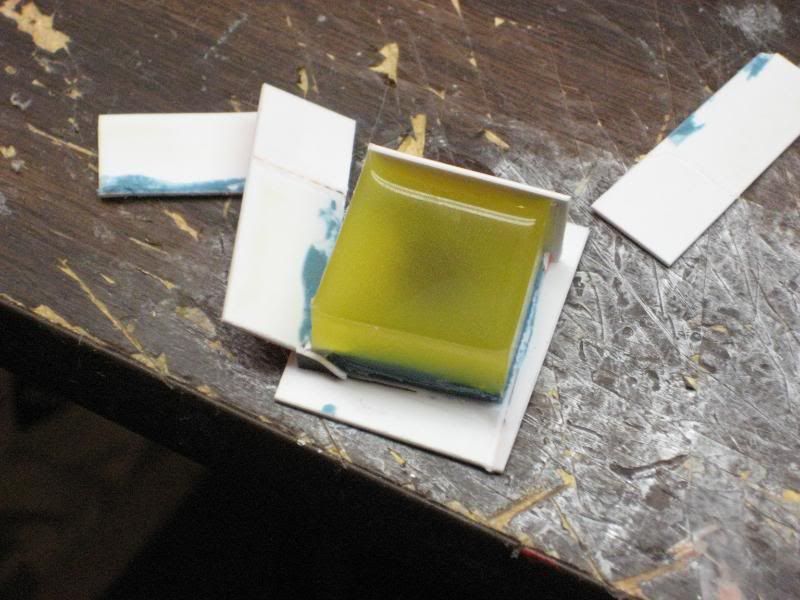
Jumping ahead, the new RTV is now cured and the plastic box is discarded. Now you'll carefully separate the two halves of the mold from one another. On occasion the halves may stick together if the mold release didn't get full coverage. If so, just take a new X-acto blade and carefully cut the stuck area free:
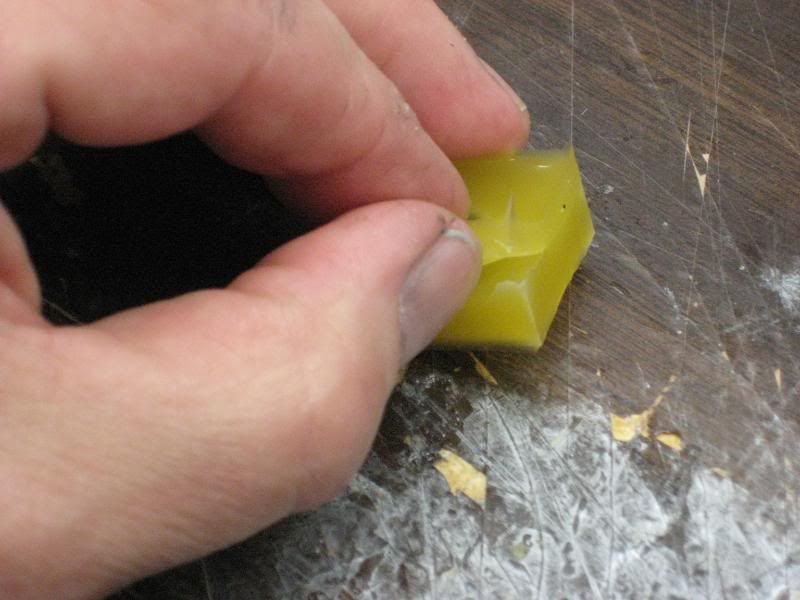
And this is the final product. Notice the pour slot in both halves of the mold. I prefer to cut this slot in both halves with the X-acto after the mold is cured. Some casters glue a piece of sprue to the master before pouring the RTV to achieve the same result. Either way is acceptable so long as you make the pour hole big enough to get the resin to flow through it.
Next will be the final step, pouring the resin.
After you've gotten all the clay cleaned from both the master and the mold you'll be seeing something like this view. Brush on a coat of Vaseline or mold release to all of the exposed RTV of the first half, including the guide nipples. Be careful to NOT get any Vaseline on the master part or it will show the brush marks. Spray-on mold release can be sprayed lightly on the entire thing without a problem:
The final steps are to reassemble the box around the block, mix another batch of RTV, and pour the same way as the first half was done, remembering to get out any entrapped air bubbles:
Jumping ahead, the new RTV is now cured and the plastic box is discarded. Now you'll carefully separate the two halves of the mold from one another. On occasion the halves may stick together if the mold release didn't get full coverage. If so, just take a new X-acto blade and carefully cut the stuck area free:
And this is the final product. Notice the pour slot in both halves of the mold. I prefer to cut this slot in both halves with the X-acto after the mold is cured. Some casters glue a piece of sprue to the master before pouring the RTV to achieve the same result. Either way is acceptable so long as you make the pour hole big enough to get the resin to flow through it.
Next will be the final step, pouring the resin.
Re: Resin Casting And Moldmaking
Sun Feb 27, 2011 1:17 pm
Ill be reviewing this thread many times. 
Re: Resin Casting And Moldmaking
Sun Feb 27, 2011 1:24 pm
Chris, find a project to start on that is a bit less complicated than the Corsair and practice the techiques.
Perhaps if you'd post or P.M. me a photo of the Corsair broken down into the separate parts we could figure out how to create the molds. That gull wing may prove to be a little tricky to mold and we can put our collective heads together to figure out the best way to go forward. Lay a six-inch rule next to for easy reference, too.
Scott
Re: Resin Casting And Moldmaking
Mon Feb 28, 2011 10:58 am
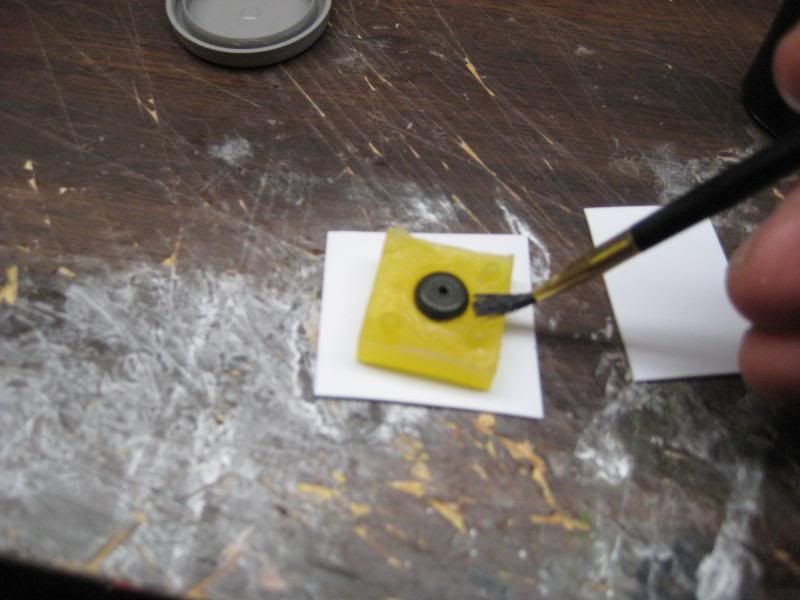
Finally the time has come to pour resin into the new mold. As an aside, the company that made my commercial RTV back in the day recommended that you let the mold cure for a day or so after completion and before you pour the first resin parts. The theory is that the rubber needs time to fully complete the curing process and using it immediately can shorten the life of the mold. I still follow that practice, but if you're in a hurry you can use the mold right away.
To use the new mold you'll be pouring the resin into the pour opening that was cut into the halves earlier. Before you mix your resin have a short piece of wire or similar instrument at the ready to insert into the hole during pouring. This will help remove any bubble of air that might be entrapped during the pour. Also, you have a fairly limited time to pour the resin and do the "air fishing" before the resin starts to harden.
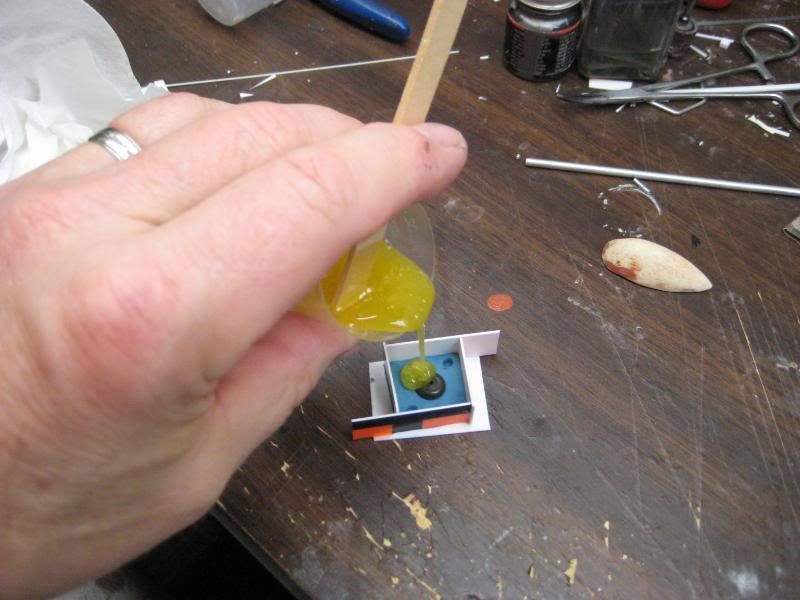
Now it's time to place the two halves of the mold together and make sure the pour "spout" is vertical. Mix a quantity of resin (experience will tell you how much you'll need depending on the volume of the pour) per the manufacturer's directions, and pour it slowly into the pour spout. If it seems to bridge up, use the wire instrument to break the airlock and continue the pour. This may take some practice.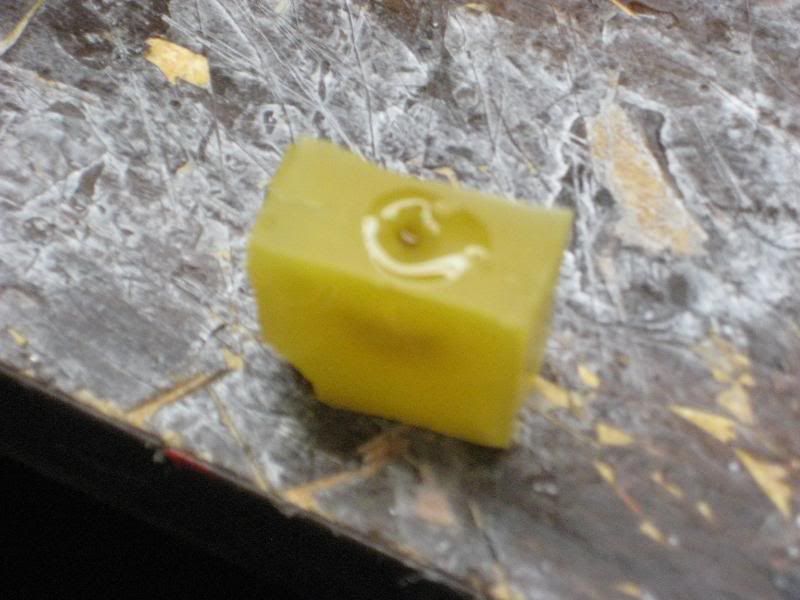
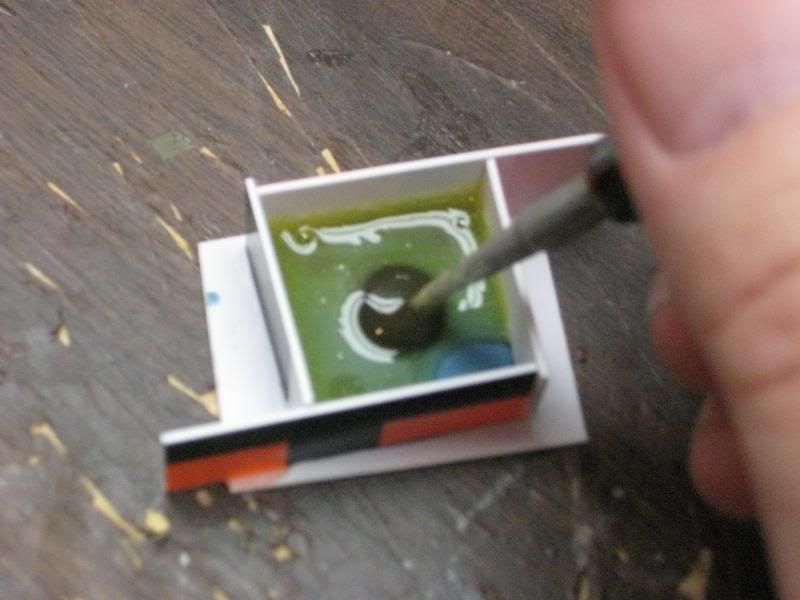
During the pour you'll be holding the two halves together firmly so that resin won't leak into the seam. On small molds I use my fingers, on larger ones you may experiment with stir sticks secured with rubber bands. Don't hold the mold too tightly or it'll distort the chamber inside. The viscosity of the resin becomes thicker pretty quickly so you won't be holding the mold together for more than a couple of minutes. In the photo above you can see a little bit of the Alumilite around the opening and it is just starting to change from the clear amber color to the cured tan.
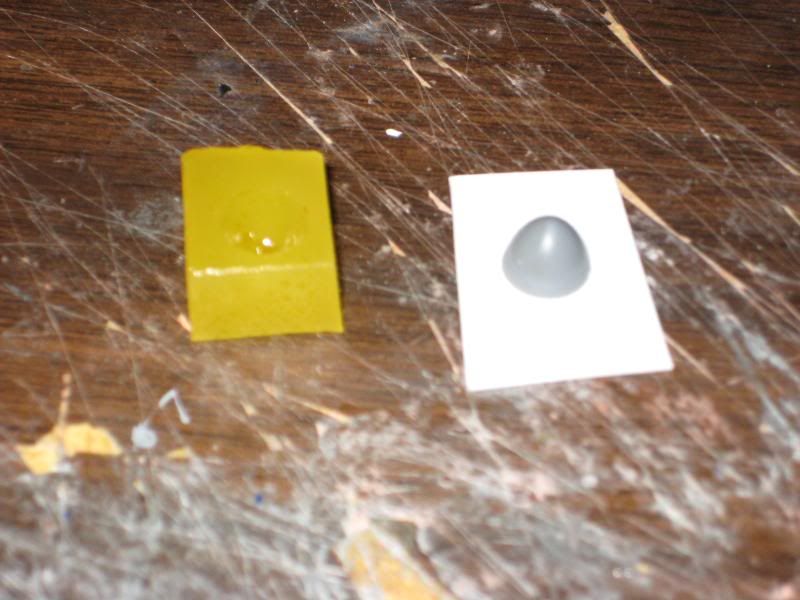
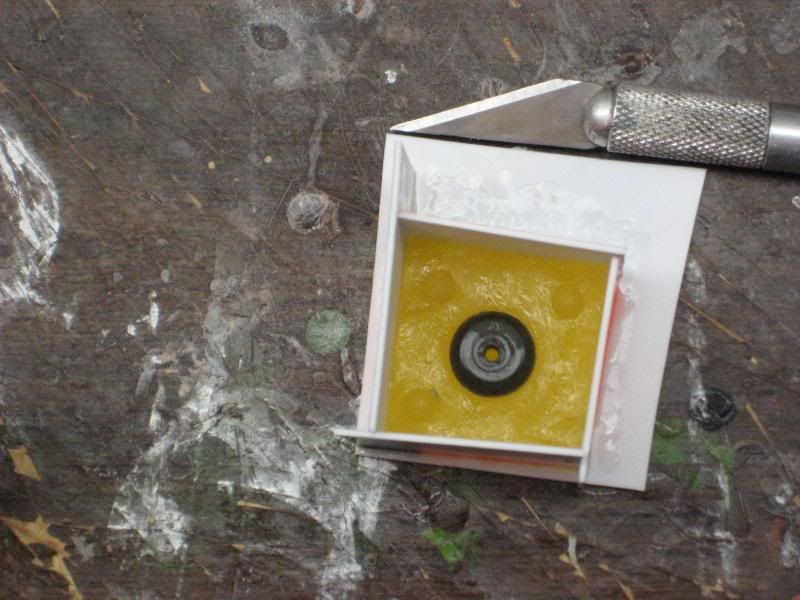
After a few minutes (cure time depends on air temperature somewhat, and you can stretch out the curing time of Alumilite by refrigerating the two components before pouring. Also a large mold will cure a bit faster than a small, thin part because of the heat involved with the chemical process of mixing the two resin components.) you can carefully disassemble the mold and this should be the result:
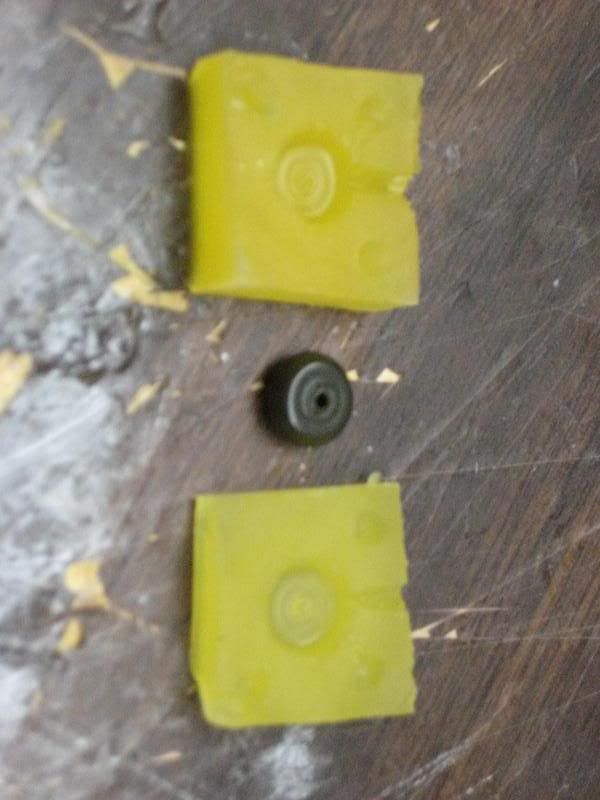
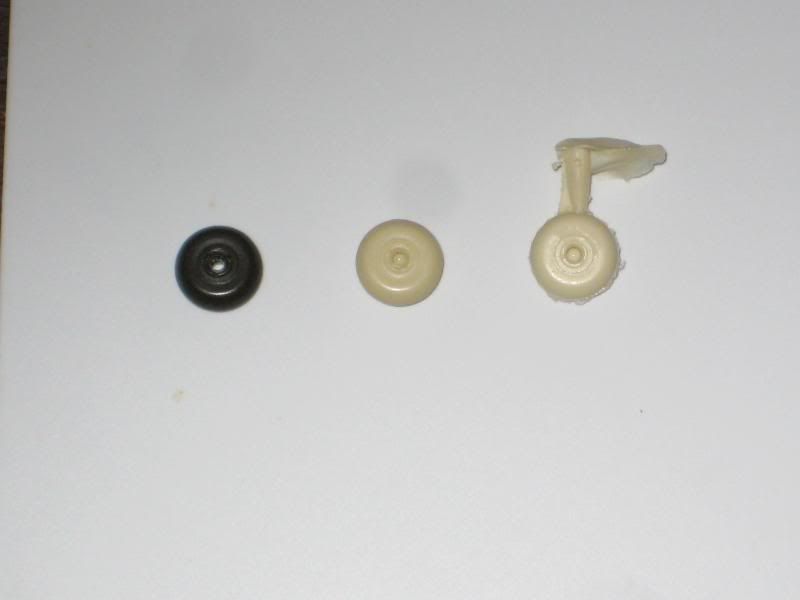
Now pop the part out of the other half and carefully trim off the pour stub. If there is seam flash (just like on some styrene kit parts) you can also remove it now. The resin I use is much easier to work when it is fresh from the mold. After a few hours of curing time it becomes more brittle but still workable. Here's the original, a finished copy, and an unfinished one:
After you've made the parts and cleaned up any seams and pour stubs it's time to prep for paint. Resin parts often carry a residue on them that paint will NOT adhere to no matter how hard you try. One way to remove the by-product of the casting/curing process is to immerse the parts in Wesley's Bleche Wite whitewall tire cleaner. It sounds kinda odd, but this stuff is just the ticket for removing mold release. It'll also work as an enamel paint remover for old kit restoration.
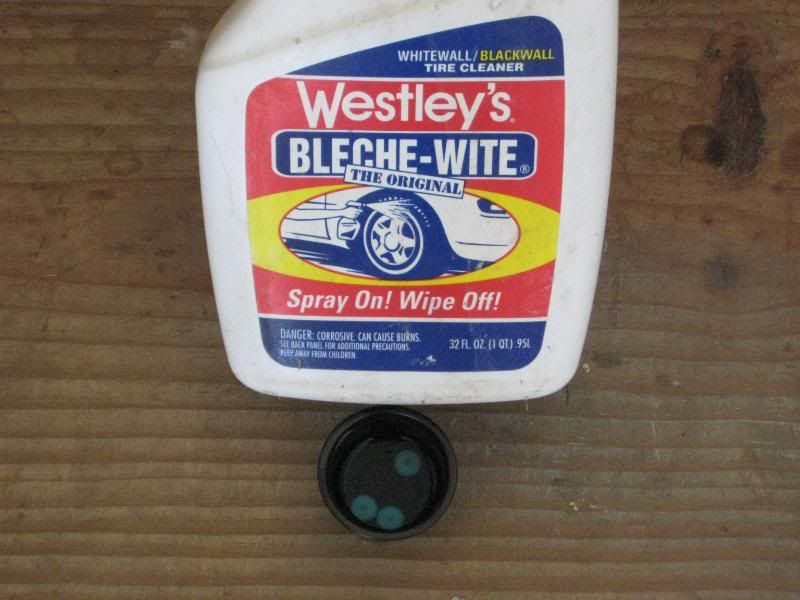 Just drop the parts in a container of Bleche Wite (don't use a styrofoam cup--it eats them) and let the pieces soak for a few minutes. I usually use an old brush to stir the pieces around in the solvent and the whole process takes ten minutes or so. After the soak simply wash the parts in fresh water and dry. The Bleche Wite can be saved and re-used for quite some time.
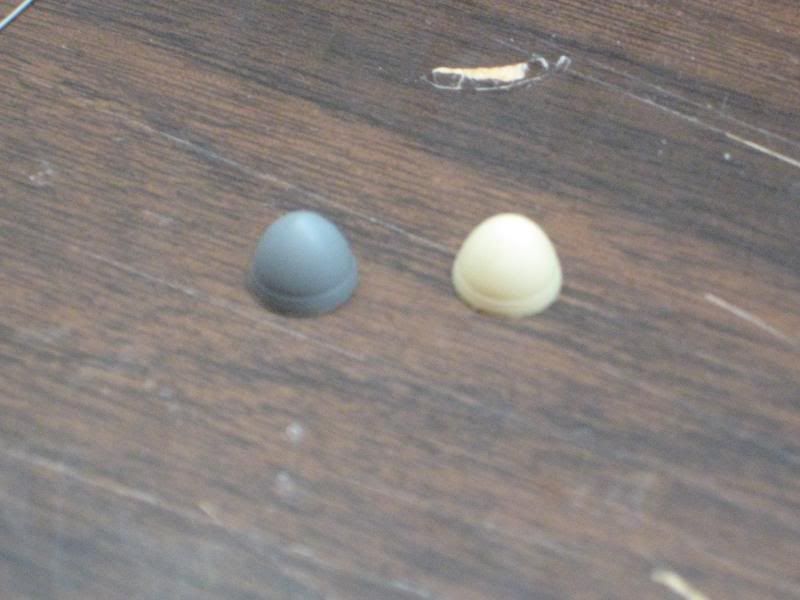
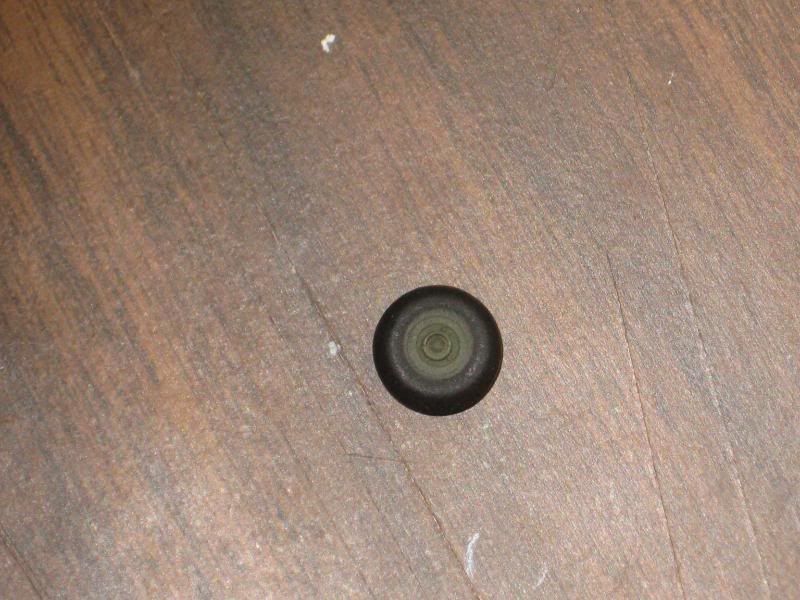
It's been my experience that most any model paint will adhere to resin parts after the clean/rinse cycle explained in the last paragraph. If, for some reason, enamel doesn't seem to stick, a light dusting coat of lacquer primer will usually adhere and the enamel can then go on over the primer. If the lacquer doesn't seem to stick, go back through the Bleche Wite cycle one more time and then wipe the part down with lacquer thinner before painting. On my little tire I went directly to Modelmaster without primer. Here's the finished product, ready to be installed on a 1/48th scale M1 bomb loading cart:
To use the new mold you'll be pouring the resin into the pour opening that was cut into the halves earlier. Before you mix your resin have a short piece of wire or similar instrument at the ready to insert into the hole during pouring. This will help remove any bubble of air that might be entrapped during the pour. Also, you have a fairly limited time to pour the resin and do the "air fishing" before the resin starts to harden.
Now it's time to place the two halves of the mold together and make sure the pour "spout" is vertical. Mix a quantity of resin (experience will tell you how much you'll need depending on the volume of the pour) per the manufacturer's directions, and pour it slowly into the pour spout. If it seems to bridge up, use the wire instrument to break the airlock and continue the pour. This may take some practice.
During the pour you'll be holding the two halves together firmly so that resin won't leak into the seam. On small molds I use my fingers, on larger ones you may experiment with stir sticks secured with rubber bands. Don't hold the mold too tightly or it'll distort the chamber inside. The viscosity of the resin becomes thicker pretty quickly so you won't be holding the mold together for more than a couple of minutes. In the photo above you can see a little bit of the Alumilite around the opening and it is just starting to change from the clear amber color to the cured tan.
After a few minutes (cure time depends on air temperature somewhat, and you can stretch out the curing time of Alumilite by refrigerating the two components before pouring. Also a large mold will cure a bit faster than a small, thin part because of the heat involved with the chemical process of mixing the two resin components.) you can carefully disassemble the mold and this should be the result:
Now pop the part out of the other half and carefully trim off the pour stub. If there is seam flash (just like on some styrene kit parts) you can also remove it now. The resin I use is much easier to work when it is fresh from the mold. After a few hours of curing time it becomes more brittle but still workable. Here's the original, a finished copy, and an unfinished one:
After you've made the parts and cleaned up any seams and pour stubs it's time to prep for paint. Resin parts often carry a residue on them that paint will NOT adhere to no matter how hard you try. One way to remove the by-product of the casting/curing process is to immerse the parts in Wesley's Bleche Wite whitewall tire cleaner. It sounds kinda odd, but this stuff is just the ticket for removing mold release. It'll also work as an enamel paint remover for old kit restoration.
Just drop the parts in a container of Bleche Wite (don't use a styrofoam cup--it eats them) and let the pieces soak for a few minutes. I usually use an old brush to stir the pieces around in the solvent and the whole process takes ten minutes or so. After the soak simply wash the parts in fresh water and dry. The Bleche Wite can be saved and re-used for quite some time.It's been my experience that most any model paint will adhere to resin parts after the clean/rinse cycle explained in the last paragraph. If, for some reason, enamel doesn't seem to stick, a light dusting coat of lacquer primer will usually adhere and the enamel can then go on over the primer. If the lacquer doesn't seem to stick, go back through the Bleche Wite cycle one more time and then wipe the part down with lacquer thinner before painting. On my little tire I went directly to Modelmaster without primer. Here's the finished product, ready to be installed on a 1/48th scale M1 bomb loading cart:
Re: Resin Casting And Moldmaking
Mon Feb 28, 2011 11:19 am
Neato! How /where do you store molds or do you just toss them after X number of parts and make a new mold?
Westleys also removes 'chrome' plating from model car parts and does a good job on the white walls on my T BIRD.
Thanks again this is most informative and helpful!
Westleys also removes 'chrome' plating from model car parts and does a good job on the white walls on my T BIRD.
Thanks again this is most informative and helpful!
Re: Resin Casting And Moldmaking
Mon Feb 28, 2011 11:53 am
Chrome removal was how I found out about Wesley's. It's good stuff!
I suggest storing molds in a dark cool place when not in use. They seem to react to UV light about like normal rubber so I keep them boxed between uses.
Each mold has a definite lifespan. With the BareMetal RTV I've gotten thirty to forty pieces from a single mold, but it depends a lot on the part shape and size as to how long the mold will survive. I also didn't mention mold release--there are spray releases (and talcum powder, but I've never used it) that will help extend the life of the molds. I've never gotten more than fifty pulls from a mold no matter what I use as mold release.
You'll know when a mold has reached the end when you try to pull a part from it and the RTV sticks to the resin and tears loose from the mold. At that point it's time to pour a new mold. On really big molds I've recycled the old RTV by grinding up the old molds in a hand-crank meat grinder. Then I add it to my RTV mix after I've gotten a good film coat of new RTV over the master part. The old chunks are good filler for the outside parts of the mold. It's really not useful for smaller molds, however.
Re: Resin Casting And Moldmaking
Tue Mar 01, 2011 10:53 am
I neglected to show how to make a one-piece mold earlier. It's quite simple, really--just tack-glue the master part onto the mold box, build the sides, and pour RTV in the box. When you're pouring resin into the finished mold you can fill it and carefully rake off any excess if needed before the resin cures. Here is a spinner for the counterweight Hamilton Standard propeller: