Warbird Information Exchange

DISCLAIMER: The views expressed on this site are the responsibility of the poster and do not reflect the views of the management.
It is currently Fri Apr 19, 2024 10:05 pm

All times are UTC - 5 hours


Classic Wings Magazine WWII Naval Aviation Research Pacific Luftwaffe Resource Center
When Hollywood Ruled The Skies - Volumes 1 through 4 by Bruce Oriss


Post new topic Reply to topic  [ 46 posts ]  Go to page Previous  1, 2, 3, 4  Next
Author Message
PostPosted: Sun Jun 28, 2020 9:46 pm 
Offline
2000+ Post Club
2000+ Post Club
User avatar

Joined: Wed May 30, 2007 3:57 pm
Posts: 2266
Location: Minnesota
Actually the one on the far right (looking at the photo) is the former P-51D "Ridge Runner III" turned TF-51D "Hel-eter", owned by Pat Harker. It will be the next to be completed at Airmotive Specialties. It was anticipated that it would be completed this year, but I'm sure the virus slowed things down a bit. It will be absolutely stunning!

The one on the far left is the fuselage of Silvia Sorlini's F-6D "Lil' Margaret", having been receiving repairs following the accident in the UK a couple years ago.

It is a great photo!


Top
 Profile  
 
PostPosted: Sun Jun 28, 2020 9:59 pm 
Offline
2000+ Post Club
2000+ Post Club
User avatar

Joined: Wed May 30, 2007 3:57 pm
Posts: 2266
Location: Minnesota
Here is a photo shared by Cal Pacific Airmotive on their Facebook page a few months ago of the TF-51D 44-74978 (N74978), registered to Tallevast LLC in Florida, nearing completion with another TF-51D project fuselage in the background.

Image


Top
 Profile  
 
PostPosted: Sun Jun 28, 2020 11:03 pm 
Offline

Joined: Sun Jun 01, 2008 10:53 am
Posts: 31
Location: FL/SC
One interesting "conundrum" is 'Quicksilver', which I recall was largely built from scratch from the ground-up, but according to the late Bill Yoak, they used only original NAA-made parts and skins wherever possible.


Not scratch at all, just reskined a most of the exterior. The spar, longhorns, ribs, etc are all NAA

_________________
P-51D 45-11439 "QuickSilver"
The Resurrected Veteran
Scott Yoak


Top
 Profile  
 
PostPosted: Sun Jun 28, 2020 11:08 pm 
Offline
2000+ Post Club
2000+ Post Club
User avatar

Joined: Wed May 30, 2007 3:57 pm
Posts: 2266
Location: Minnesota
I'm sorry Scott, it was a faulty memory. I've been in awe of your aircraft ever since I first saw it at Oshkosh in 2007.


Top
 Profile  
 
PostPosted: Mon Jun 29, 2020 8:01 am 
Offline
2000+ Post Club
2000+ Post Club
User avatar

Joined: Fri Apr 30, 2004 8:11 am
Posts: 2373
Location: Montreal, Quebec, Canada
Wow....thank you for the list!!!!!!

I would be curious if you have the tally on the ex RCAF birds! They do have a different and unique story on their own with some unique modifications for winter operation.

I am FLABBERGASTED by the amazing quality of these 2 shops....just take a look at the pictures. Well worth it!

I am amazed by the mix of old craftsmanship blended with new tech such as scanning and 3D printing!!!!!!!!!!!!!!!!!

https://www.facebook.com/pg/AirmotiveSpecialties/photos/?ref=page_internal

https://www.facebook.com/pg/calpacificairmotive/photos/?ref=page_internal


Top
 Profile  
 
PostPosted: Mon Jun 29, 2020 8:06 am 
Offline
2000+ Post Club
2000+ Post Club
User avatar

Joined: Fri Apr 30, 2004 8:11 am
Posts: 2373
Location: Montreal, Quebec, Canada
Just gorgeous!

Image

Image

Image

Image


Top
 Profile  
 
PostPosted: Mon Jun 29, 2020 8:58 am 
Offline
2000+ Post Club
2000+ Post Club

Joined: Wed May 05, 2004 3:45 pm
Posts: 2531
Can anyone explain the reason for both yellow & green chromate used on some of these rebuilds? Owner preference, accurate for a NAA production change, etc.? Odd that one restoration facility would restore five aircraft differently.


Top
 Profile  
 
PostPosted: Mon Jun 29, 2020 9:07 am 
Offline
User avatar

Joined: Sun Jul 29, 2012 6:14 pm
Posts: 372
Location: Waukesha, WI
John,
I also wish to thank you for this list. The level of information and detail is excellent! :drink3: I always look forward to your posts, especially relating to mustangs.

_________________
Always looking for P-51D parts.


Top
 Profile  
 
PostPosted: Mon Jun 29, 2020 11:06 am 
Offline
Long Time Member
Long Time Member
User avatar

Joined: Wed Jan 19, 2011 12:27 am
Posts: 5252
Location: Eastern Washington
Since few of us are in the position to have a Mustang, it would be interesting to get an owners view of having a Mustang built/rebuilt/restored by a major shop.

What decisions, other than the obvious paint scheme, are owners faced with in terms of engine (are there different levels of "tune", upgrades like Roush parts, etc?), airframe (interior, comfort/convenience features, bomb racks, guns, drop tanks, etc.), of course avionics, and I'm sure a lot of other less obvious details.

I would assume the major shops have a list and estimated prices.
Given the numbers completed, I doubt if they have car-like catslogs. :)

Great idea for a magazine article, TV episode or even book.

_________________
Remember the vets, the wonderful planes they flew and their sacrifices for a future many of them did not live to see.


Top
 Profile  
 
PostPosted: Mon Jun 29, 2020 11:33 am 
Offline
2000+ Post Club
2000+ Post Club
User avatar

Joined: Wed May 30, 2007 3:57 pm
Posts: 2266
Location: Minnesota
mike furline wrote:
Can anyone explain the reason for both yellow & green chromate used on some of these rebuilds? Owner preference, accurate for a NAA production change, etc.? Odd that one restoration facility would restore five aircraft differently.


According to the most experts on the subject that I've listened to over the years, including guys like Erik Hokuf, Mike Vadeboncoeur, Dana Bell, and Alan Wojciak/Bill Klaers...

The patchwork of yellow/green primer is how they came out of the NAA factory. Zinc chromate in its natural/raw form is yellow in color and a single coat of zinc chromate was required to be applied to most aluminum parts, such as aluminum extrusions, castings and forgings. Those parts would therefore show as yellow. However, with magnesium-based parts (primarily castings), two coats of zinc chromate were required. To easily indicate that a magnesium part had two coats of zinc chromate applied, with full/complete coverage, NAA used zinc chromate mixed with black pigment which resulted in green zinc chromate. In practice however, and due to wartime production demands, it wasn't so cut and dry on the shop floor. Aluminum parts were sometimes finished with the tinted (green) zinc chromate when batches of un-tinted (yellow) zinc chromate were not at hand, as production demands didn't allow for waiting around for the next batch of un-tinted zinc chromate to be available, and I believe that sometimes happened in reverse with magnesium parts when a batch of tinted (green) zinc chromate wasn't immediately available. All of this contributed to the patchworks of yellow and green throughout. Furthermore, during most Mustang production, skins were usually hardly ever finished in primer on the interior surfaces, as their Alclad or Pureclad surfaces were considered enough of a protection against corrosion. Even ribs were sometimes left bare metal. By/during P-51D-30-NA production, however, most everything got a coating or two of primer.

In restorations today, the way the interior parts are finished depends on the owner's choice. It is less time consuming, likely cheaper, and more aesthetically-pleasing to finish all of the interior surfaces in one uniform coating of green or grey, but it is not authentic to the way they were when manufactured in the 40's. With a few restorations, like "Sierra Sue II" and "Happy Jack's Go Buggy", a detailed analysis was made of every part when the airframes were disassembled prior to restoration so as to record how each individual part was originally finished from the factory and then have them re-finished in the same manner prior to reassembly (each part either getting refinished in yellow, green or left bare metal depending on the evidence from inspecting each part). Of course not all Mustang restorations begin as the time capsules they were, so many that have now been restored with the patchworks of yellow/green primers use restorations or other time capsules like those as a general guide to recreate an authentic appearance. It should be said too that the vast majority of Mustang restorations don't use real zinc chromate, but rather modern paint that is tinted to resemble zinc chromate. The only Mustang restorations I'm aware of that used real zinc chromate is "Sierra Sue II" and "Lope's Hope 3rd", and you can see and feel the difference in the finish (it also seems to chip/scuff a lot easier). If I recall correctly, there is a company in California which is the only one in the world that still produces real zinc chromate.

In the Airmotive Specialties photos posted by Michel Lemieux, the fuselage in the rotisserie with the combination of yellow/green paint/primer is Pat Harker's, and you can see some of the 1940's Alcoa Alclad red dye watermarks on the interior surfaces of the skins in the rear fuselage showing through the yellow zinc chromate. That sort of detail has become an often-repeated process in authentically-minded warbird restorations ever since Midwest Aero's restoration of "Happy Jack's Go Buggy" in 2008.

BTW, perhaps also worth mentioning with this particular topic, with Vought Aircraft, early on and until mid-1943, their way of indicating two-coat coverage of zinc chromate was by adding red pigment to raw (yellow) zinc chromate, creating the orange/pink salmon color talked so much about in modeling circles.


Top
 Profile  
 
PostPosted: Mon Jun 29, 2020 1:43 pm 
Offline
2000+ Post Club
2000+ Post Club
User avatar

Joined: Wed May 30, 2007 3:57 pm
Posts: 2266
Location: Minnesota
If anyone is interested in more discussion about primer finishes on Mustangs...

With time capsule projects like "Sierra Sue II" and "Happy Jack's Go Buggy", the easiest way of determining how a part was originally finished, either with raw (yellow) zinc chromate, tinted (green) zinc chromate, or left bare aluminum, is during the disassembly process. When originally manufactured by North American, if a part was given a coating or two of primer, it was always done prior to assembly, or left bare metal. Therefore, no matter what else has been done to the airframe over the years, when a skin is removed for the very first time, the surface of each rib or stringer that was flush up against that skin will still have whatever primer on it that was used from the factory (or it will be bare metal having not received any coating of primer). The same goes when any part is disassembled for the first time from any other part on the airframe. When a skin/panel is removed, the area that had always been flush up against the ribs/stringers will either have primer or no primer depending how how that skin/panel was finished originally prior to assembly at the factory. The cockpit section wasn't painted interior green until the main fuselage was assembled. Everywhere else throughout the interior of the airframe was left as is, however the individual parts/skins were finished or left unfinished prior to assembly.

I'm going to try and use other people's photos to illustrate some of these points that I've talked about...

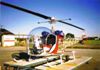
Here are a few photos that were taken by Martin Kyburz of the well preserved time capsule Inglewood-produced P-51D-25-NA 44-73349 that is on display at the Swiss Air Force Museum, showing the original primered and un-primered finishes it still has from when it was manufactured by North American. The only thing changed in this area being the paper placard done in German on the hydraulic accumulator from its days in service with the Swiss AF. The look of these wheel wells is very similar to that of what was found on the "Happy Jack's Go Buggy" airframe.

Image

Image

Image

Image


By comparison, here are some photos that were posted on the Britmodeler forum of the preserved/unrestored wheel wells on the much earlier Dallas-produced P-51K-10-NT 44-12125, on display at the Netherlands Military Aviation Museum. On the few parts with the black-tinted (green) zinc chromate, it is hard to see any green any longer. Note too that at this earlier stage all of the ribs were left bare metal.

Image

Image


These following two pictures from AirCorps Aviation are some of my favorites from the restoration of "Sierra Sue II". What you see here is the reassembly of the fuselage after each part was inspected and refinished in the same primer that they were found to have been originally (through the process I outlined earlier). Each part and skin that is bare metal was found to have been bare metal when originally assembled. Shortly after this particular stage of assembly, just like at the factory, this area which makes up the cockpit section then received a coating of interior green paint. Note too that the inside-facing side of the skin on the right has the Alcoa watermarks while the inside facing side of the left skin does not, as was found when the aircraft was disassembled and was reproduced prior to reassembly. The reason for this is that skins like those were cut the same way, so the Acloa watermarks on the skin on the left were actually present on the outter-facing side, facing the same direction as the same-cut skin on the right side.

Image

Image


Here are a couple views (AirCorps Aviation photos) of the right wheel coming together on "Sierra Sue II". Again, each part and skin was refinished as it was found during the disassembly process, so each yellow, green or bare metal finish is correct to each individual part as it was when it originally rolled out of the factory,

Image

Image


Another example here, this is a photo from the Warbirds of Glory/Sandbar Mitchell group from their Russian lend-lease B-25J. This shows the well-preserved, unrestored bomb bay section, illustrating the yellow and green finishes on the various extrusions and brackets, but also just how much of the structure in this particular location of the fuselage was left bare metal (the Reynolds Aluminum Pureclad watermarks still easy to see on one of the skins).

Image

Although most of the interior of the B-25J was painted, when you remove the skins, as illustrated in this photo, you can see the way each individual part was primered or left without primer prior to assembly and painting based on the surface of each part that was always protected by being flush with the skins.

Image


And another photo I like so much, from AirCorps Aviation, taken after the assembly of the fuselage for the P-51C "Lope's Hope 3rd", showing the rear fuselage looking forward. Done with the highest regard for accuracy and authenticity to original P-51C production, most of the skins and internal structure are left without primer as was done during such early Mustang production. The newly-manufactured liner board, making up most of the "bulkhead" you can see looking straight forward (just aft of where the fuselage tank was mounted), is how the liners looked when fresh and originally manufactured in the 1940's. Most seen in restorations today, being original/75-years old, have long since been yellowed with age.

Image


Top
 Profile  
 
PostPosted: Mon Jun 29, 2020 8:18 pm 
Offline
1000+ Posts!
1000+ Posts!
User avatar

Joined: Sun Oct 07, 2007 5:31 pm
Posts: 1333
Location: Galveston County
4RG.I.'S wrote:
John,
I also wish to thank you for this list. The level of information and detail is excellent! :drink3: I always look forward to your posts, especially relating to mustangs.


^^^ Couldn't have said it better. Thanks (again) JT!

_________________
Cheers,
Kurt Maurer
League City, Texas

PIC, Ford 6600 pulling Rhino batwing up and down the runway


Top
 Profile  
 
PostPosted: Tue Jun 30, 2020 5:56 am 
Offline
2000+ Post Club
2000+ Post Club

Joined: Tue Oct 02, 2012 7:26 pm
Posts: 2002
Location: Creemore Ontario Canada
Pogo wrote:
4RG.I.'S wrote:
John,
I also wish to thank you for this list. The level of information and detail is excellent! :drink3: I always look forward to your posts, especially relating to mustangs.


^^^ Couldn't have said it better. Thanks (again) JT!

I too, appreciate you sharing, your seemingly endless knowledge on this subject John. Your passion for the subject is quite apparent.
I have no doubt that you are a world authority sir.

Many thanks

Andy


Top
 Profile  
 
PostPosted: Tue Jun 30, 2020 7:20 am 
Offline

Joined: Tue Jan 19, 2010 2:49 pm
Posts: 532
Yes I agree John, very informative. It’s great to learn all the intricate details. Thank you for all your posts.


Top
 Profile  
 
PostPosted: Tue Jun 30, 2020 8:21 am 
Offline
User avatar

Joined: Sun Jul 29, 2012 6:14 pm
Posts: 372
Location: Waukesha, WI
JohnB wrote:
Since few of us are in the position to have a Mustang, it would be interesting to get an owners view of having a Mustang built/rebuilt/restored by a major shop.

What decisions, other than the obvious paint scheme, are owners faced with in terms of engine (are there different levels of "tune", upgrades like Roush parts, etc?), airframe (interior, comfort/convenience features, bomb racks, guns, drop tanks, etc.), of course avionics, and I'm sure a lot of other less obvious details.

I would assume the major shops have a list and estimated prices.
Given the numbers completed, I doubt if they have car-like catslogs. :)

Great idea for a magazine article, TV episode or even book.


I think when it's time to build, the sky's no limit... :)
For the engine, it can be anything from the stock (Allison for early models, Merlin -3, -7 or -9 for later models) to upgrades like transport heads or Roush components as options.
Interior could be stock, two seat or complete dual control. Stock panel to glass, avionics are endless.
Bomb racks can be fit to all of them as well as drop tanks, depends on the owner. If the desire is realistic display or speed/lower fuel consumption as everything hanging off of it adds drag. Many have fake guns made from aluminum instead of steel but they still add about 30 lbs each.

As far as pricing, there isn't really any "standard" that I've seen. The work is very specific, many of the shops are booked out a ways. I'm aware of one situation where someone inquired about a new build fuselage (not even asking about cost) and a couple of shops weren't even interested in taking it on... The prices for work aren't really advertised as there are too many options and it depends on what there is to start with. There was a project available a while back that had additional info on building it out for those that inquired. The detail was very in depth and even included a timeline. That timeline extended for a couple of years, the cost was impressive... The pricing for parts is quite varied as well. Seems like mustang parts have and will continue to demand a premium.

_________________
Always looking for P-51D parts.


Top
 Profile  
 
Display posts from previous:  Sort by  
Post new topic Reply to topic  [ 46 posts ]  Go to page Previous  1, 2, 3, 4  Next

All times are UTC - 5 hours


Who is online

Users browsing this forum: Google Adsense [Bot], JohnH and 246 guests


You cannot post new topics in this forum
You cannot reply to topics in this forum
You cannot edit your posts in this forum
You cannot delete your posts in this forum
You cannot post attachments in this forum

Search for:
Jump to:  
Powered by phpBB® Forum Software © phpBB Group